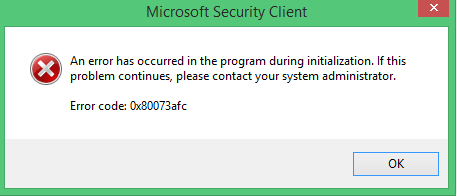
If you see Windows Defender throw up an error code 0x80073afc when you boot your Windows computer or when you try to run Windows Defender manually, then the cause for this could be corrupted Windows Defender files. This error could also occur if third-party security software is interfering with the smooth functioning of this Microsoft Security Client. If you face this problem, here’s what you can do to resolve the issue.

Windows Defender error code 0x80073afc
If you create a System Restore point, you can try to undo any modifications on your computer, by performing System Restore. In case, you do not have a habit of creating a System Restore point; I suggest you start doing so because it is a very strong feature that will let you fix your computer in a number of scenarios.
We will be undertaking the following fixes for error 0x80073afc for Windows Defender-
- Check the status of all Windows Defender-related Services.
- Re-register concerned DLL files.
- Using the Registry Editor.
- By checking the Environmental Values.
- Using System File Checker.
1] Check the status of all Windows Defender-related Services
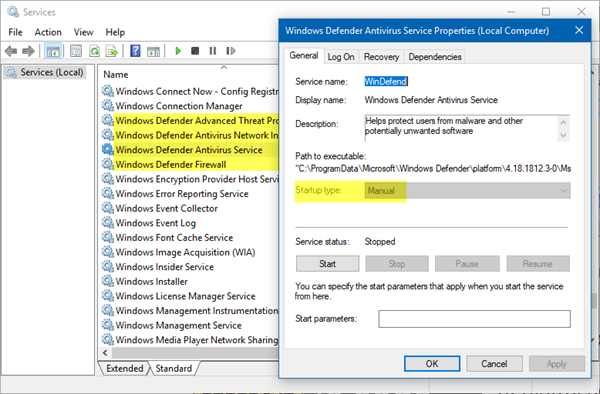
Open the Windows Services Manager.

Right-click on the following service, one after the other and open Properties. From the drop-down of Startup Type, select Manual – and make sure that they is Running by manually pressing the Start button.
- Windows Defender Advanced Threat Protection.
- Windows Defender Advanced Network Infrastructure.
- Windows Defender Antivirus Service.
Right-click on the following service, and open Properties. From the drop-down of Startup Type, select Automatic – and make sure that it is Running.
- Windows Defender Firewall.
2] Re-register concerned DLL files
You might have to re-register some DLL or Dynamic Link Library files on your computer. So launch CMD (Admin) and re-register the following DLL files by executing these commands one after the other:
regsvr32  atl.dll
regsvr32  wuapi.dll
regsvr32  softpub.dll
regsvr32  mssip32.dll
Reboot your computer for the changes to take effect.
3] Using the Registry Editor
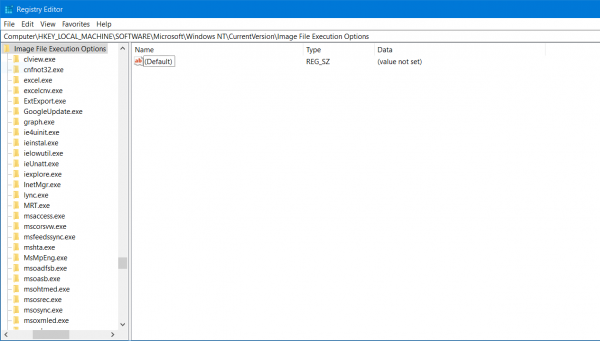
Hit the WINKEY + R button combination to launch the Run utility, type in regedit and hit Enter. Once Registry Editor opens, navigate to the following key-
Computer\HKEY_LOCAL_MACHINE\SOFTWARE\Microsoft\Windows NT\CurrentVersion\Image File Execution Options

Now, check if you find some DWORDs named as MSASCui.exe, MpCmdRun.exe, MpUXSrv.exe, or msconfig.exe. If you don’t, just move to the next fix. But if you do see them, delete all these keys or folders.
Reboot your computer for the changes to take effect.
4] By checking the Environmental Values
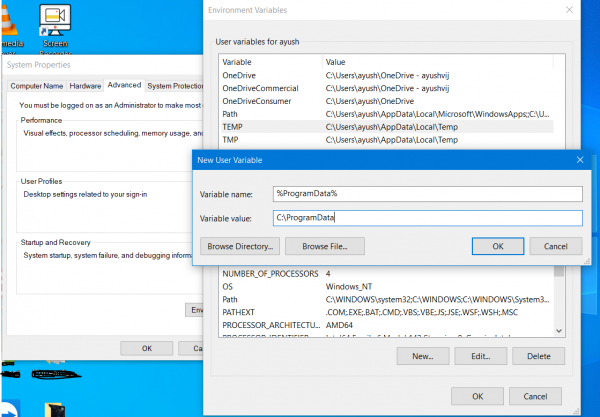
Start by typing View advanced system settings in the Windows Search Box. Select the appropriate result.
A new mini window will pop up. Navigate to a tab called Advanced. On the bottom part of the mini window, click on the button named Environment Variables…

For the variable name of %ProgramData% make sure that the value for it is set to C:\ProgramData.
Select OK to save the settings.
5] Using System File Checker
Right-click on the Start button and click on Command Prompt (Admin), type in the following command to run System File Checker, and then hit Enter.
sfc /scannow
Restart your system after the scan is completed.
How do I fix Windows Defender update error?
You may get different Windows Defender Update errors on your system. Hence, you have to apply the fixes accordingly. For example, if Windows Defender is not updating automatically on your Windows 11/10 system, running the Windows Update Troubleshooter can help. Alternatively, you can also trigger Windows Defender Updates manually via the command line.
What is error code 0x8007139f Windows Defender?
When the Windows Defender is unable to scan your system, it displays the error code 0x8007139f along with the following error message:
The scan couldn’t be started.
The group or resource is not in the correct state to perform the requested operation.
To fix this error, repair your system image files and Windows Defender.
Hope something here helps you!
Leave a Reply