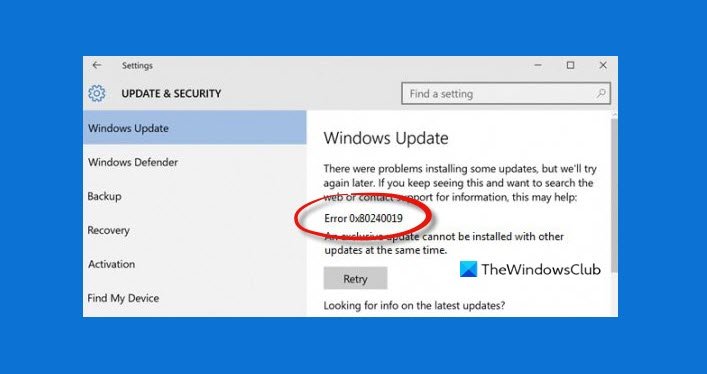
You may encounter the error code 0x80240019 when a Windows update installation fails on your Windows 11 or Windows 10 computer. This post identifies the most likely causes of the error, as well as offers the most suitable solutions affected PC users can apply to successfully resolve this issue on your device.

This update error description reads as follows;
WU_E_EXCLUSIVE_INSTALL_CONFLICT – An exclusive update cannot be installed with other updates at the same time.
The most likely culprit for this error could be that some other Windows updates are available/pending.
Fix Windows Update error 0x80240019
If you’re faced with this issue, you can try our recommended solutions in the order presented below to resolve the Windows Update error 0x80240019 on your Windows 11/10 computer.
- Run Windows Update Troubleshooter
- Clear SoftwareDistribution and Catroot2 folder
- Reset/Clear Windows Update cache/components
- Manually download and install updates
- Clear pending.xml file
- Check Windows Update log file.
Let’s take a look at the description of the process involved concerning each of the listed solutions.
1] Run Windows Update Troubleshooter
This solution requires you to run the inbuilt Windows Update Troubleshooter and see if that helps to resolve the Windows Update error 0x80240019. The automated wizard is designed to help PC users resolve update errors or issues on their Windows 11/10 system.
2] Clear SoftwareDistribution and Catroot2 folder
This solution requires you clear the contents of the SoftwareDistribution folder, as well as reset Catroot2 folder and then retry the update process again via Settings > Windows Updates > Check for updates. If the issue is still unresolved, continue with the next solution.
3] Reset/Clear Windows Update cache/components
In this solution, you can use the Reset Windows Update Agent Tool to reset/clear the Windows Update cache/components and see if that helps to fix the issue at hand. You can also run this PowerShell script to reset Windows Update Client on your Windows 11/10 computer. Additionally, you can manually reset each Windows Update components to default.
Proceed with the next solution if this action didn’t work for you.
4] Manually download and install updates
This solution requires you to make a note of all pending updates on your Windows PC, and then manually download from the Microsoft Update Catalog those updates and then install them one after the other on your device.
5] Clear pending.xml file
Open an elevated command prompt window, type the following and hit Enter:
Ren c:\windows\winsxs\pending.xml pending.old
This will rename pending.xml file to pending.old. Now try again.
6] Check Windows Update log file
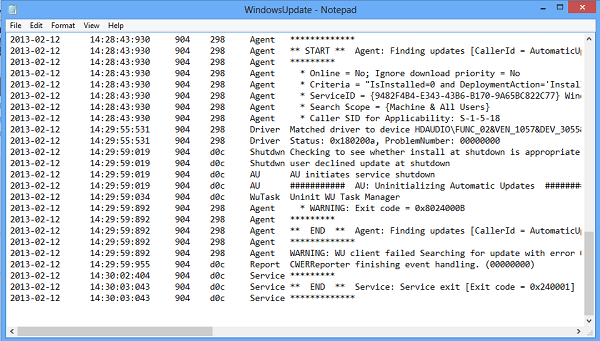
If still, you have a problem then, go to C:\Windows\WindowsUpdate.log and look for the most recent entry. This will be present towards the end of the log. Any failed updates will have error code/s written next to them. Note them down. If you find just too many entries too confusing delete this WindowsUpdate.log and try installing the problematic updates again.
Now open the newly re-created WindowsUpdate log file and have a look at its contents.

The warnings will probably appear as -: WARNING: Failed to find updates with error code AAAAAAAA.
Now Right-click Computer > Manage > Event Viewer > Applications and Service Logs > Microsoft > Windows > WindowsUpdateClient > Operational . Check out for any Critical Message or Warning.

Next, refer to the Windows Update Error Codes. This will give you the direction in which you may have to look for the solution. You may also search for the Windows Update error code here and see if a specific solution is available.
How do I fix Windows 11 not updating?
If your Windows 11 PC is not updating, you can troubleshoot Windows Update issues for Windows 11 by trying the following suggestions: Make sure you have enough free space in your C drive to install the latest Windows 11 updates. Restart the Windows 11 PC to make sure the previous updates are installed. Re-run the Windows updates again from Settings > Windows Updates > Check for updates.
How do I fix error 0x80240023?
If you have encountered Windows update error 0x80240023 on your Windows 11/10 PC, you can try the following solutions to fix the error:
- Clear Windows Update temporary cache folder.
- Run SFC utility.
- Clean Windows Update download path.
- Check Date & Time.
- Run Windows troubleshooter.
- Check Windows Activation.
- Install the failing update manually.
Is there any problem with Windows 11?
A known Windows 11 issue is that it’s causing AMD CPUs to take performance hits. Basically, Windows 11 may cause L3 cache latency to as much as triple on some AMD PCs, and the second is that an AMD CPU feature that preferentially allocates work to the CPU’s fastest core may not work correctly in Windows 11.
What does Windows 11 failed to install 0x8024001e mean?
If you get error 0x8024001e while installing Windows 11 updates, it means that you have some corrupt DLL files on your computer. In order to fix the issue, you can make use of the Windows Update Troubleshooter first. However, if it doesn’t work, it is suggested to download the respective update from the official website of Microsoft and install it manually.
Related post: Error 0x80240017 while downloading or installing Windows Update.
Leave a Reply