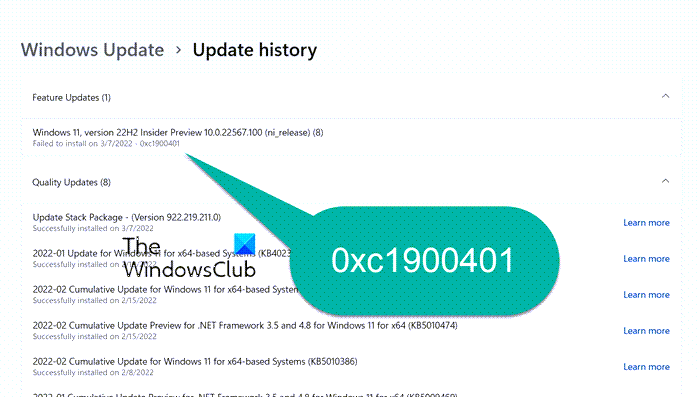
Some Windows 11/10 users, they are facing trouble downloading the latest update. While trying to download the update via Settings > Windows Update, they see the update error code 0xc1900401. If you are also looking for the reasons, and the ways to troubleshoot Windows Update Error 0xc1900401, then this is where you need to be. In this post, we will talk about all the major culprits behind the error message and how to get rid of them. Let’s begin.

Error code 0XC1900401, MOSETUP_E_UA_NO_PACKAGES_TO_DOWNLOAD
What causes the Windows Update Error 0xc1900401?
There can be multiple reasons behind the Windows Update Error 0xc1900401. But among all, the major ones are listed below.
- You will face the mentioned Windows Update error code if you are connected to a weak or unstable internet connection.
- Unnecessary external devices connected to your system can also trigger the error message.
- If you have disabled the Windows Update Services, you will face the error message.
- Corrupted system files can be another primary culprit behind the issue.
- If the Windows cache folder has been corrupted for some reason, you are most likely to face the mentioned error code.
- A third-party antivirus program installed on your system can also trigger the issue.
Now that you have a prior piece of knowledge about the reasons causing Windows Update Error 0xc1900401, let’s look at all the solutions to eliminate the problem.
Fix Windows Update Error 0xc1900401
Below is a list of all the effective workarounds you can try to get rid of Windows Update Error 0xc1900401.
- Check the internet connection
- Run Windows Update Troubleshooter
- Remove unnecessary external devices
- Enable Windows Update & Windows Update Medic Services
- Delete SoftwareDistribution folder
- Run Windows Update in Clean Boot State
- Download Update from Microsoft Update Catalog
Let’s take a look at all the solutions in detail.
1] Check the internet connection
Before getting into anything technical, your internet connection is the first thing you should check. If you are connected to a weak or unstable internet connection, you will face problems while downloading the latest Windows updates in different error messages. So, connect your system to a stable and strong internet connection.
2] Run Windows Update Troubleshooter

The next thing you can try is to run the Windows Update troubleshooter. It is one of the best ways to eliminate any minor issue related to Windows Update. To run Windows Update Troubleshooter, follow the below steps.
Windows 11
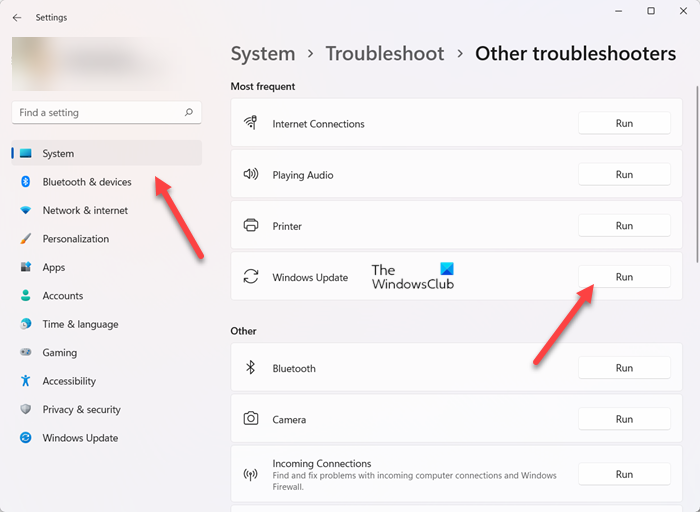
- Open the Settings menu by pressing Windows + I shortcut key.
- Click on this System option present on the left panel.
- Now, navigate to Troubleshoot > Other troubleshooters.
- Click on the Run option present next to Windows Update.
It’ll initiate the Windows Update Troubleshoot process.
Windows 10
- Open the Settings window on your Windows 10 PC.
- Click on the Update & Security option.
- Now, navigate to Troubleshoot > Additional troubleshooters.
- Choose Windows Update from the list of options.
- Select Run the troubleshooter.
Once the troubleshooting process is complete, restart your system. Try to download the update and check if the problem persists.
3] Remove unnecessary external devices
As mentioned, unnecessary external devices like Pendrive or hard drive attached to the system can also cause the mentioned error message. Thus, while downloading the update, remove all the unnecessary devices from the system. Check if the problem is fixed or not. If not, try the next solution.
See: Fix Windows Update Error Code 0x80244018
4] Enable Windows Update & Windows Update Medic Services

If you have disabled the Windows Update Services by mistake, you will most likely face the error message. You will have to manually turn on the Windows Update Services to solve the problem. You can do so by following the below steps.
- Open the Start Menu by pressing the Windows key.
- Type Services in the space provided and press enter.
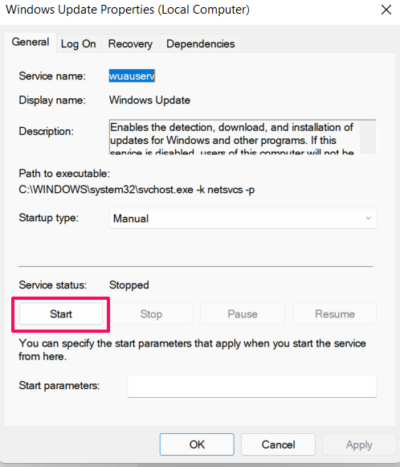
- Locate Windows Update and open it.
- If the Service status says Stopped, click on the Start option.
- Click on OK and exit the window.
Now, you will have to repeat the process for Windows Update Medic Services as well. Locate, and open it. Check the Service status. Click on Start if the Service status says Stopped.
Restart your PC, and check if the problem continues.
5] Delete SoftwareDistribution folder
The next thing you can do is delete the SoftwareDistribution folder. Here are the exact steps you need to follow.
- To begin with, boot system in safe mode.
- Now, open Command Prompt in administrator mode.
- Type the below-mentioned commands and press enter.
net stop wuauserv
net stop cryptsvc
- Now, open File Explorer and locate SoftwareDistribution. It will be found under C:\ Windows.
- Delete the folder.
- Open Command Prompt again in administrator mode.
- Type the below-mentioned commands and press enter.
net start cryptsvc
Once the commands are executed, restart your system. Check if the problem is fixed or not.
Read: How to fix Windows Update Error Code 0x80242008
6] Run Windows Update in Clean Boot State
Perform Clean Boot, and then manually update Windows and see if that works.
7] Download Update from Microsoft Update Catalog
If none of the mentioned workarounds helped you solve the problem, the last thing you can try is to manually download the update from Microsoft Update Catalog. It is the service from Microsoft where you can find the latest software updates, drivers, and hotfixes.
How to I fix a Windows 10 update error?
Depending on the cause, there are multiple ways to fix Windows 10 update errors. From performing an SFC scan, running Windows Update Troubleshooter, installing Windows Update in Clean Boot State, to Cleaning the SoftwareDistribution folder, all these methods can help solve the problem.
What is wuauserv?
Windows Update Services or wuauserv helps detect, download, and install the latest Windows and application updates. If you have disabled this service by any chance, you will struggle to use the Windows update or its automatic updating feature. Plus, the installed applications will also not be able to access the Windows Update Agent (WUA) API.
Read Next: Fix Windows Update Error 0xCA00A009 on Windows 11.
Leave a Reply