If you often play games on your computer, you should check out Game Backup Monitor. It will help you automatically back up the configuration files of your games. It is a free and open-source software that is available for multiple computer platforms including Windows. Lest us see how to set up and use it to create a backup of games on Windows 11/10.
Many games save all the files in the cloud. If you are playing such games, there is no need to back up the configuration files manually. However, many games save all the files in your hard drive. If your hard drive gets corrupted and you must format the hard disk, you will lose all the game’s files. That is why you should get a solution like Game Backup Monitor that can let you move your games to another computer by backing up the files.
Previously, this tool was used to save all the backups on the local computer. However, recently, they started keeping the backup in cloud storage (DOSBox). The best thing is that you can also install a cloud storage app such as Google Drive, OneDrive, Dropbox, etc., and use that cloud storage to save the backup file.
Game Backup Monitor for Windows PC
To backup games on Windows using the Game Backup Monitor tool, you need to follow these steps-
- Download and install Game Backup Monitor
- Set it up with correct game installation details
- Run the backup manually once.
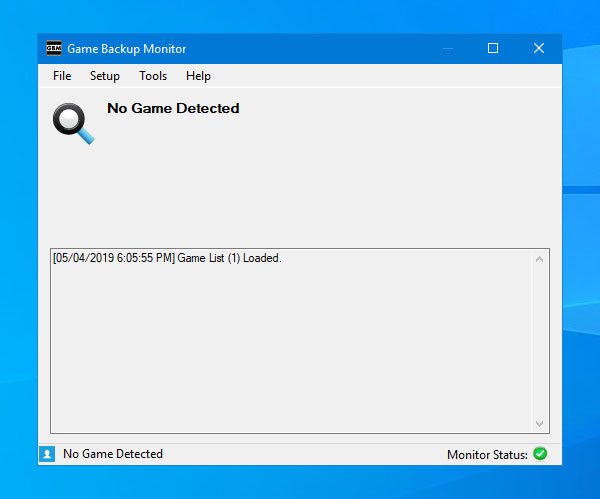
It is easy to set up Game Backup Monitor on your Windows computer. To get started, download and install it. After opening it, you should find a window like this-

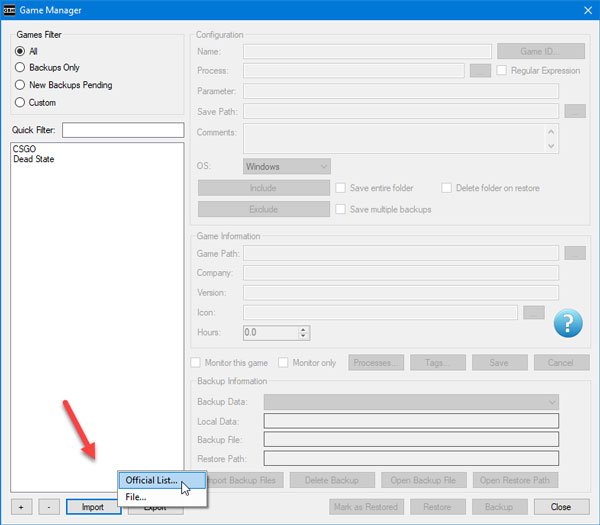
Now you need to go to Setup > Game Manager so that you can add a game to the list.
The good news is that it offers the configurations for almost 384 games. That means you do not have to manually choose the game’s installation details. You can find out the game from the list and select it. To do that, click the Import button and select Official List option.

If you have an internet connection, it will show a list of games. From here, you can select the game you have on your computer and want to back up. To select a game from the list, mark it in the checkbox and hit the Import button.
If you have a valid installation, every required field will be filled up automatically. However, if you cannot find a game in the list, you must follow these steps to select it manually.
In the Game Manager window, click the plus(+) sign that is visible under the empty box on your left-hand side. Now, you need to enter some mandatory information such as the game name, process (.exe file/desktop shortcut), Save path (what you want to backup), Game Path, etc.
Remember to tick the checkbox that says Save entire folder. This is important when you do not know which file to back up. If you select this option, it will back up the whole folder.
Also, make a tick in the Monitor this game checkbox. If you do not select this option, it won’t monitor the game. If you choose this option, it will detect the game automatically and back it up accordingly.
Whether you choose the automatic method or manual, you should test your setup once. For that, click the Backup button on the Game Manager window.
It takes less than thirty seconds to backup your game. By default, it saves the backup file in .7z format, which you can find in the Documents folder (Library folder).
Game Backup Monitor settings

Game Backup Monitor offers some important options so that you can set it up and run it according to your requirements. Every user must check these options and settings before closing the window.
- Stop Monitoring: If you enable File > Stop Monitoring, your games will not be backed up. Many times, you might need to play the game without being detected by this tool. At such times, you can use this option to stop this app from monitoring your game changes.
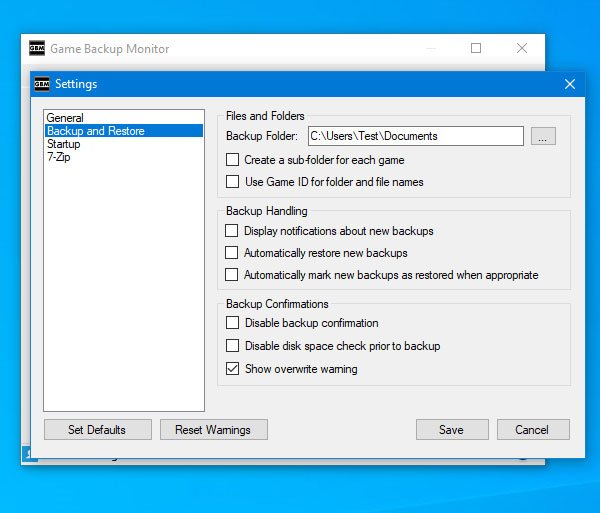
- Change backup folder: As mentioned earlier, this tool saves all the backups in your Documents folder, a Library folder. However, if you want to change it and you want to use cloud storage or such, you can open the Settings and go to Backup and Restore option. To open Settings, you need to go to File > Settings. After that, click the respective button and select a location, where you want to save your backup.
Here you can find other options-
- Create a sub-folder for each game: By default, it saves all the backups in one folder. If you have selected multiple games and you want to categorize them, you can choose this option.
- Use Game ID for folder and file names: Whenever you set up a game, it creates a Game ID. It can be used to name a backup.
- Allow this app to run at startup: If you do not want to miss any changes in your game, you should run this app right after booting your PC. For that, you can use this inbuilt option called Start automatically on log-in, which is available in the Settings > Startup.
- Change compression level: By default, it doesn’t compress the backup. However, if you are low in storage and you want to get a compressed backup, you can go to Settings > 7-Zip and select a compression level based on your needs.
Considering all its features, Game Backup Monitor seems to be an excellent solution for backing up games on a Windows computer. You can download It from its download page.
Other similar free game backup software: GameSave Manager | SaveGameBackup.
Leave a Reply