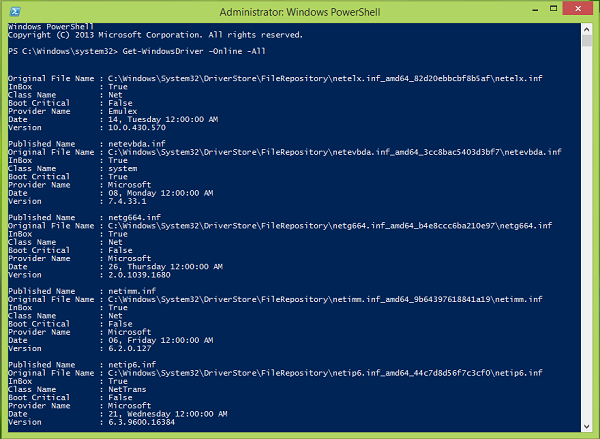
Device Drivers are the most vital component behind the working of a computer as they help to drive the system. Although you can install, remove or update drivers using Devices Manager, this tool doesn’t give you all the list and technical details about the installed drivers on your Windows Image.
For getting the complete description of installed drivers, we can use Windows PowerShell cmdlets. Get-WindowsDriver is such a PowerShell cmdlet that outputs the basic root information of drivers; for both third-party drivers and default installed drivers; in different scenarios.
In this article, we’ll discuss how you can use this cmdlet to extract information about drivers on your Windows 11/10/8.1/7.
Get Installed Driver List using PowerShell
1. Search for Windows PowerShell. From the results, right-click on Windows PowerShell and select Run as administrator. If you’re prompted for the user account password, provide that.
2. Next, in the Windows PowerShell window, you can type this cmdlet, after making choice about parameters, and hit Enter key. The general cmdlet goes like this:
Get-WindowsDriver -Online [-All] [-Driver <String> ] [-LogLevel <LogLevel> {Errors | Warnings | WarningsInfo} ] [-LogPath <String> ] [-ScratchDirectory <String> ] [-SystemDrive <String> ] [-WindowsDirectory <String> ] [ <CommonParameters>]

Here is how you can vary the parameters (shown in [ ]) as per your requirement:
-Online : Specifies that the action is to be taken on the operating system that is currently running on the local computer.
-All : Include it to display information about default drivers. If you do not specify this parameter, only third-party drivers and listed.
For example-
PS C:\> Get-WindowsDriver –Online -All
-Driver <string> : Specifies the .inf file or folder containing the .inf files of the drivers you want detailed information about. When you specify a folder, .inf files that are not valid driver packages are ignored.
For example-
PS C:\> Get-WindowsDriver –Path "c:\offline" –Driver "OEM1.inf"
-LogLevel<LogLevel> : Specifies the maximum output level shown in the logs. The default log level is 3. The accepted values are as follows:
1 = Errors only
2 = Errors and warnings
3 = Errors, warnings, and information
4 = All of the information listed previously, plus debug output
For example-
PS C:\> Get-WindowsDriver –Path "c:\offline" –LogLevel "1"
-LogPath<String> : Specifies the full path and file name to log to. If not set, the default is %WINDIR%\Logs\Dism\dism.log.
For example-
PS C:\> Get-WindowsDriver –Path "c:\offline" –LogPath "C:\DriversInfo"
-Path<String> : You can alter this parameter to specify the full path to the root directory of the offline Windows image on which drivers are loaded.
For example, To get gets detailed information about the Usb.inf driver in a mounted Windows image, use this command:
PS C:\> Get-WindowsDriver –Path "c:\offline" –Driver "c:\drivers\Usb\Usb.inf"
-ScratchDirectory<String> : This parameter states a temporary directory that will be used when extracting files for use during servicing. The directory must exist locally. If not specified, the Windows\%Temp% directory will be used, with a subdirectory name of a randomly generated hexadecimal value for each run of DISM. Items in the scratch directory are deleted after each operation.
For example-
PS C:\> Get-WindowsDriver –Online -All -ScratchDirectory "C:\Temp"
-SystemDrive<String> : This is a necessary parameter to locate BootMgr files when these files are located on a partition other than the one that you are running the command from.
For example, to locate BootMgr files on C: Drive, when you’re running PowerShell command on D: drive use this cmdlet:
PS C:\> Get-WindowsDriver –Online -All -SystemDrive "C:"
In this way, you can get detailed info about drivers of your system, in various scenarios. I hope you find the guide useful!
Now Read:
This post will show you how to Export and Backup Device Drivers in Windows using PowerShell
Leave a Reply