If you’ve decided to learn the hottest tech topic these days ‘Node.js’ and you are a Windows user, then you have landed at the right place. If you are just starting, you might see a lot of people are using a Mac or Linux for Node.js development. Probably your course instructor is doing that too. But maybe you want to work on Windows itself. Many people switch platforms when it comes to development – but why switch when Windows is fully capable of getting you started with any development? This post is all about setting up a good Node.js development environment on a Windows machine.

Setup Node.js development environment on Windows
Our mission in this post is to set up your computer for development so that you can start coding right away. These are a few things we will install on your computer:
- Node.js itself
- Git
- A modern code editor
- MongoDB (Optional)
So, let’s jump right in and get started with it.
Node.js
A little bit about Node.js, it is a beautifully written cross-platform open-source JavaScript runtime environment built on Google’s Chrome’s V8 JavaScript engine. Node.js basically lets you code applications in JavaScript and run them on the backend on a server. When I said ‘cross-platform’, I really mean it. You can install Node.js on Windows and even deploy applications. Download Node.js from the official website. Since you are just starting to learn, it is recommended to download the LTS (Long-Term Support) variant. The current latest LTS version available at the time of writing this post is 6.11.0.
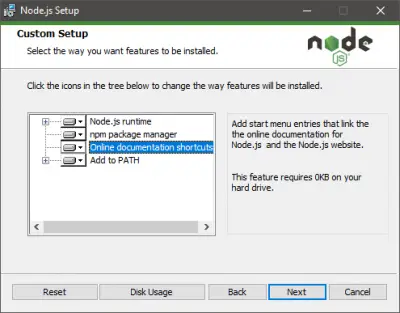
Once you’ve downloaded, run the installer, and you need not make any changes and just hit ‘Next’ on all the steps. Node.js setup comes built-in with the Node Package Manager which is required to download and install third-party modules. You will find yourself using NPM very often. So, do not change this setting while installing Node.js on your computer. Also, the setup automatically modifies the PATH variables so that you can run npm commands from the CMD. So, if you want to modify any of these settings go for Custom Setup; else I would recommend Express installation.
Once installed, search for ‘Node.js command prompt’ in the start menu and hit enter to run the console. This CMD window is everything to you for your Node.js career. This window has been initialized for using Node.js and NPM so that you can run your commands from this window. To verify, just run ‘npm –v’ to see the version of NPM installed on your computer. If you are following a Node.js tutorial elsewhere, you can run all the commands mentioned in that tutorial from this window here.
Git
Git is the most widely used and industry-specific version control system. You will learn about version control systems soon if you don’t know them already. Download Git for Windows here. Git will help you a lot in managing code for larger projects. Git is very easy to learn and get started. A short challenge-based guide is available online that can get you started with Git.
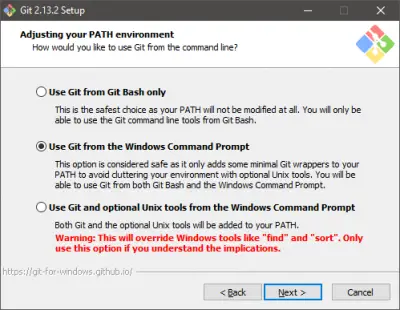
Once you’ve run the installer, you may face a few steps where you will not be aware of your actions. There is this one step I would like to discuss. The step that says ‘Adjusting your PATH variable’ is one important step. Here you need to select how you like to use Git on your computer.
I always go for the second option ‘Use Git from Command Prompt’. Selecting this option will make the Git commands available in Node.js command prompt as well as in Git Bash. Git Bash is another command line tool included with Git; you can use it for development purposes or continue using the command prompt. Do not worry about the rest of the steps, just keep hitting ‘Next’ on the installer. Explaining these steps is beyond the scope of this post, but you can search for Git installation on the Internet.

Once the installation is complete, you can open a command prompt window and type in ‘git –version’ to verify that you have Git installed.
Code Editor
Choosing a code editor can be a challenging task when you have so many options out there. You can choose something between a full-fledged IDE like WebStorm or a code editor like Brackets. Here are a few recommendations:
- WebStrom: The most powerful JavaScript IDE used by professionals. It is a paid tool, and I would recommend you to get started with a free one and later make an investment as you advance your career.
- Visual Studio Code: If you are already familiar with Visual Studio go for it. VS Code is a free open-source code editor brought to you by Microsoft. The program comes with a built-in debugger and syntax highlighting for various languages. Not just Node.js, you can code in a lot of other languages.
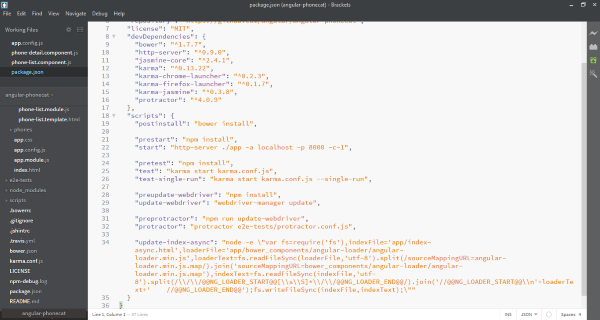
- Brackets: It is a powerful open-source code editor available for all platforms. It supports syntax highlighting in a ton of languages. And it comes with this great extension manager that lets you add more functionality and features to the tool. I personally use this tool, and I like features such as automatic web page refresh, extensions, and keyboard shortcuts. Also, it adds an option to your right-click menu so that you can directly open project folders in Brackets.

These were just my recommendations; you are free to choose any IDE or editor. You can even write code in a simple Notepad if you are brave enough.
MongoDB
This is an optional step. MongoDB is a cross-platform document-based database program. It is used in place of SQL in traditional Node.js CRUD applications. You can use SQL if you want but since MongoDB is widely accepted with Node.js, we’ve covered it here. You need to download MongoDB Community Server from here. Optionally you can install MongoDB Compass, a GUI tool to browse through your database. Once downloaded and installed, go to the MongoDB installation directly and navigate to the bin folder. The address may look something like this:
C:\Program Files\MongoDB\Server\3.4\bin
Now run ‘mongod.exe’ to start your MongoDB server. Next run ‘mongo.exe’ to interact with the server through the command line or use Compass if you prefer GUI. You can even add this directory to PATH variable to directly run mongod and mongo from the command line. You can learn here about changing your System Environment Variables Path.
That’s it! You are ready to code your first Node.js application. You have the right tools and environment setup for development.
How to set the path of Node.js in windows?
Type ‘environment’ in the Windows Search bar and click Open next to the ‘Edit the system environment variables’ option on the right. In the System Properties window, click the Environment Variables button. In the Environment Variables window, double-click on Path under ‘User variable for <username>’. You’ll see a lot of paths already set. Click ‘New‘ and add the path to your Node.js installation directory, usually, C:\Program Files\nodejs by default. Once you’ve set the path, close the windows and open Command Prompt. Verify your Node.js and npm installation by running node -v and npm -v to display the installed versions
How to run Node.js in Windows?
Running Node.js on Windows involves installing Node.js and npm, creating a JavaScript file for your application, and executing the file using Command Prompt or PowerShell. Download and install Node.js from the official Node.js website. Press Win+R, type cmd, and hit Enter to open Command Prompt. Use the cd command to navigate to the directory containing your Node.js application files. Then run the application. For example, if you create a file named app.js, type node app.js in Command Prompt and press Enter to run the script.
Read Next: How to Install NPM on Windows.

Leave a Reply