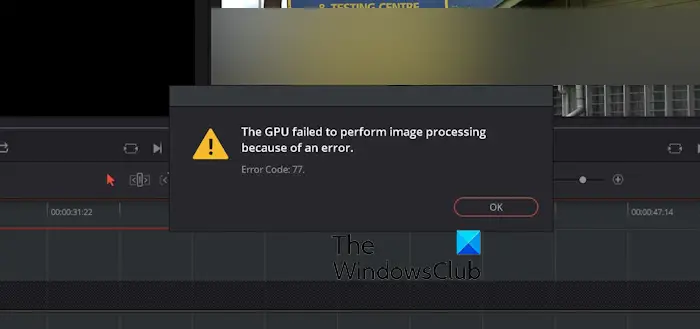
Are you getting The GPU failed to perform image processing error with Error Code 999, 1, 40, 702, 700, 38, 5, 77, 59, etc. in DaVinci Resolve? DaVinci Resolve is undoubtedly one of the best professional video editors for Windows and other platforms. The good thing is it offers both free and paid versions. However, it is not devoid of errors and issues like any other application.

This error message is prompted with different error codes, including 999, 1, 40, 702, 700, 38, 5, 77, 59, and more. It mainly occurs when encoding the video or using a feature like a stabilizer. Some users have also experienced this error while opening certain projects.
The primary reason behind the error message turns out to be your graphics driver. A recent driver update can cause the error. It can also occur when the graphics driver is out-of-date. Besides that, it can also be the graphics processing mode triggering the error.
GPU failed to perform image processing error in DaVinci Resolve
If you keep getting the GPU failed to perform image processing error message followed by an error code like Error Code 999, 1, 40, 702, 700, 38, 5, 77, 59, etc. in DaVinci Resolve, here are the methods you can use to fix the error:
- Revert drivers to a previous version.
- Install an older version of your GPU driver.
- Update the device drivers.
- Change the GPU processing mode.
- Make sure DaVinci Resolve is up-to-date.
1] Revert drivers to a previous version

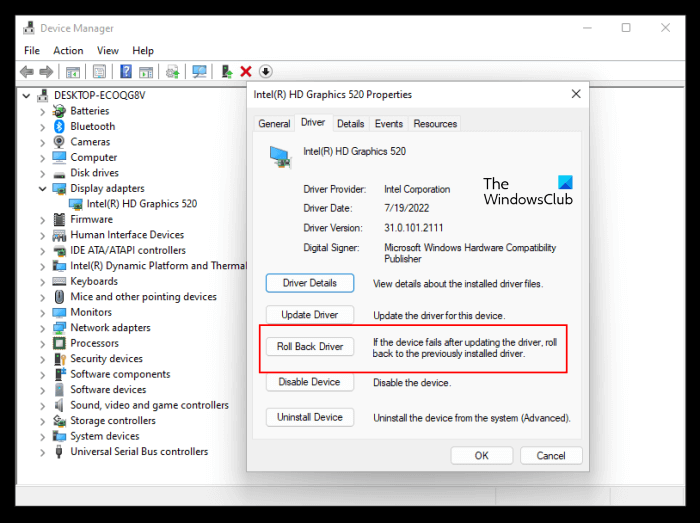
DaVinci Resolve is known to act weird with graphics drivers as it is highly specific when dealing with GPU drivers. If you have an incompatible or unsupported graphics driver, you will get errors like GPU failed to perform image processing because of an error. In case you have started experiencing this error after installing driver updates, you can roll back your graphics driver to an older version to fix the error.
Here’s how:
- First, quickly hit the Win+X hotkey, and from the pop-up menu, select the Device Manager app.
- Next, locate the Display adapters category and expand it.
- After that, right-click on your GPU driver and choose the Properties option from the context menu.
- Now, navigate to the Driver tab and click on the Roll Back Driver button.
- When the process finishes, open DaVinci Resolve and see if you have stopped receiving the error.
Read: Can’t import media into DaVinci Resolve.
2] Install an older version of your GPU driver
Some users have reported that manually installing an older version of the GPU driver helped them fix this error message with error codes like 59. Hence, you can also try doing the same and see if it helps you fix the error. To do that, uninstall the driver, visit the graphics card manufacturer’s website, download an older version of the graphics driver, and install it on your PC. Here’s how:
First, launch Device Manager and expand Display adapters. Now, right-click on the graphics driver, select Uninstall device, and follow the prompted instructions to remove the driver.
When you have uninstalled the driver, you can visit the Intel, NVIDIA, or AMD website and download an older version of your graphics driver. You can visit the following website links as per the graphics card you own:
Search for a previous version of the GPU driver based on the product details and then download it on your computer. Once downloaded, install the driver and reopen DaVinci Resolve to check if the error is fixed.
Read: Fix DaVinci Resolve high CPU usage on Windows.
3] Update the device drivers
It could also be the case that the error is caused due to an outdated graphics driver. So, update your graphics driver to its latest version and see if it helps.
4] Change the GPU processing mode

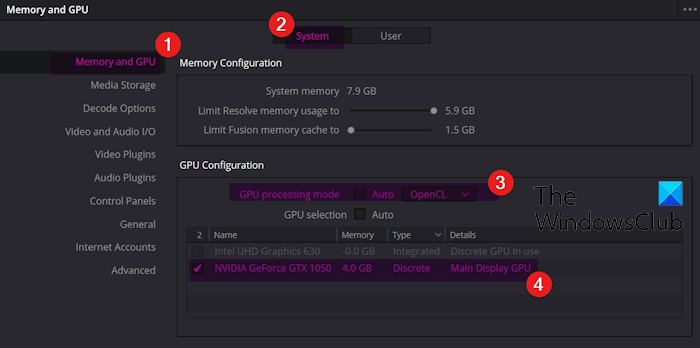
Several affected users have reported that adjusting the graphics processing mode preference resolved the error for them. Hence, you can also try modifying DaVinci Resolve’s GPU processing mode and check if it helps. Here’s how you can do that:
- First, start DaVinci Resolve and press the DaVinci Resolve menu.
- After that, go to the Memory and GPU section and click on the System tab from the top of the window.
- Next, deselect the Auto checkbox associated with the GPU processing mode option.
- Now, click on the drop-down menu option and set it to OpenCL.
- Next, uncheck the Auto box present next to the GPU selection option.
- After that, select the checkbox associated with your graphics card.
- Then, press the Save button to save changes.
- When done, reopen the DaVinci Resolve video editor, and hopefully, you won’t receive the same error now.
In case you are using OpenCL mode, try changing it to CUDA or another processing mode to check what works for you.
See: DaVinci Resolve rendering zero-byte files on Windows.
5] Make sure DaVinci Resolve is up-to-date

It is recommended to keep the DaVinci Resolve app up-to-date to avoid such errors and performance issues. Here’s how you can do that:
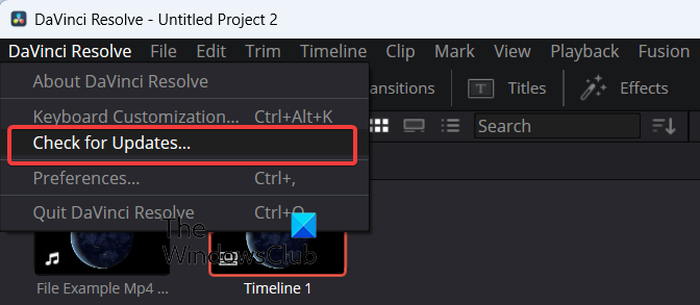
- First, open Resolve and tap on the DaVinci Resolve menu.
- Now, click on the Check for updates option.
- In case there are software updates, it will display the same. You can now press the Download button to download the updates.
- When you have downloaded the updates, you can decompress the downloaded folder and double-click on the installer to start the update process.
- Lastly, restart the video editor and check if the “GPU failed to perform image processing” error is fixed.
Read: Your GPU memory is full in DaVinci Resolve.
How do I fix DaVinci Resolve Unsupported GPU Processing mode?
If you get the Unsupported GPU Processing Mode error message in DaVinci Resolve, try rolling back your graphics driver to fix the error. On the other hand, you can update your graphics driver if it is outdated and see if it works. Besides that, manually configuring the GPU processing option and repairing or reinstalling the app might fix the error. If you are an AMD user, try reinstalling AMD Adrenalin to resolve the error.
How do I get DaVinci Resolve to use my GPU?
You can use the GPU acceleration feature in the paid version of DaVinci Resolve (Studio) to utilize your GPU to the fullest. It can be used by changing your preferences. Here’s how:
- First, open the app, click on the DaVinci Resolve app, and select the Preferences option.
- Now, move to the Decode section and make sure you are in the System tab.
- Next, tick the Decode H.264/H.265 using hardware acceleration checkbox.
- After that, select your graphics card and press the Save button to apply changes.
Now read: DaVinci Resolve not opening or keeps crashing on startup.
Leave a Reply