Microsoft Word is a very useful software when it comes to writing long paragraphs with styling. Almost every writer uses Word on his/her computer. People use Microsoft Word over Notepad because – apart from the formatting options – it can detect spelling mistakes, grammatical errors, and sentence formations. However, if your Grammar and Spell Checking is not working in Microsoft Word, then this post will show you how to fix the problem.

Fix Spell Check not working in Word
The reasons for this problem could be many. For instance, if you have added more than one language to the system, you can get this problem. On Windows 11/10, if you have changed the language to use Cortana, you can get this issue with Microsoft Word. The feature can be disabled automatically. Therefore, if you are facing the same issue and want to solve the problem, carry out the following steps.
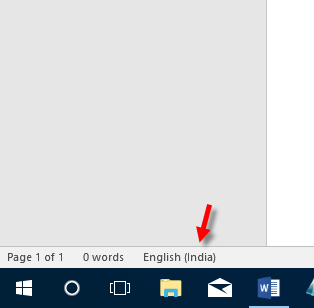
1] Open Microsoft Word. You will see the language at the bottom. It can be English (India), English (US), etc. Click on that language button.

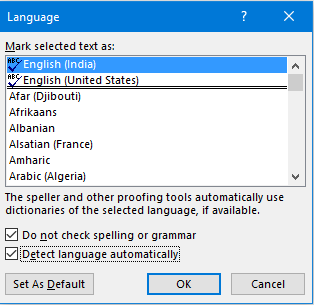
If you have added two languages, you will get a popup like this:

Now, select a language that you want to write in and make sure that the following options are unchecked:
- Do not check spelling or grammar
- Detect language automatically
Remove the tick mark from both of the boxes. If you do not remove the tick from “Detect language automatically”, the same error will appear when you open the Word for the second time. Now, hit the Set As Default button and click on the affirmative option.
2] If you still face the same problem, you can do the following.
Open Word and click on File. Now, go to Options > Proofing.
Under When correcting spelling and grammar in Word, you can find a few options like “Check spelling as you type,” “Check grammar with spelling” and more others. Make sure that all of these are checked.
3] This can also happen if the Proofing Tools are not installed for the default language. You may need to install them. You can do this via Control Panel, Uninstall a Program applet. Select Microsoft Office > Change > Add or remove features > Expand Office Shared Features > Proofing Tools.
4] Ensure that the Speller add-in is disabled. If you use English (US) then the add-in would be Speller EN-US. You can do this here – Click File tab > Options > Add-ins.
Restart your computer and check. Your Microsoft Word software should be able to detect spelling and grammar mistakes.
Read: Spell check not working in Excel
How do I enable grammar check in Word?
In the latest version of Microsoft Word in Microsoft 365, you need to use the Editor panel to enable grammar check. It checks for spelling, grammar, clarity, formality, etc., at once in Word. Whether you have a small piece of document or a school and college project, you can use the Editor to check for grammar in Word. Alternatively, you can enable it from File > Options > Proofing.
How do you reset spelling and grammar check in Word?
As of now, there is no option to reset spelling and grammar checks in Word. Most of all, you do not need to reset this setting since it just searches for potential mistakes and notifies you on the go. However, if you want to turn on or off grammar and spelling check, you need to go to File > Options > Proofing. Then, check the Check spelling as you type and mark grammar errors as you type checkboxes.
I hope this guide helped.
Leave a Reply