Some of you have seen green check marks on your desktop files, folders, and some icons. These check marks appear at the bottom left side of files, folders, and shortcut icons placed on the desktop. Don’t get confused with the little green arrows that appear on the bottom left side of desktop shortcuts. These check marks are different. In this article, we will see what these green check marks on desktop icons are and how to remove them.
![]()
What are green check marks on Desktop icons?
The green check mark icon overlay indicates that it is a synced file or folder. It is seen if you have OneDrive, or Dropbox installed and your cloud sync is enabled for that file or folder. The check marks on files, folders, and icons indicate that these files, folders, and icons are successfully backed up to your cloud storage, and data is locally available on your system.
When you set up OneDrive on your Windows 11/10 computer, it shows you the following three options to manage folder backup:
- Desktop
- Documents
- Pictures
By default, all these three folders remain selected and OneDrive backs up all the files and folders you place inside these folders. You can stop backup anytime for these three folders in OneDrive settings. Backing up your files and folders to OneDrive cloud storage protects your files from being lost permanently in case your system runs into a problem. Hence, these green check marks are because OneDrive is installed on your computer and not because of a virus or malware infection.
How to remove Green Check Marks on Desktop Icons in Windows 11/10
If you do not want your files, folders, and icons placed on your desktop to show these green check mark icon overlays, you can remove them.
- Unlink OneDrive
- Stop backup in OneDrive
- Disable it using AutoRuns or ShellExView
- Tweak the Registry
Let’s see all these fixes in detail.
1] Unlink OneDrive
The green check marks appear because OneDrive keeps running in the background and syncing your data to the cloud. OneDrive has the option to pause sync but the maximum time limit for this is 24 hours. Hence, if you select 24 hours, after 24 hours, you have to pause sync again.
Hence, instead of using the Pause syncing feature, you can unlink OneDrive from your computer. This action will stop syncing your files to the cloud and remove all the Online Only files but the Locally Available files will not be removed. You will be able to access the Locally available files after unlinking OneDrive from your computer.
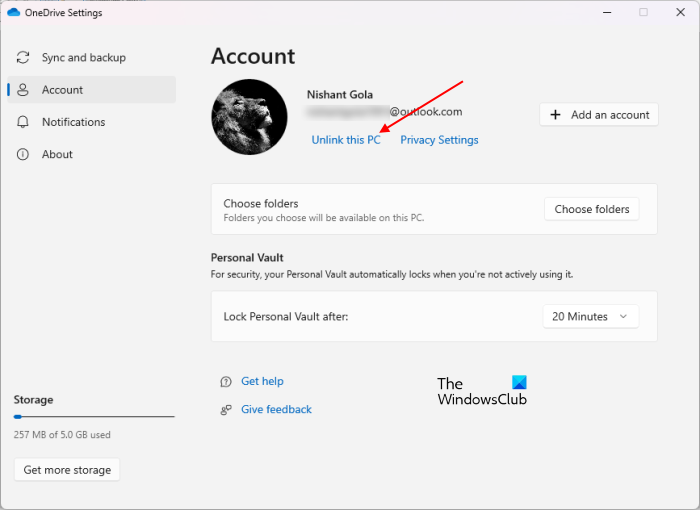
The steps to Unlink OneDrive from your computer are:
- Click on the cloud icon on the right side of your Taskbar.
- Click on the gear-shaped icon on the top right side and select Settings.
- A new window will appear. Select the Account tab.
- Click Unlink this PC.
Read: What is this Red X on folders, files or Hard Drive?
2] Stop backup in OneDrive
If you do not want to unlink OneDrive from your computer, you can stop backup in OneDrive settings. We have explained earlier that OneDrive keeps syncing the data placed inside the following three folders:
- Desktop
- Documents
- Pictures
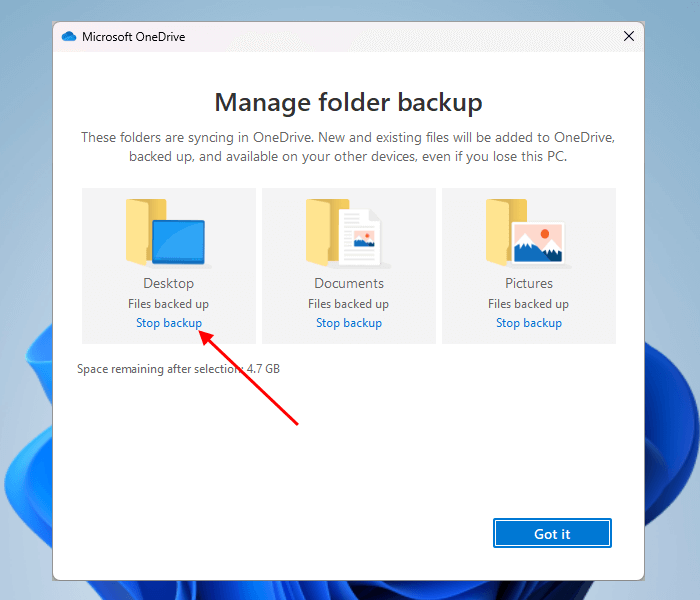
You can stop backup for any of these folders. To do so, open OneDrive settings by following the instructions explained in the previous fix and select the Sync and Backup tab. Now, click on the Manage backup button. This action will open the Manage folder backup window. Here you will see the three folders mentioned above. Click on the Stop backup link under Desktop to stop the backup. After performing this action, the files and folders with green check marks will disappear from your desktop.
Now, you can copy those files, folders, and icons on your desktop, and they will no longer show the green check marks. To do so, open the Desktop folder. To open your Desktop folder, type the following command in the Run command box and click OK.
%userprofile%
The above command will open your user profile folder that contains Desktop and other folders. Open the Desktop folder and copy all the items inside it to your desktop.
Read: How to remove Lock Overlay Icon on Encrypted Files
3] Disable it using AutoRuns or ShellExView
You can also use AutoRuns or ShellExView software to remove green check marks from the desktop icons, files, and folders. AutoRuns is a useful tool developed by Microsoft that helps users know which programs are configured to run during system startup or login and when you run different built-in Windows applications. ShellExView is a third-party software that helps users enable and disable shell extensions installed on their Windows computers. Both AutoRuns and ShellExView are portable software which means you need not install them on your system.
Before you proceed, we suggest you back up your Registry and create a System Restore Point.
Remove green check marks from desktop icons using AutoRuns
You can download AutoRuns from the official website of Microsoft. After downloading it, extract the zip file and open the extracted folder. You will find the exe file of AutoRuns there. Run it as an administrator to enable or disable the shell extensions.
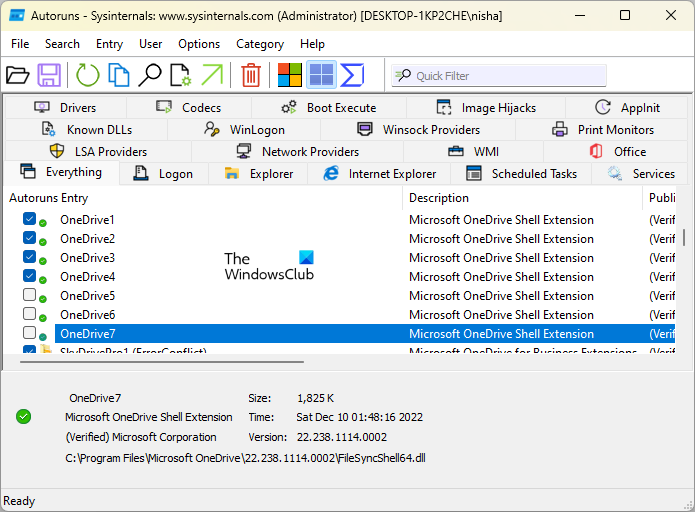
After launching AutoRuns, scroll down and locate OneDrive.
![]()
You will find multiple OneDrive entries, named from number 1 to number 7. If you do not find OneDrive entries, go to the Everything tab. The green check marks on your desktop icons, files, and folders are due to any one of these OneDrive entries. Now, follow the steps written below:
- Disable any one of the OneDrive entries, say OneDrive1. To do so, uncheck the checkbox.
- Open the Task Manager and locate Windows Explorer.
- Right-click on Windows Explorer and select Restart.
Go to your desktop and see if the green check marks have disappeared or not. If not, disable the next OneDrive entry, OneDrive2, then restart Windows Explorer, and see if it helps. Repeat the process till the green check marks disappear. In my case, disabling the OneDrive7 entry fixed the issue.
Do note that disabling the OneDrive entry by using AutoRuns also deletes that particular key from the Registry, and enabling the same entry restores the deleted key. But you will not be able to restore that key once you exit AutoRuns without enabling that entry. In this case, the only way to restore the deleted key is using the System Restore or Registry backup. We suggested you create a System Restore Point and a Registry backup.
Read: What are these 2 small blue arrow overlays which appear on desktop icons?
Remove green check marks from desktop icons using ShellExView
You can also use ShellExView to remove the green check marks from your desktop icons, files, and folders. First, download ShellExView from its official website, nirsoft.net. Now, extract the downloaded zip file and open the extracted folder. Double-click on the application file to launch ShellExView and select the following items:
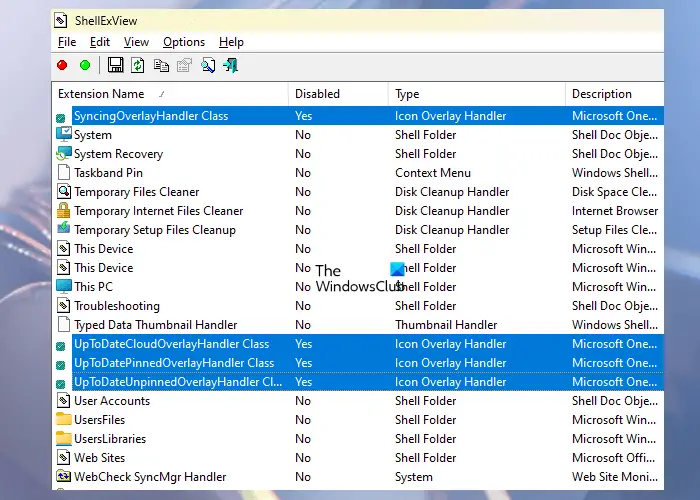
- ErrorOverlayHandler Class
- SharedOverlayHandler Class
- UpToDateCloudOverlayHandler Class
- UpToDatePinnedOverlayHandler Class
- UpToDateUnpinnedOverlayHandler Class
Press and hold the Ctrl button to select multiple items. After selecting the above items, click on the red dot on the top left side to disable the selected items. Alternatively, you can also use the right-click context menu. After disabling the above items, restart Windows Explorer using Task Manager.
Related: OneDrive not showing green check marks
4] Tweak the Registry
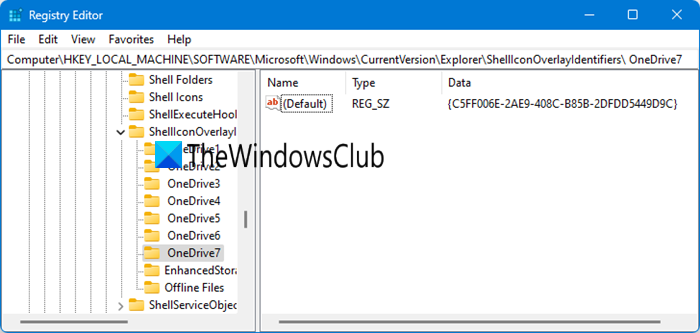
You can also remove the green check marks from the desktop icons, files, and folders permanently by deleting the required key from the Registry Editor. In the above fix, we have seen that the OneDrive7 key is responsible for green check marks in my case. Hence, I deleted that key from the Registry Editor, and the problem disappeared. In your case, the key may be the same or different. You can use this trick. But before you delete any OneDrive key, we recommend you create a backup of that key so that you can restore it again.
Open the Registry Editor and go to the following path:
Computer\HKEY_LOCAL_MACHINE\SOFTWARE\Microsoft\Windows\CurrentVersion\Explorer\ShellIconOverlayIdentifiers
To go to the above path, copy and paste it into the address bar of the Registry Editor. After that, hit Enter. Now, expand the ShellIconOverlayIdentifiers key. You will see OneDrive subkeys and other subkeys under that key. To delete a particular OneDrive key, right-click on it and select Delete. But before deleting it, right-click on it and select Export to save it on your computer so that you can restore it later.
Read: The chevron (>>) character in a blue box icon overlayexplained
I hope this helps.
Read next:
- How to remove blue and yellow shield from an icon
- Fix OneDrive error: Sorry there is a problem displaying this folder.