By default, background apps shouldn’t consume a lot of resources. They often run unnoticed and don’t demand much from your CPU. However, some processes consume so much that you can’t ignore them. The RAVBg64.exe is an example of such a background process.
Many Windows users have noticed the RAVBg64.exe process glaring at them in their Task Manager while consuming from 20% to 50% of their Windows CPU resources. This is never welcomed and should be tackled immediately because of adverse effects like a slow PC.
What is RAVBg64.exe?
RAVBg64.exe is a process that belongs to the Realtek Driver or the Realtek High Definition Audio codecs. The Realtek driver is an intermediary between your audio devices (speakers and sound card) and your operating system.
This makes RAVBg64.exe an important part of your system that should run in the background but not consume many resources. It is typically located here:
C:\Program Files\Realtek\Audio\HDA\
Since Realtek plays a major role in your computer, it should not be terminated.
Related: Why does RAVBg64.exe want to use Skype?
HD Audio Background process (RAVBg64.exe) using High CPU
There are a few known reasons behind this issue; however, your system file getting corrupt while upgrading could cause it.
Although the RAVBg64.exe isn’t a virus – provided it is located in the official path mentioned above. If it is located elsewhere, it could be malware. Advanced hackers have been reported to have used its name to hide malicious processes to bypass antiviruses and security tools.
So, if you have noticed typical virus infection signs like lagging, unresponsive software, error messages, etc. while having a high RAVBg64.exe process, you may want to run an antivirus scan.
High CPU usage by RAVBg64.exe
They are a ton of ways to fix this high CPU usage issue. You can try any of the solutions stipulated below:
- Update the Realtek driver
- Disable Realtek from the Task Manager
- Disable Realtek from the Device Manager.
- Reinstall Realtek audio driver.
Now, go below to see each solution in detail.
1] Update the Realtek Audio Driver

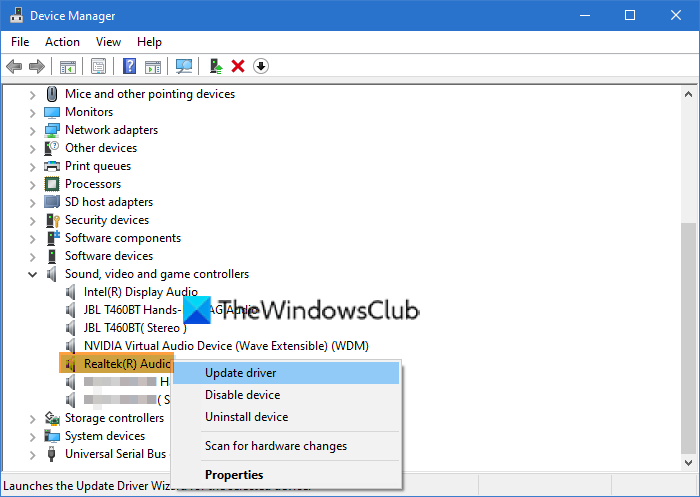
Open the Device Manager then expand the Sound, Video & Game Controller section.
Locate and right-click on Realtek Audio Driver then select Update Driver. Restart your computer and check if the problem persists.
2] Disable Realtek from the Task Manager
Open the Task Manager, then click on the Startup tab. Locate and Uncheck the Realtek Audio Manager.
Click Apply and hit Ok. Finally, restart your computer.
3] Disable Realtek from the Device Manager
Open your Device Manager, expand Sound, Video and Game Controllers, right-click on Realtek Audio Driver, then select Disable. Restart your PC.
4] Reinstall Realtek audio driver
- Open your Device Manager, then click on Sound, Video and Game Controllers, right-click on Realtek High Definition Audio > Uninstall.
- Accept the UAC and restart your PC.
- When your computer comes back on, reopen Device Manager, click the Action tab on the toolbar, and Scan for Hardware Changes until the system detects the missing hardware.
- Click Install driver and allow windows to locate and install the driver.
If you encounter any error here, go to your manufacturer’s website and download and install the drivers manually.
All the best.
Read: How to download and reinstall Realtek HD Audio Manager.
Why is Audiodg exe using so much CPU?
Audiodg.exe may use a high CPU due to outdated sound drivers or incorrect sound settings. It’s vital not to disable this critical system component. To fix the high CPU usage, update your sound drivers and adjust your sound settings.
How do I debug high CPU utilization in Windows?
To debug high CPU utilization in Windows, open Resource Monitor, go to the CPU tab, and click the ‘Average CPU’ column header to sort processes by CPU usage. Ensure the arrow points down to display the highest usage first. This helps identify processes causing high CPU consumption.