Windows now offers better high-dynamic-range (HDR) display and wide color gamut (WCG) support. Just before we start, you need to have an HDR-capable display or TV which can show a wider range of colors. This is especially useful when you are playing Movies and Playing high-end games using Xbox or on your PC. Microsoft also has HDR Apps and Games in their store which can make use of it. In this post, we are troubleshooting Common HDR and WCG color problems in Windows 11/10.
Minimum Requirement for HDR in Windows 11/10
- The built-in display should support 1080P and 300 nits at the minimum.
- Integrated graphics card that supports PlayReady hardware with the required codecs installed for 10-bit video decoding.
- HDR display or TV must support HDR10, and DisplayPort 1.4 or HDMI 2.0 or higher.
- Graphics card that supports PlayReady 3.0 hardware digital rights.
- Codecs installed for 10-bit video decoding (for example, HEVC or VP9 codecs).
- Latest WDDM 2.4 drivers installed on your Windows PC
Fix HDR and WCG color problems in Windows 11/10
Microsoft highly recommends you to buy displays that are VESA DisplayHDR certified. These displays are designed and tested for a wide range of things, including gaming, and video streaming you can do on your PC. However, if you bought an HDR-capable display, but it has problems displaying HDR content from your PC, there are things you try to fix them.
1] Display or TV isn’t showing HDR
HDR and WCG are turned off by default in Windows 11/10. So if the display still doesn’t look impressive, you need to enable HDR in Windows by following our tutorial.
Double-check if HDR is supported in your PC
- Assuming you have turned on HDR, we need to check if the PC has required hardware to display HDR, and if it supports HDR10
- You need to run the DirectX Diagnostic Tool, and then save all information into a text file.
- Open the text file, and look at the value for HDR Support. If it says Supported, this indicates that your display supports HDR10.
Check if display connection has HDR turned on and has an HDR signal
The text file which we generated above can point to that. You need to check for a couple of values that will help users figure it out.
Display Color Space helps us to determine if the current display connection has HDR turned on and has an HDR signal. If the value is :
- DXGI_COLOR_SPACE_RGB_FULL_G2084_NONE_P2020: Supports HDR10 and the connection is displaying advanced color.
- DXGI_COLOR_SPACE_RGB_FULL_G22_NONE_P709,: This indicates this is sRGB and not advanced color.
To check if Monitor has Advanced Color Capabilities, look for these values If they are available, then the display is considered as an HDR10 capable display.
- BT2020RGB or BT2020YCC.
- Eotf2084Supported.
- AdvancedColorSupported.
- AdvancedColorEnabled. (This means that advanced color is turned on for this display)
Note: HDR10 is the current industry standard for High Dynamic Range in consumer televisions. This “open” format technology is the first generation, considered a starting point for High Dynamic Range.
Related: How to Enable HDR Support in Microsoft Edge.
2] The picture on display is dim
Displays (Monitors and TVs) interpret an HDR and SDR signal differently. If you are connected to an HDR display, and your desktop appears to be dimmer, this means the signal is SDR and not HDR. To make your screen or desktop brighter, follow the steps:
- Go to Settings > System > Display > HDR and WCG settings.
- Under Change brightness for SDR content, drag the slider until you get the brightness level you want.
You can also use the buttons on your keyboard or the on-screen menu to increase the brightness.
3] Color isn’t displaying correctly
If you see color fringes around vertical strokes when black text appears on a white background, you need to do the following:
1] Make sure you have the latest WDDM drivers installed. Go to Device Manager, select your display card, and check for updates. It will initiate the Windows Update to download the latest update. You can also install the drivers manually from the PC manufacturer’s website.
2] If you use an HDMI connection, and if your display supports HDR over a DisplayPort connection, make sure to use DisplayPort instead to connect your PC and display.
3] However, if HDMI is your only option, you can try dropping the Frame Rate or Reduce Resolution
- Reduce Frame Rate:
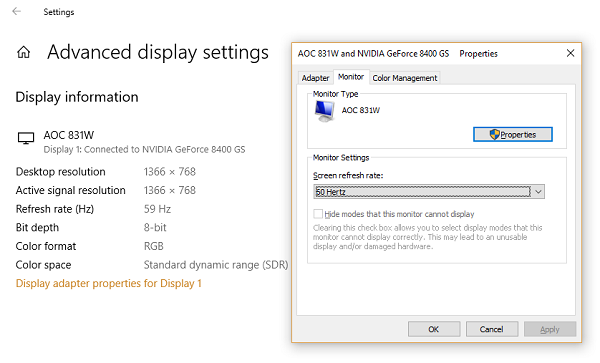
- Select Settings > System > Display > Advanced display settings >Display adapter properties.
- Switch to Monitor tab > Select 30 Hertz for the Screen refresh rate.

- Select OK.
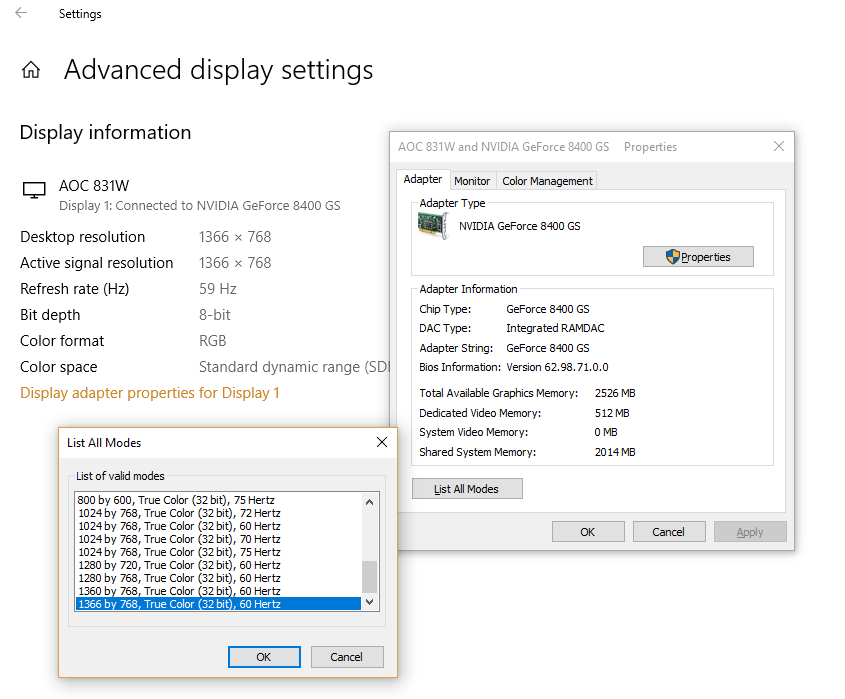
- Reduce the resolution
- If you can not find the option to change Frame Rate, reduce the resolution.
- In the Display adapter properties, switch to the Adapter tab, select List All Modes.

- In List All Modes, select the setting that includes 1920 by 1080, 60 Hertz, then select OK.
Nothing beats viewing in HDR, but it needs a combination of both Software and Hardware to experience it. If you are planning for a lot of HDR content, make sure to check with the minimum requirement for HDR we shared at the start.
