If your Headphones audio is bleeding into the mic on Windows 11/10, then this article will help you to fix this issue. This issue can occur due to the stereo mix feature, particular application settings, etc.
Headphones audio bleeding into mic on Windows 11/10
Before you proceed with further troubleshooting steps, we suggest you check for Windows Update. If an update is available for your PC, download and install it. We also suggest you unplug and replug your headphones (if they are USB headphones). Use these fixes if your Headphones audio is bleeding into the mic on Windows 11/10:
- Run the Audio troubleshooter
- Disable the Stereo Mix setting
- Disable Audio Enhancements
- Connect your PC to another wall socket
- Try lowering the microphone volume
- Disable and re-enable the Audio driver
- Update or reinstall the Audio driver
Let’s start.
1] Run the Audio troubleshooter
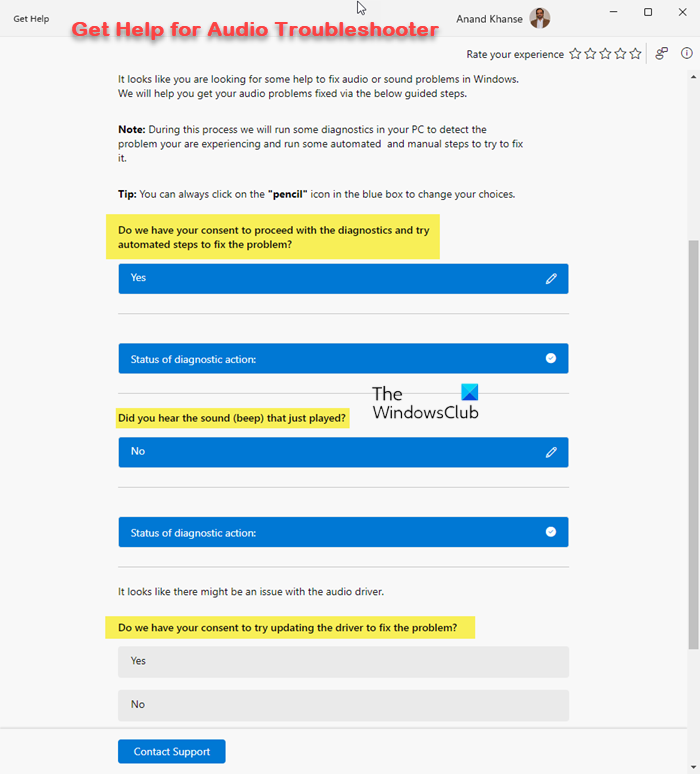
The first step you should do is run the Audio troubleshooter. This is a built-in tool that helps to identify audio-related problems (if any are found). Run the Audio Troubleshooter in the Get Help app on your Windows 11 PC and see if the problem gets solved.
2] Disable the Stereo Mix setting
Sometimes this problem can be caused due to incorrect sound settings. Therefore, we suggest you disable the Stereo Mix setting and see if it works or not. To do so, use the steps mentioned below:

- Go to the Control Panel.
- Click on Hardware and Sound.
- Click on Sound and click on the Recording tab.
- Right-click on Stereo Mix and click on Disable.
- Click on OK and Apply.
Check if it brings any changes.
3] Disable Audio Enhancements
There is a possibility that the Audio Enhancement feature is causing issues with audio devices such as headphones. To confirm whether this is the case with you, disable this feature. Use the below instructions to disable this feature:
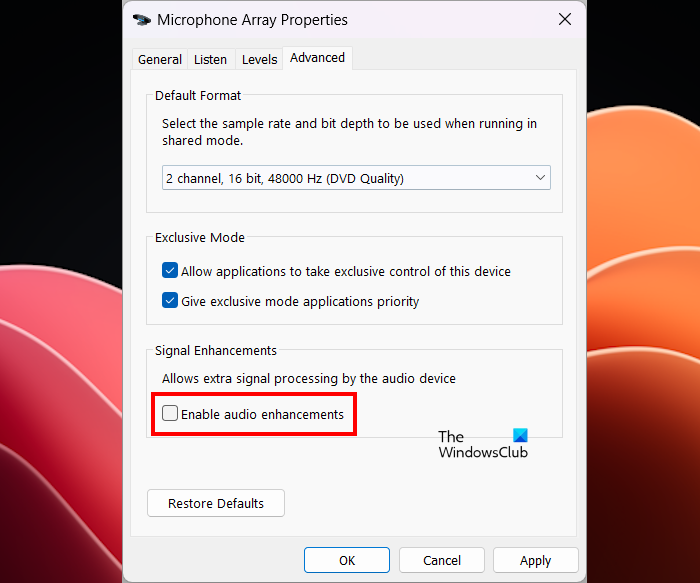
- Open the Control Panel.
- Type sound in the Control Panel search bar and click Sound.
- The Sound properties window will appear—Double-click on your Speakers to open its Properties.
- Click on the Advanced tab and uncheck the Enable audio enhancement box.
- Click Apply and then click OK.
Check if the issue persists.
4] Connect your PC to another wall socket
One possible cause of this issue is improper grounding or a malfunctioning ground. We suggest you connect your PC to another wall socket and see what happens.
5] Try lowering the microphone volume
You can also try lowering your microphone volume and see if it works. The steps to do this are as follows:
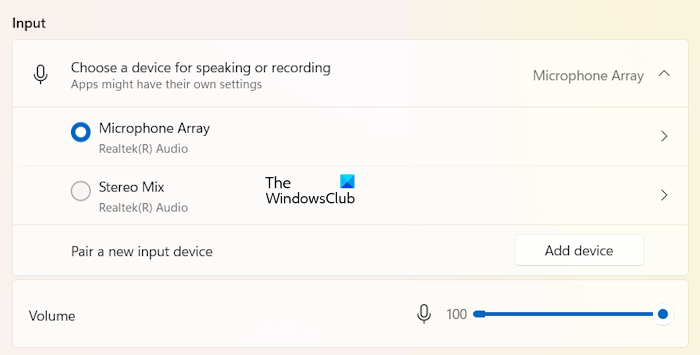
- Open Windows 11 Settings.
- Go to System > Sound.
- Expand the Input tab.
- Select your microphone.
- Lower the volume of your microphone by moving the slider to the left.
6] Disable and re-enable the Audio driver
Audio driver helps the Windows operating system to communicate with the audio devices and sound cards. The problem you are experiencing may be due to an issue with the Realtek High Definition Audio driver. Disable and re-enable this driver and see if it helps.
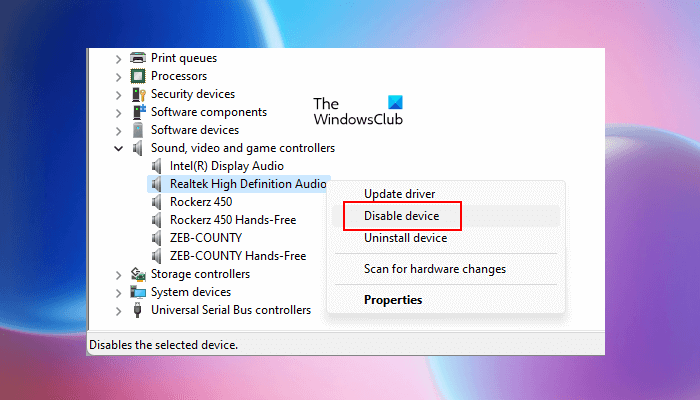
- Go to the Device Manager.
- Expand the Sound, video and game controllers.
- Right-click on the Realtek High Definition Audio driver and select Disable device.
- Wait for a few minutes, then right-click on the driver and select Enable device.
7] Update or reinstall the Audio driver
An outdated audio driver can cause a sound problem. Make sure your audio driver is up to date. However, before you proceed with updating your audio driver uninstall your existing audio driver. To do so, use the below steps:
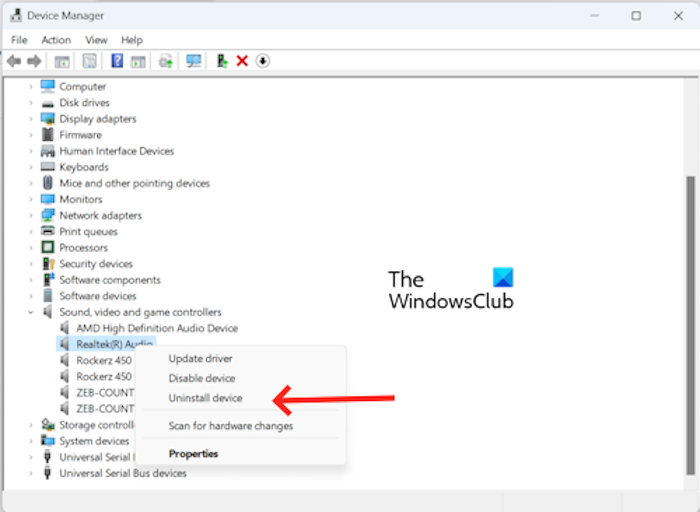
- Go to the Device Manager.
- Expand the Sound, video and game controllers.
- Right-click on your audio driver and click on Uninstall device.
After uninstalling the audio driver, download the latest audio driver from the manufacturer’s website. Once you download the latest audio driver, install it on your PC and check if it makes any changes.
That’s it, I hope this helps.
Why is Realtek audio not working?
There can be a few reasons why your Realtek audio is not working. The most common reasons are outdated Realtek audio drivers, Incorrect default device settings, etc. You can download the latest Realtek audio driver from its manufacturer’s website.
How to fix crackling audio in Windows 11?
To fix crackling audio in Windows 11, you can perform some troubleshooting steps. You can disable Audio Enhancements, change sound format, etc. Also, make sure your audio driver is up to date.
Read next: Error code 0x000003F1, Install Realtek HD audio driver failure.
Leave a Reply