In this article, we will demonstrate how you can hide files and folders from your Search Results in Windows 11 or Windows 10. There is a built-in feature to sync in and index files on the PC and updates the data whenever there is a change. The search field, one that’s available next to the Start Menu helps you search for existing built-in or downloaded programs and files. After all existing files and programs related to your searched keywords, you see matched web results.
While this feature is definitely not for everyone, you may, sometimes, want to hide a set of files in a folder from being viewed by someone. Anyway, if this is something you were looking to solve for yourself, here’s how it can be done.
How to hide specific files and folders from Search Results in Windows 11
Here, we will explain the process to:
- Hide specific folders from Search Results in Windows 11
- Hide specific files from Search Results in Windows 11
Let’s start.
1] Hide specific folders from Search Results in Windows 11
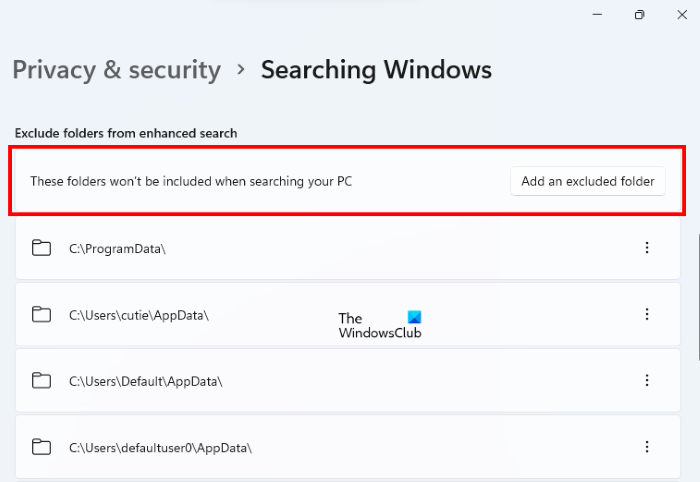
To hide specific folders from Search Results in Windows 11, follow the steps below:
- Right-click on the Start Menu and select Settings.
- Select the Privacy & security category from the left side.
- Scroll down and click on the Searching Windows tab.
- On the Searching Windows page, click on the Add an excluded folder button and select the folder that you want to hide from Windows Search. This will add the selected folder to the list of excluded folders.
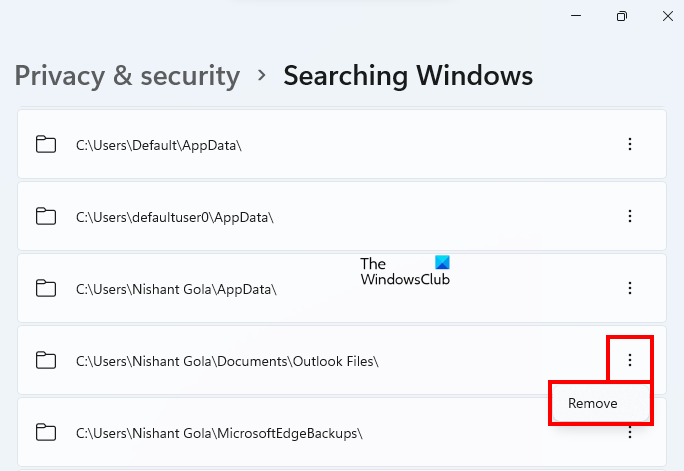
If you want to remove the folder from the excluded folders list, repeat the first three steps (listed above), locate your folder in the excluded folders list, and click on the three vertical dots next to it. Now, click Remove.
2] Hide specific files from Search Results in Windows 11
When you search for something via the Windows 11 Search, you will see different categories related to that particular keyword. These categories include apps, email, documents, images, music, etc. You can hide certain files from search results in Windows 11 by excluding their file extensions in the Search Index.
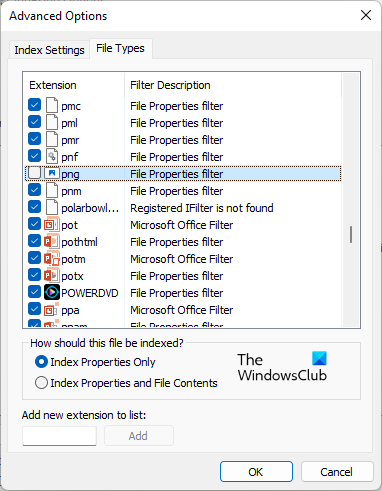
Let’s see the process to hide specific files from Search Results.
- Press Win + I keys to open the Settings app on Windows 11.
- Go to “Privacy & security > Searching Windows.”
- Scroll down the Searching Windows page and click on the Advanced indexing options tab. You will find it in the Related settings section. This will open the Indexing Options popup window.
- In the Indexing Options window, click on the Advanced button.
- Now, click on the File Types tab.
- Deselect the file extension which you want not to appear in the Search Results. If your file extension is not available in the list, type it under the Add new extension to list section and then click on the Add button.
- After deselecting the file extension from the list, click on the Index Settings tab in the Advanced Options window and click on the Rebuild button. In the confirmation window, click OK.
Wait till the indexing process gets completed. The time taken by your system to complete indexing is directly proportional to the number of files on your system. If you have a large number of files, the indexing will take more time and vice versa. You can see the progress on the Indexing Options window. After the completion of the indexing process, the Indexing Options window will display the Indexing Complete message. After this, you will not see the files in the Search Results, the extensions of which you have excluded.
To revert the changes, follow the first five steps listed above and select the file extensions that you want to appear in the Search Results. Now, select the Index Settings tab and click on the Rebuild button. Wait till the indexing process gets completed.
Related: Windows Search not working in Windows 11/10.
How to hide specific files and folders from Search Results in Windows 10
Here, we will show you how to hide:
- Specific folders from Search Results in Windows 10
- Specific files from Search Results in Windows 10
1] Hide specific folders from Search Results in Windows 10
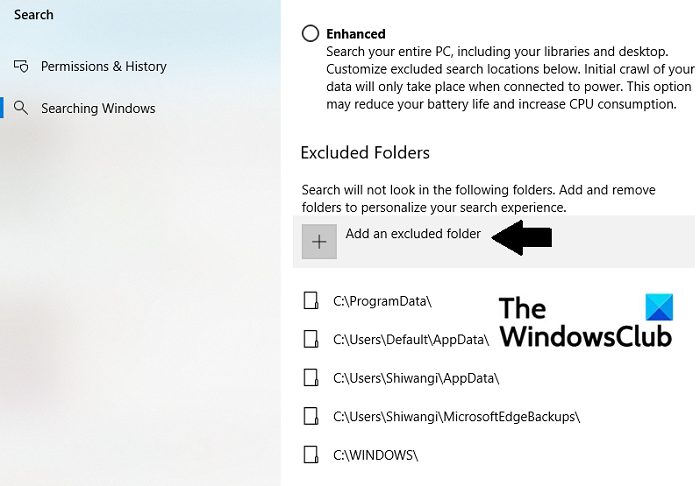
Here’s how you can configure your Windows search so as to hide certain folder(s) from appearing:
- Open Windows Settings by pressing the Windows + ‘I’ key combination
- From the options available on the Settings homepage, select Search
- Click on Searching Windows from the options pane to your left
- Scroll down and under the Excluded Folders head, click on Add an excluded folder
- A dialog prompt of your Explorer will open.
- Select the folder you don’t want to show up on your Windows search and click Selected Folder
It is just as easy for you to delete a folder from the list of excluded folders as it was to add one.
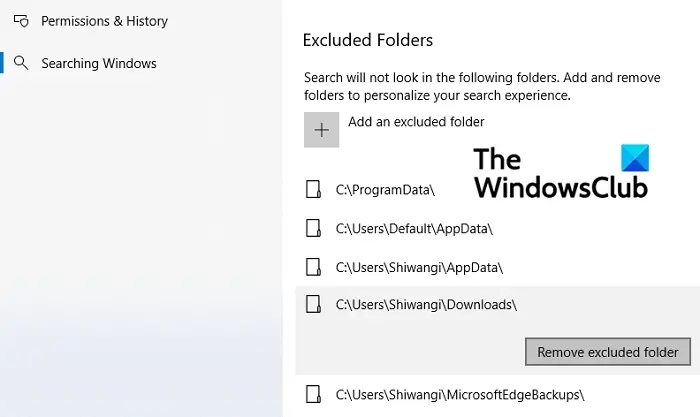
All you have to do is select the folder you don’t want to be a part of the list and select Remove excluded folder.
2] Hide specific files from Search Results in Windows 10
Like Windows 11, you have to exclude the file extensions of the files that you want not to appear in the Search Results in Windows 10. We have explained the process below:
- Right-click on the Start Menu and select Settings.
- Go to “Search > Searching Windows.”
- Scroll down and click on the Advanced Search Indexer Settings link. This link is available under the More Search Indexer Settings section.
- The Indexing Options window will appear on your screen. Click Advanced.
- Now, select the File Types tab and deselect the file extension that you want not to appear in the Search Results. You can also add a particular file extension by entering its name and clicking on the Add button.
- Select Index Settings on the same window and click on the Rebuild button. Wait till indexing gets completed.
How do you hide a folder in Windows 10?
A question very similar to the one discussed above is how one can hide a folder or Drive in Windows 10 and it’s a little different too. When you hide a folder in Windows, it doesn’t show up when you browse through File Explorer or Windows Search. Here’s how you can enable that privacy setting on a folder:
- Open File Explorer, right-click on the folder you want to hide, and click on Properties
- Under the General tab, enable the Hidden option which is next to the Attributes head
- Click on Apply and then Ok to save these changes
- Enable the Apply changes to this folder, subfolders, and files option if you’re hiding a folder with subfolders in it
Read this article if you want to know about how you can further increase your file’s secrecy by protecting it with a password.
How do I change a hidden folder to normal?
Analogous to the question above is how one can unhide a folder in Windows 10. If you want to view hidden files and folders, there’s a straightforward option to do so in File Explorer. Click on the View tab and in the Show/Hide section, select Hidden items.
We hope that this post was able to clear all your doubts around files on Windows and how they can be secured as per your needs.
Read next: Best free Windows Search Alternative Tools for Windows.