If you want to show or hide the Lock option from the account picture in Start Menu, then this article will help you do that. When you click the profile picture in the Start Menu in Windows 11/10, it shows the Lock option. However, if you want to lock your computer using the Win+L keyboard shortcut only, and you want to hide the option from the Start menu, then read this post for the method.
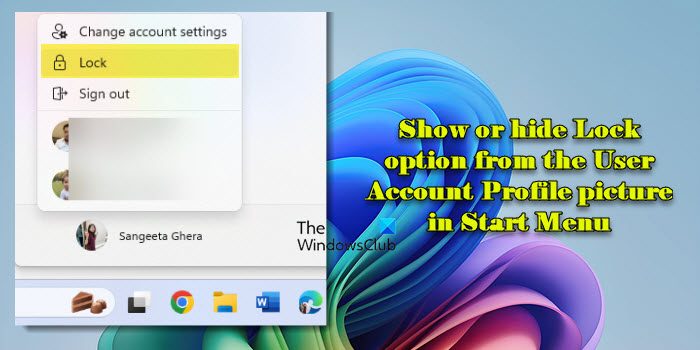
Show or Hide Lock option from the User Account Profile Picture
To show or hide the Lock option from the User Account Profile picture in Start Menu of Windows 11/10, follow one of these methods:
- Use Power Options.
- Use the Group Policy Editor.
- Use Registry Editor.
1] Add or remove Lock icon from profile picture using Power Options
Open the Control Panel on your computer. For that, search for “control panel” in the Taskbar search box and click on the corresponding result. After opening the Control Panel, search for “power options.” You should find the Power Options menu on your screen. Click on it.
Next, you need to click on an option called Choose what the power buttons do. For your information, it is the same place from where you can show the Hibernate option in Power Button.
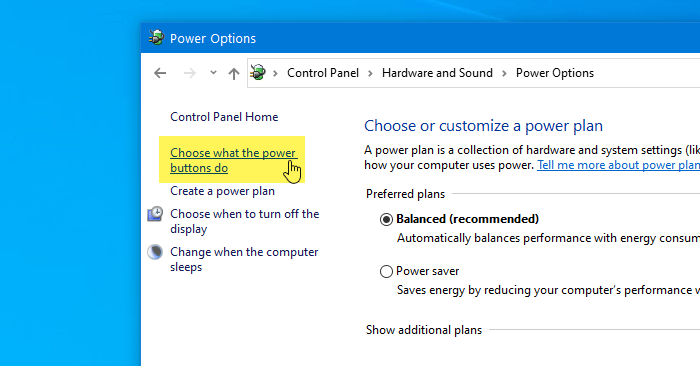
After clicking on that option, you should find another option named Change settings that are currently unavailable.
Once you click on it, you can see a checkbox before the Lock – Show in account picture menu option.
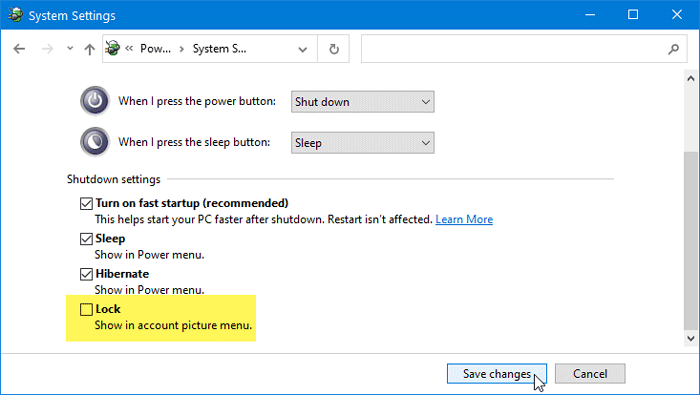
You need to remove the check mark from the checkbox and click on the Save changes button.
Now, you should not find the Lock option if you click on your profile picture in the Start Menu.
To show the lock, check the ‘Lock’ option again.
2] Show or hide Lock icon in profile picture using Group Policy Editor
The Local Group Policy Editor can do the same thing as mentioned before. To get started, open Local Group Policy Editor first and navigate to the following path-
Computer Configuration > Administrative Templates > Windows Components > File Explorer
In the File Explorer, you should see a setting called Show lock in the user tile menu. You need to double-click on this setting/policy, select Disabled, and click the OK button to save the change.
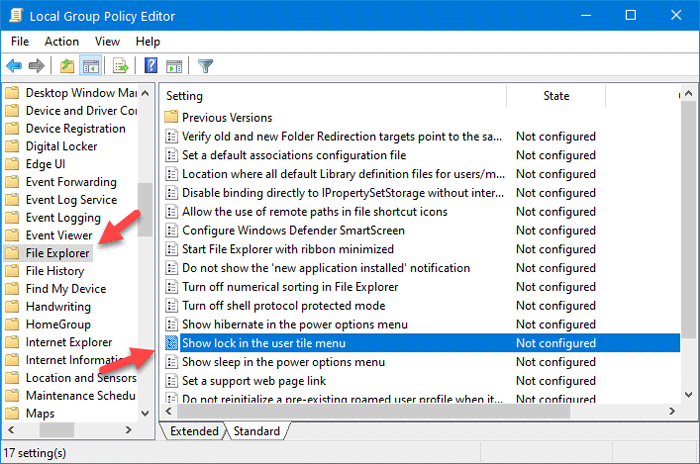
After that, you should not see the icon option after clicking the profile picture in the Start Menu.
To view the lock icon, enable the Show lock in the user tile menu policy.
3] Enable or disable Lock icon in profile picture using Registry Editor
If you want to use Registry Editor, don’t forget to backup Registry files and create a System Restore point to be on the safe side.
To get started, press Win+R, type regedit, and hit the Enter button to open Registry Editor on your Windows 11/10 computer. After that, navigate to the following path-
HKEY_LOCAL_MACHINE\SOFTWARE\Microsoft\Windows\CurrentVersion\Explorer\FlyoutMenuSettings
In the FlyoutMenuSettings key, you should see a REG_DWORD value called ShowLockOption.
If you cannot find it, right-click on space, select New > DWORD (32-bit) Value, and name it as ShowLockOption.
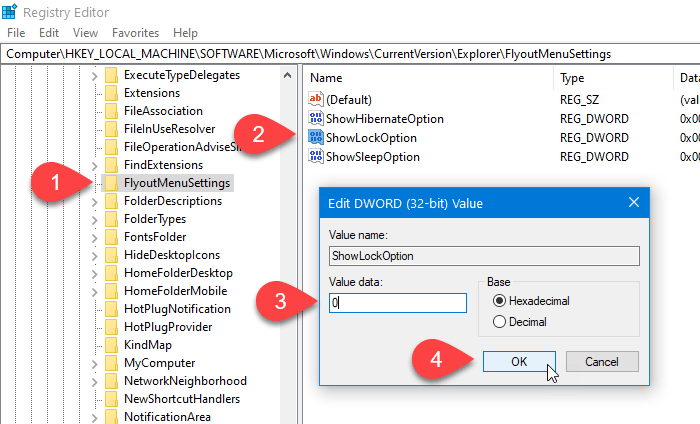
After that, double-click on it and set the value as 0.
After saving the change, you will not find the Lock option if you click on your profile picture in the Start Menu. To view the lock icon, set the ShowLockOption value to 1.
That’s it!
Read: Prevent users from changing Lock Screen in Windows.
How do I hide the Start menu icon?
You may set the taskbar to auto-hide when not in use, which eventually hides the Start menu icon. This setting is useful for a cleaner desktop or when you need more screen space to work with your applications. Right-click on the taskbar and select Taskbar settings. Go to Taskbar behaviors. Select the box for ‘Automatically hide the taskbar’. The taskbar and the Start menu icon will hide automatically. To bring them back, move your mouse to the bottom edge of the screen, where the taskbar is usually located.
How do I remove the user account picture in Windows?
While you can’t leave the user account picture completely blank in Windows 11/10, you can replace it with a generic picture or reset it to a default image. Go to Settings > Accounts > Your info. Click the Browse files button next to the Choose a file option under your current account picture. Navigate to C:\ProgramData\Microsoft\User Account Pictures and select the default user icon. Alternatively, click on ‘Browse files’ and choose a generic or blank image to use as your account picture.
Read Next: Fix Profile Picture not showing up in Windows Settings.