The Host TPM Attestation Alarm in VMware vSphere indicates a security verification issue with the ESXi host’s TPM (Trusted Platform Module). TPM Attestation helps ensure the integrity of the ESXi host by verifying Secure Boot, Cryptographic settings, and system firmware. The Host TPM Attestation Alarm is a critical alert that signals TPM attestation issues. In this article, we will explore the causes of the TPM attestation alarm, and how to fix it.

What is the Host TPM Attestation Alarm present in VMware vSphere?
The Host TPM Attestation Alarm in VMware vSphere is a security alert that indicates issues with the TPM attestation process on the ESXi host. This occurs when the vSphere Server cannot verify the integrity of the host’s TPM measurements, which are essential for ensuring that the host has not been tampered with and is in a secure state.
Host TPM Attestation Alarm in VMware vSphere [Fix]
If you encounter the Host TPM Attestation Alarm error in VMware vSphere, execute the solutions listed below.
- Verify the system requirements
- Enable TPM and Secure Boot
- Reconnect the host to vCenter
- Update vCenter Server/ESXi version
- Acknowledge and reset the alarm
Let’s get this show on the road.
1] Verify the system requirements
Verifying the system requirements is essential to ensuring that the TPM Attestation process functions correctly. Moreover, checking hardware and software prerequisites will help us rule out compatibility issues and comply with VMware’s trusted computing standard.
- Physical TPM 2.0 chip must be installed and enabled.
- Secure Boot must be enabled in BIOS/UEFI.
- TPM must support SHA-256 encryption.
- vCenter Server and ESXi must be version 6.7 or higher.
If any one of the requirements is not met, proceed with the next solution.
2] Enable TPM and Secure Boot
Secure Boot ensures that only trusted signed software runs during startup while TPM provides cryptographic validation of the system state. Therefore, enabling TPM and Secure Boot is essential to ensure the integrity and security of the ESXi host. Follow the steps mentioned below to enable them.
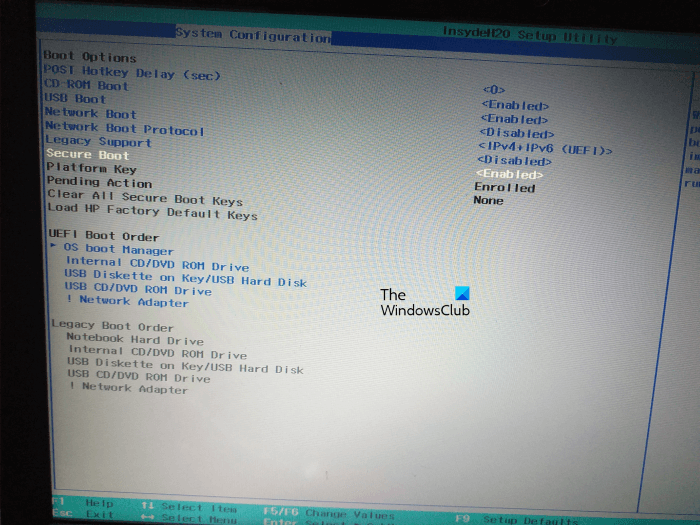
- Reboot the PC, and press the appropriate key to enter the BIOS/UEFI setup.
- Navigate to the Boot tab, look for the Secure Boot option, and set it to Enabled.
- Now, go to the Security or Advanced tab, locate the TPM Settings, and set it to Native or Enabled option instead of Discrete. Save the changes and exit the BIOS.
Launch VMware vSphere, and check if the alert appears on the screen. Slide to the next solution accordingly.
3] Reconnect the host to vCenter

Often, temporary glitches or communication issues between the ESXi host and vCenter Server trigger the alarm. In such cases, it is recommended that the host be reconnected to vCenter. This clears the issue by refreshing security settings and applying any recent configuration changes such as enabling Secure Boot or updating Firmware. To do the same, see the steps listed below.
- Launch the vSphere Client, log in with the credentials, and then select Hosts and Clusters from the left-side navigation pane.
- In the inventory tree, locate the ESXi host, right-click on it, and select Disconnect.
- Follow the onscreen prompts to confirm the decision, and wait for the host status to shift to ‘Disconnected’. Once done, right-click on it again, and select the Connect option. Ensure that the status of the host is changed back to ‘connected’.
- Next, right-click on the host, select Storage, and click Rescan Storage. Wait for the process to complete, then navigate to the Configure tab and select Networking. Click on Physical Adapter and select the Rescan All option.
The steps ensure that vSphere correctly recognizes all storage and network resources after the host reconnection.
4] Update vCenter Server/ ESXi version
Outdated vCenter Server and ESXi versions can cause compatibility issues, security risks, and attestation failures. Updating them helps properly recognize and validate TPM measurements, thereby resolving the alarm. For this, ensure a full backup of the vCenter Server, its database, and ESXi host configuration.
- Navigate to VMware’s website, and download the latest update for ESXi and vCenter Server.
- To upload the vCenter Server update, log in to VAMI, go to the Update tab, check for updates, and install it. The vCenter Server will reboot during the update process.
- For uploading the ESXi hosts, log in to the vSphere Client, right-click on the ESXi host, and select Enter Maintenance Mode.
- Now, upload the update to the host using a SIP client and install via SSH. Reboot the ESXi host and exit the Maintenance mode once the update is complete.
After updates, check if the TPM attestation alarm is resolved.
Read: How to install Windows Server on VMware Workstation
5] Acknowledge and reset the alarm
Often, temporary or resolved issues can continue to display as active alarms. Acknowledging and resetting the alarm is a useful step when one has addressed the underlying issues, but the alarm persists.
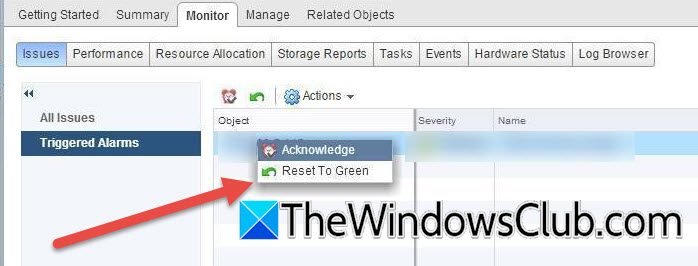
- Launch the vSphere Client, and in the inventory tree, locate and select the ESXi host that has the alarm.
- Click on the Monitor tab, and then select Issues to view the list of alarms and notifications.
- Locate the TPM Attestation alarm, right-click on it, and select the Reset to Green option.
That’s it.
Read: How to install VMWare ESXi Hypervisor in Hyper-V Virtual Machine
How do I check my ESXi host attestation status?
To check your ESXi host attestation status, log in to the vSphere Client, select the host, and go to the Monitor tab. Then click on Security and view the attestation status in the Attestation column. More details can be found in the Message column.
Also Read: Convert VMware to Hyper-V and vice versa.

Leave a Reply