You can add any custom folder under This PC in File Explorer in Windows 11/10 by editing the Registry by following this tutorial. In Windows 11/10 File Explorer Navigation Pane, if you want, you can add or remove Linux, add Recycle Bin, add or remove Network, add or remove Libraries, and so on. In this post, we will show you how to modify the Registry to add any Folder under This PC node in File Explorer Navigation Pane.

How to add a Folder to This PC in Windows 11/10
To add any folder or a custom shell folder manually under This PC in File Explorer in Windows 11/10 is to use a custom GUID and then replicate the settings of an existing inbuilt shell folder like Music or Videos. For this post, we will mimic the Videos shell folder’s registry settings using a different GUID and a custom folder path.
Let’s begin!
Since this is a registry operation, it is recommended that you back up the registry or create a system restore point as necessary precautionary measures. Once done, you can proceed as follows:
- Press the Windows key + R to invoke the Run dialog.
- In the Run dialog box, type notepad and hit Enter to open Notepad.
- Copy and paste the code below into the text editor.
Windows Registry Editor Version 5.00

;Videos shell folder registry keys - Windows 11/10.
[HKEY_LOCAL_MACHINE\SOFTWARE\Classes\CLSID\{f86fa3ab-70d2-4fc7-9c99-fcbf05467f3a}]
"DescriptionID"=dword:00000003
"Infotip"=hex(2):40,00,25,00,53,00,79,00,73,00,74,00,65,00,6d,00,52,00,6f,00,\
6f,00,74,00,25,00,5c,00,73,00,79,00,73,00,74,00,65,00,6d,00,33,00,32,00,5c,\
00,73,00,68,00,65,00,6c,00,6c,00,33,00,32,00,2e,00,64,00,6c,00,6c,00,2c,00,\
2d,00,31,00,32,00,36,00,39,00,30,00,00,00
"System.IsPinnedToNameSpaceTree"=dword:00000001

[HKEY_LOCAL_MACHINE\SOFTWARE\Classes\CLSID\{f86fa3ab-70d2-4fc7-9c99-fcbf05467f3a}\DefaultIcon]
@=hex(2):25,00,53,00,79,00,73,00,74,00,65,00,6d,00,52,00,6f,00,6f,00,74,00,25,\
00,5c,00,73,00,79,00,73,00,74,00,65,00,6d,00,33,00,32,00,5c,00,69,00,6d,00,\
61,00,67,00,65,00,72,00,65,00,73,00,2e,00,64,00,6c,00,6c,00,2c,00,2d,00,31,\
00,38,00,39,00,00,00

[HKEY_LOCAL_MACHINE\SOFTWARE\Classes\CLSID\{f86fa3ab-70d2-4fc7-9c99-fcbf05467f3a}\InProcServer32]
@=hex(2):25,00,73,00,79,00,73,00,74,00,65,00,6d,00,72,00,6f,00,6f,00,74,00,25,\
00,5c,00,73,00,79,00,73,00,74,00,65,00,6d,00,33,00,32,00,5c,00,73,00,68,00,\
65,00,6c,00,6c,00,33,00,32,00,2e,00,64,00,6c,00,6c,00,00,00
"ThreadingModel"="Both"

[HKEY_LOCAL_MACHINE\SOFTWARE\Classes\CLSID\{f86fa3ab-70d2-4fc7-9c99-fcbf05467f3a}\Instance]
"CLSID"="{0E5AAE11-A475-4c5b-AB00-C66DE400274E}"

[HKEY_LOCAL_MACHINE\SOFTWARE\Classes\CLSID\{f86fa3ab-70d2-4fc7-9c99-fcbf05467f3a}\Instance\InitPropertyBag]
"Attributes"=dword:00000011
"TargetKnownFolder"="{35286a68-3c57-41a1-bbb1-0eae73d76c95}"

[HKEY_LOCAL_MACHINE\SOFTWARE\Classes\CLSID\{f86fa3ab-70d2-4fc7-9c99-fcbf05467f3a}\ShellFolder]
"Attributes"=dword:f080004d
"FolderValueFlags"=dword:00000029
"SortOrderIndex"=dword:00000000

[HKEY_LOCAL_MACHINE\SOFTWARE\WOW6432Node\Classes\CLSID\{f86fa3ab-70d2-4fc7-9c99-fcbf05467f3a}]
"DescriptionID"=dword:00000003
"Infotip"=hex(2):40,00,25,00,53,00,79,00,73,00,74,00,65,00,6d,00,52,00,6f,00,\
6f,00,74,00,25,00,5c,00,73,00,79,00,73,00,74,00,65,00,6d,00,33,00,32,00,5c,\
00,73,00,68,00,65,00,6c,00,6c,00,33,00,32,00,2e,00,64,00,6c,00,6c,00,2c,00,\
2d,00,31,00,32,00,36,00,39,00,30,00,00,00
"System.IsPinnedToNameSpaceTree"=dword:00000001

[HKEY_LOCAL_MACHINE\SOFTWARE\WOW6432Node\Classes\CLSID\{f86fa3ab-70d2-4fc7-9c99-fcbf05467f3a}\DefaultIcon]
@=hex(2):25,00,53,00,79,00,73,00,74,00,65,00,6d,00,52,00,6f,00,6f,00,74,00,25,\
00,5c,00,73,00,79,00,73,00,74,00,65,00,6d,00,33,00,32,00,5c,00,69,00,6d,00,\
61,00,67,00,65,00,72,00,65,00,73,00,2e,00,64,00,6c,00,6c,00,2c,00,2d,00,31,\
00,38,00,39,00,00,00

[HKEY_LOCAL_MACHINE\SOFTWARE\WOW6432Node\Classes\CLSID\{f86fa3ab-70d2-4fc7-9c99-fcbf05467f3a}\InProcServer32]
@=hex(2):25,00,73,00,79,00,73,00,74,00,65,00,6d,00,72,00,6f,00,6f,00,74,00,25,\
00,5c,00,73,00,79,00,73,00,74,00,65,00,6d,00,33,00,32,00,5c,00,73,00,68,00,\
65,00,6c,00,6c,00,33,00,32,00,2e,00,64,00,6c,00,6c,00,00,00
"ThreadingModel"="Both"

[HKEY_LOCAL_MACHINE\SOFTWARE\WOW6432Node\Classes\CLSID\{f86fa3ab-70d2-4fc7-9c99-fcbf05467f3a}\Instance]
"CLSID"="{0E5AAE11-A475-4c5b-AB00-C66DE400274E}"

[HKEY_LOCAL_MACHINE\SOFTWARE\WOW6432Node\Classes\CLSID\{f86fa3ab-70d2-4fc7-9c99-fcbf05467f3a}\Instance\InitPropertyBag]
"Attributes"=dword:00000011
"TargetKnownFolder"="{35286a68-3c57-41a1-bbb1-0eae73d76c95}"

[HKEY_LOCAL_MACHINE\SOFTWARE\WOW6432Node\Classes\CLSID\{f86fa3ab-70d2-4fc7-9c99-fcbf05467f3a}\ShellFolder]
"Attributes"=dword:f080004d
"FolderValueFlags"=dword:00000029
"SortOrderIndex"=dword:00000000

[HKEY_LOCAL_MACHINE\SOFTWARE\Microsoft\Windows\CurrentVersion\Explorer\MyComputer\NameSpace\{f86fa3ab-70d2-4fc7-9c99-fcbf05467f3a}]

[HKEY_LOCAL_MACHINE\SOFTWARE\WOW6432Node\Microsoft\Windows\CurrentVersion\Explorer\MyComputer\NameSpace\{f86fa3ab-70d2-4fc7-9c99-fcbf05467f3a}]
- Now, click the File option from the menu and select Save As button.
- Choose a location (preferably a desktop) where you want to save the file.
- Enter a name with .reg extension (eg; TWC.reg). Don’t close the file yet.
- Next, head over to GuidGen.com to generate a random GUID string. This site uses Microsoft’s GUIDGen.exe at the backend. Alternatively, you can run the New-Guid cmdlet in PowerShell.
- In this, example, below is the GUID generated.
{3b955948-9e4e-4f8a-92b3-492012902461}
- Now, copy the GUID to Clipboard.
- In the open Notepad, replace every instance of the GUID below.
{f86fa3ab-70d2-4fc7-9c99-fcbf05467f3a}
- Once done, save the reg file.
- Close Notepad.
- Now, double-click the saved .reg file to merge it.
- If prompted, click on Run > Yes (UAC) > Yes > OK to approve the merge.
- Next, press the Windows key + R to invoke the Run dialog.
- In the Run dialog box, type regedit and hit Enter to open Registry Editor.
- Navigate or jump to the registry key path below:

HKEY_LOCAL_MACHINE\SOFTWARE\Classes\CLSID\{3b955948-9e4e-4f8a-92b3-492012902461}
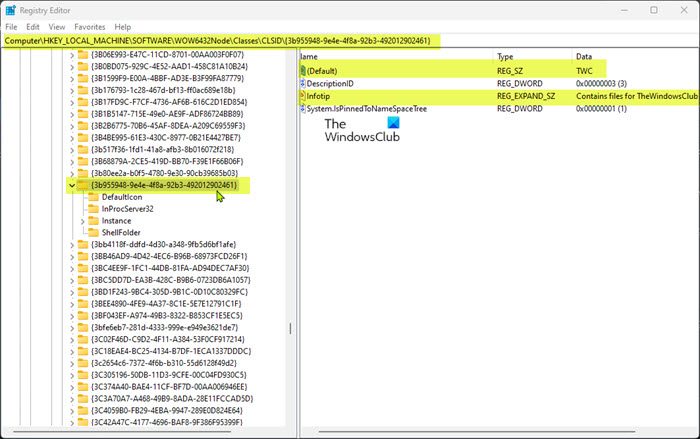
HKEY_LOCAL_MACHINE\SOFTWARE\WOW6432Node\Classes\CLSID\{3b955948-9e4e-4f8a-92b3-492012902461}
- At both locations, in the right pane, change the value data for (Default) to show the name of the custom folder and InfoTip accordingly.
The InfoTip text will be shown when you hover the mouse over the custom folder in File Explorer.
- Next, navigate to the DefaultIcon subkeys below:

HKEY_LOCAL_MACHINE\SOFTWARE\Classes\CLSID\{3b955948-9e4e-4f8a-92b3-492012902461}\DefaultIcon
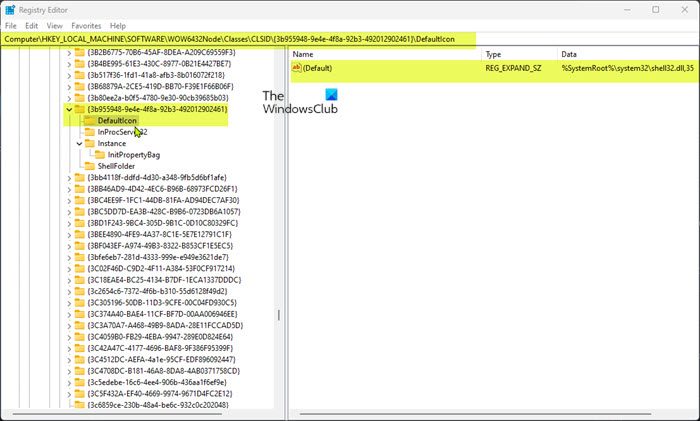
HKEY_LOCAL_MACHINE\SOFTWARE\WOW6432Node\Classes\CLSID\{3b955948-9e4e-4f8a-92b3-492012902461}\DefaultIcon
- At both locations, set the icon value accordingly. You can use the
shell32.dll,35icon for the folder you’re adding.
If you want, you can also use free Icon packs to change File and Folder Icons.
Next, navigate to the Instance\InitPropertyBag subkeys below:

HKEY_LOCAL_MACHINE\SOFTWARE\Classes\CLSID\{3b955948-9e4e-4f8a-92b3-492012902461}\Instance\InitPropertyBag
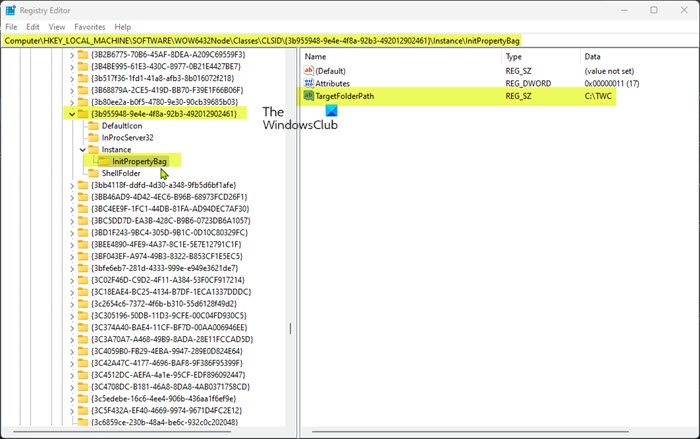
HKEY_LOCAL_MACHINE\SOFTWARE\WOW6432Node\Classes\CLSID\{3b955948-9e4e-4f8a-92b3-492012902461}\Instance\InitPropertyBag
- At both locations, you will need to delete the
TargetKnownFoldervalue to add a custom folder path by creating a string value (REG_SZ) namedTargetFolderPathand set its value data, with the full folder path. - Once done, exit Registry Editor.
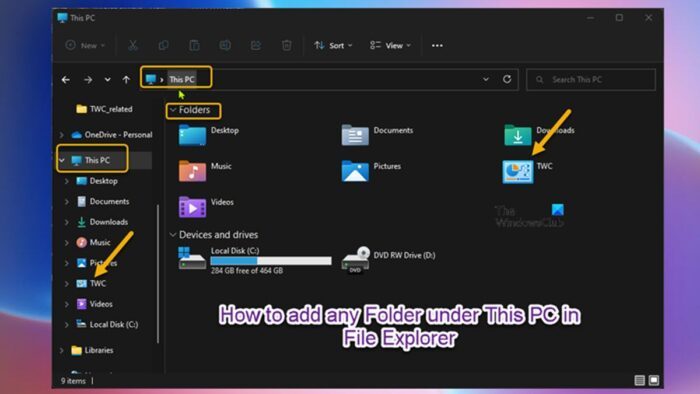
You should now see the custom folder in the navigation pane and the Folders section in This PC view as shown in the lead-in image above.
Now, if you’re adding a mapped drive or folder pointing to a network location, you can make the item appear under the Network locations section in This PC view by modifying the DescriptionID value to 9 (0x00000009) in line 4 of the reg file.
That’s how you can add any Folder under This PC in File Explorer in Windows 11/10!
TIPS:
- You can also easily add or display any folder in This PC folder using our Ultimate Windows Tweaker.
- You can also display any file, folder, or program in This PC using another simpler method.
How do I add a folder to This PC in Windows 11?
There is no direct option to add or remove a folder from the ‘This PC’ Section in File Explorer on Windows 11. However, if you want, you can do this with the help of registry tweaks, registry files, or third-party tools to easily add or remove a folder from This PC section of the navigation pane in File Explorer on Windows 11.
These posts might also interest you:
- Turn On or Off Show all folders in the Navigation Pane of Explorer
- Make Explorer Navigation Pane expand to open the folder
- How to show or remove Quick access and Favorites from the Navigation Pane of Explorer
How add or remove folders from This PC in Windows 11?
To add folders in This PC in Windows 11, you need to take the help of the Windows Registry. Either you can create the keys manually or create a .reg file to install everything automatically. On the other hand, if you want to remove folders from This PC in Windows 11, you can go through the same process. However, this time you need to delete all the keys from the Registry Editor.