The real power of Adobe Premiere Pro lies in its effects. One of these effects is the Text effect. This effect is similar to WordArt in MS Word and other applications. However, these text effects can be animated throughout the video. If you wish to add text and text effects to Adobe Premiere Pro, then please read through this article for the procedure.

How to add and create animated Text Effects in Premiere Pro
The procedure to add text and text effects to Adobe Premiere Pro is as follows:
Add text to Adobe Premiere Pro
- Open Adobe Premiere Pro.
- Either Open or Create a new project file in Adobe Premiere Pro.
- Upload your media files or create your output file in the timeline.
- Bring the play hit to the exact point from which you wish for the text effect to appear.
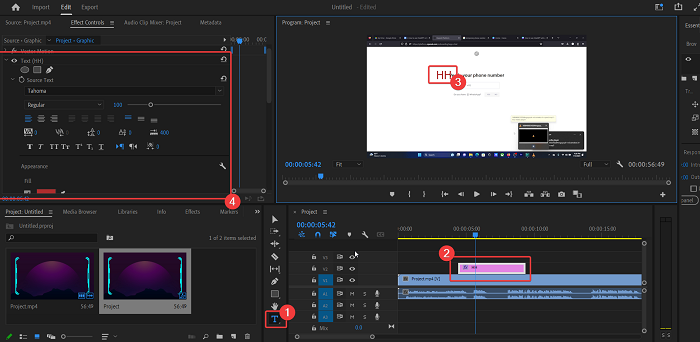
- Now, you will notice a few elements just left of the timeline column. One of those elements is shaped T. T represents Text. Please click on it.
If you hold the click, you will notice two type tools – Type tool and Vertical type tool. Please select the Type tool.
If you click on the Text element once (without holding), it will invoke the Type tool by default.
Now, you can type the text at any position of your choice in the Program window (which is just above the timeline window).
As soon as you type the text, you will notice a pink-colored surplus layer in the timeline window. The text will appear from when you entered it, to a few seconds later. You can stretch or contract the layer for the text to increase or decrease the duration of the appearance of the text.
Add text effects in Adobe Premiere Pro
Once the text has been added, you can make changes to it. Click on the pink text layer to select the text. Then, click on Effects Controls in the Source window.
The menu for text effects will appear.
You can change the following effects:
- Font Type: The Font Type is set at Tahoma by default. If you prefer anything different, you can change the Font Type.
- Bold: The font is regular when created, however, you have the option to change it to Bold.
- Font Size: The Font Size is set at 100 by default. You can change it to something else of your choice.
- Text Alignment: The original alignment of text is towards the left. You can change this alignment to center or right.
- Text Color: Interestingly, the default color of the text is white, and it is the most impractical color for text in a video. You can change it to anything else of your choice.
Deleting text in Adobe Premiere Pro
Deleting text in Adobe Premiere Pro is simple.
- Click on the pink text layer you created.
- Hit the DELETE key.
- This will delete the text you created.
Other than this, it will also delete any text effects you might have added.
Read: How to clear Media Cache in Premiere Pro
How do I add text in Premiere Pro?
Adding text to an Adobe Premiere Pro project is easy. Simply create your project timeline. Then, in the timeline, you can add text using the Text tool. The text will appear as an additional pink layer in the timeline. You can change the length of the layer to manage its duration.
Read: How to stabilize Shaky Video Footage in Premiere Pro
How do you add effects to text in Adobe?
If you wish to add effects to text in Adobe Premiere Pro, then the procedure is simple. Select the pink layer of text that you have created. Now, click on Effects Control in the Source window. You will get the option to create or change effects for the text you created.
Leave a Reply