An FTP site is essentially a server or location on the Internet that uses the File Transfer Protocol (FTP) to facilitate file sharing and transfer. FTP is a standard network protocol used to move files between computers, typically one acting as the client and the other as the server. In this post, we will show how to configure an FTP server and add an FTP site to the Windows Server.
Add FTP Site on Windows Server
An FTP server is a computer system that uses File Transfer Protocol (FTP) to store and share files. It allows users to upload, download, and manage files over a network. To access the server, users need an FTP client or browser and login details. FTP servers are commonly used for website file management or sharing large files between computers. In order to add an FTP Site, you need to configure the FTP Server initially. You can follow the steps mentioned below to set up the FTP Site.
- Install the required roles and features
- Configure FTP Firewall
- Restart FTP Server
- Set Firewall Ports
- Create FTP Site
Let us talk about them in detail.
1] Install the required roles and features
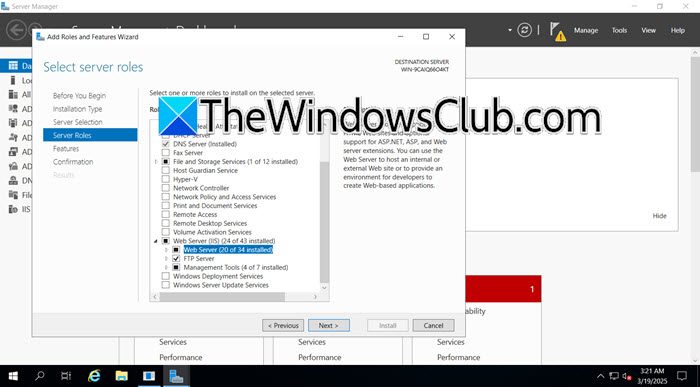
Since we are going to set up our FTP Site, we need to install the Server Role Web Server (IIS) and then the Web Server Role (IIS) feature. Follow the steps mentioned below to do the same.
- Open the Server Manager.
- Go to Add roles and features and then once the wizard opens, click on Next.
- Select Role-based or feature-based Installation and click on Next.
- Now, you need to select the server and then click on Next.
- We need to look for Web Server (IIS), tick the checkbox, and if you get a pop-up, click on Add Features. Make sure to expand the Web Server (IIS) and the FTS Server is checked. Then, click on Next.
- In the Features tab, tick Web Server Role (IIS), and then click on Next.
- When you are on the Web Server Role (IIS) tab, go to Role Services, and then tick File Server (if you have not already), and click on Next.
- Once you are on the Confirmation screen, click on Install.
Wait for a few minutes as the installation will take a little time.
To install the feature, you can also run the following PowerShell command with admin privileges.
Install-WindowsFeature Web-FTP-Server -IncludeManagementTools
The server might take a little while to install. Once it has, proceed to the next step.
2] Configure FTP Firewall
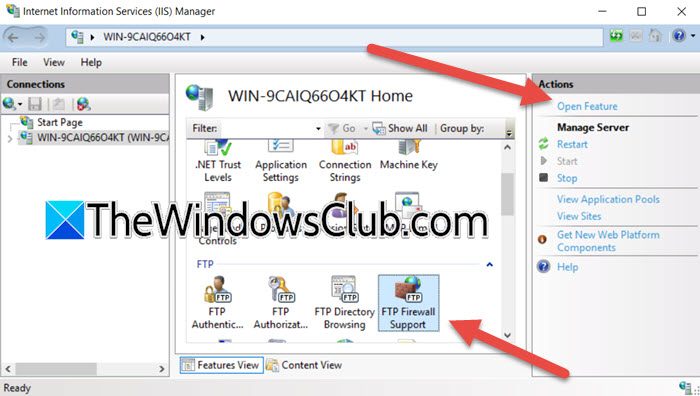
Now that we have installed the required roles and features, let us go ahead and configure it. To do so, you need to follow the steps mentioned below.
- Open the Server Manager.
- Go to Tools > Internet Information Services (IIS) Manager.
- Now, click on your server and then click on the FTP Firewall Support > Open Features or just double-click on FTP Firewall Support.
- In the Data Channel Port Range, you need to set the port range for passive mode, and then click on Apply.
- You will get a pop-up to configure, then you need to click on Ok.
Once done, move on to the next step.
3] Restart FTP Server
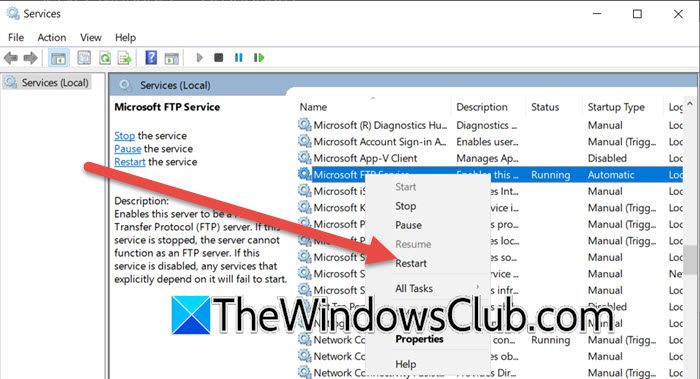
When you install the FTP Server, its service is added to the Services app. And after configuring the server, we need to restart it. To do so, open the Services app, search for Microsoft FTP Server, right-click on it, and select Restart.
4] Set Firewall Ports
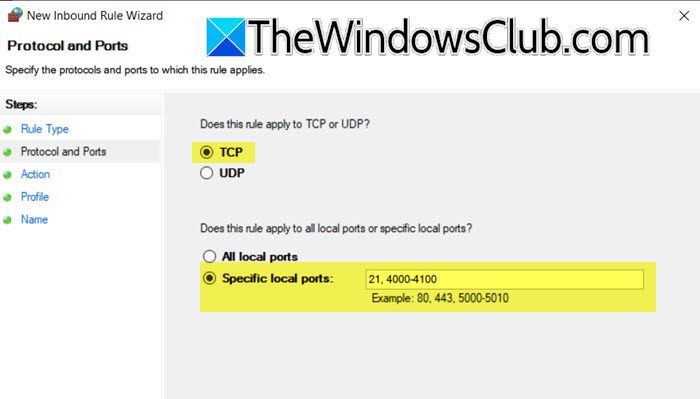
Now we need to include port number 21 and then set the Data channel port range. To do so, you need to follow the steps mentioned below.
- Search and open “Windows Defender Firewall with Advanced Security”.
- Click on Inbound Rules > New Rule.
- Now, go to Port and click on Next.
- Now, select TCP and go to Specific local ports, enter 21, and then the Data channel port range.
- Click on Next and follow the on-screen instructions to complete the setup.
This way, we have configured the FTP Server; our next step should be to configure the FTP Site.
4] Create FTP Site

An FTP Site is not the same as an FTP Server. An FTP server hosts files for sharing, while an FTP site is the accessible location on the server where users interact with those files.
For your information, C:\inetpub\ftproot is the default FTP root directory.
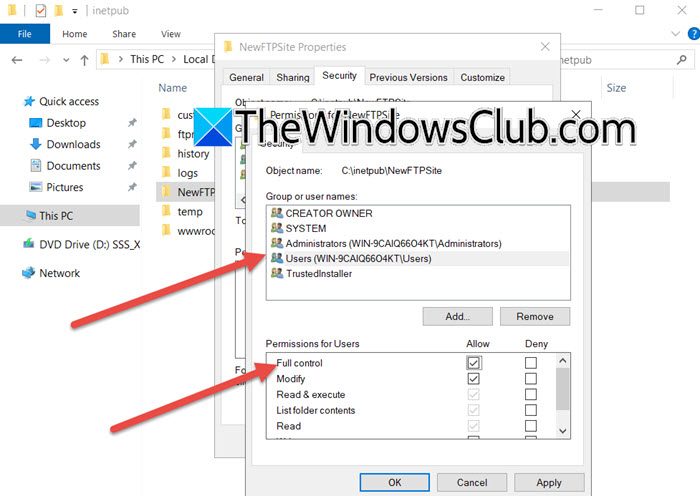
First of all, you need to go to C:\inetpub, then create a new folder there, and give it any name. Now, right-click on the folder and select Properties. Go to the Security tab, select the group that you want to have rights over the folder, and click on Edit. Now, tick Full control and select Apply > Ok.
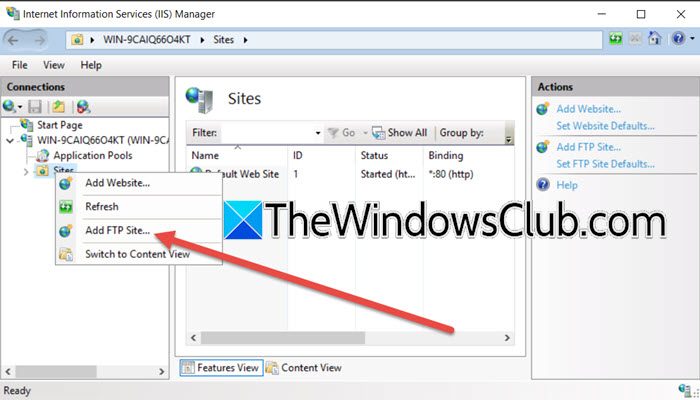
Now, we need to create a new FTP Site. For that, follow the steps mentioned below.
- In the Server Manager, go to Tools > Internet Information Services (IIS) Manager.
- Now, expand the server, right-click on Sites, and then click on Add FTP Site.
- You then have to enter the name in the FTP site name and then click on the three dots associated with the Physical path.
- Navigate to the new folder that we created and select it.
- Then click on Next.
- You can either keep the IP Address field unchanged or give it an IP of your choice, the Port should be 21, then select No SSL, and click on Next.
- In the Authentication, select Basic, in the Authorization, select Specified roles or user groups, and then type “Users”, and click boxes associated with Read and Write Permissions.
- Click on Finish.
Finally, a new FTP Site will be added to your FTP Server. If you want to make any further changes to the site, right-click on it, and select Manage FTP Site > Advanced Settings. You can stop or restart it from the Manage FTP Site > Stop or Manage FTP Site > Restart options respectively.
Hopefully, this guide will help you install the required roles for the FTP Site and add a new FTP Site to your Windows Server.
Read: How to set up an FTP Server on Windows 11
How do I access an FTP site on Windows?
To access an FTP site on Windows, open File Explorer and type the FTP site’s address in the address bar, starting with “ftp://”. Press Enter to connect. If login credentials are needed, enter your username and password when prompted. You can then browse, upload, or download files from the FTP site just like using a normal folder on your computer.
Read: Create FTP Server that can accessed from Outside Network
How to connect to FTP in CMD?
To connect to FTP in CMD, open Command Prompt and type ftp, then press Enter. Next, type open [FTP address] and hit Enter. Enter your username and password when prompted. Once connected, you can use commands like dir to list files, get to download files, and put to upload files. When finished, type bye to exit the FTP session.

Leave a Reply