Microsoft PowerPoint users not only can use PowerPoint only for presentations, but they can also edit or format images as well. If you add certain effects to a picture or shape, PowerPoint has plenty of features that you can use to make your images look artistic. In this tutorial, we will explain how to add a glass effect to a picture or shape in PowerPoint.
How to add a Glass effect to a Picture, Shape or WordArt in PowerPoint
Follow the steps below to add a glass effect to a picture or shape in PowerPoint.
How to add a glass effect to a picture in PowerPoint
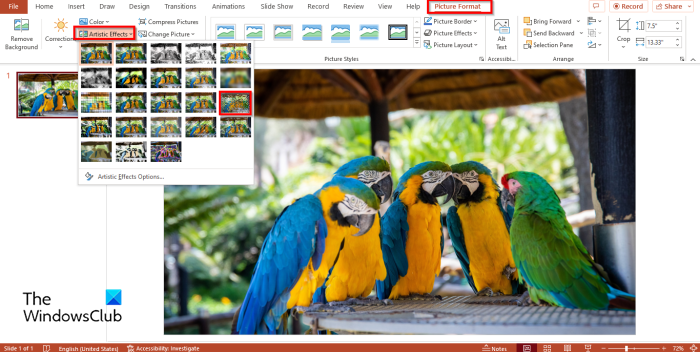
- Launch PowerPoint, change the layout to blank, and insert a picture into the slide.
- Click the Picture Format tab and click the Artistic Effects button in the Adjust group and select Glass from the menu.
- A Glass effect will be added to the picture.
- If you want to customize the glass effect.
- Right-click the picture and select Format Picture from the context menu.
- A Format Picture pane will appear on the right.
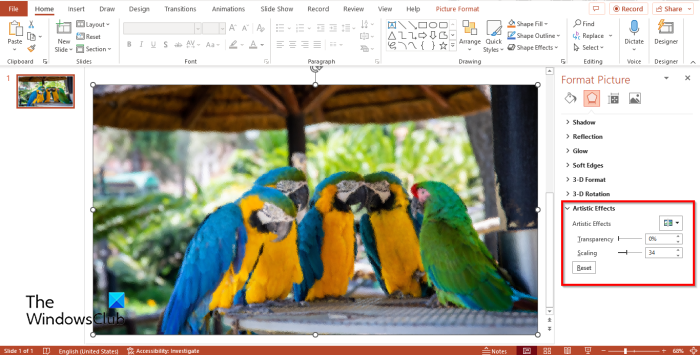
- In the Artistic Effects section.
- You can set a percentage for both the Transparency and the Scale.
- Then close the Format Picture pane.
How to add a glass effect to a in PowerPoint
- Insert a shape on the slide.
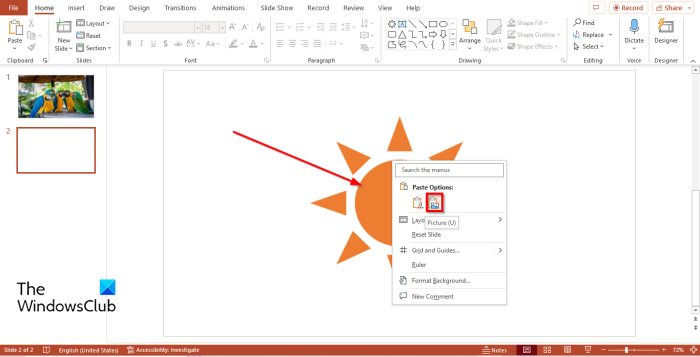
- We are going to convert the shape into a picture.
- Right-click the shape and select Cut.
- Then right-click, under Paste Options, choose Picture from the context menu.
- Click the Picture Format tab and click the Artistic Effects button in the Adjust group, and select the Glass effect from the menu.
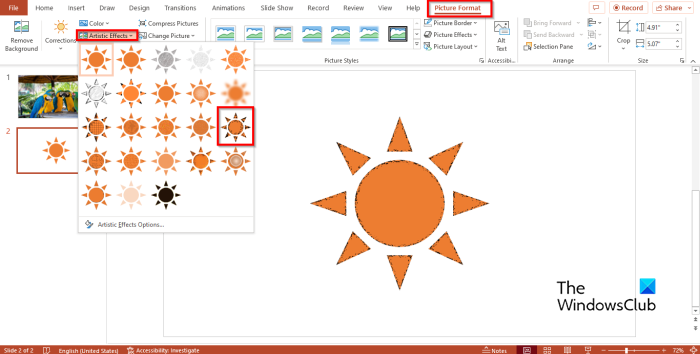
The Shape now has a glass effect.
How to add a glass effect to WordArt in PowerPoint
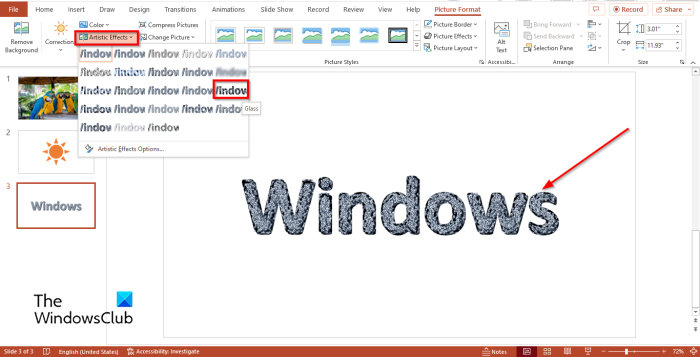
- Insert WordArt into the slide.
- Right-click the WordArt and select Cut from the context menu.
- Then right-click, under Paste Options, choose Picture from the context menu.
- Click the Picture Format tab and click the Artistic Effects button in the Adjust group, and select the Glass effect from the menu.
- The WordArt is now having a glass effect.
We hope you understand how to add a glass effect to a picture in PowerPoint.
How do you make a frosted glass effect in PowerPoint?
Follow the steps below to make a frosted glass effect in PowerPoint.
- Insert a Picture into the slide.
- Click the Picture Format tab and click the Artistic Effects button in the Adjust group and select the Blurry effect from the menu.
- Right-click the picture and select Format Picture from the menu.
- On the Effects tab, click the Artistic Effects section and set the Radius to 50%.
- Then click the Insert tab and click the Shapes button and select a rectangle.
- Draw the rectangle over the picture.
- Then go to the Shape Format tab, click the Shape Fill button and choose the light grey color.
- Right-click the Shape and select Format Shape from the context menu.
- On the Fill tab, change the Transparency percentage to 45%.
- Then close the pane.
READ: How to use the Graphics Format tab in PowerPoint
What is artistic effect?
Artistic Effect is a feature in Office that allows users to add effects to a picture to give it an artistic look. Artistic Effects can make your photo blurry or even look like a pencil sketch. Users of PowerPoint can make their background pictures look artistic when using Artistic Effects.
READ: How to blur background image of a picture in PowerPoint