Are you looking for a solution to add noise to your videos on Windows PC? Noise is usually added to videos to make their look and feel more realistic or found footage. It appears as grain or artifacts in the video clips and makes the audience believe that the clips are real. It also makes looks videos old, noisy, rough, and distorted. If you want to apply noise to video clips, this post will interest you. Here is a complete guide showing you how to apply noise effects and filters to your videos.
How to add Noise to Videos in Windows 11/10
You can use third-party free software to add a noise effect or filter to your videos on Windows PC. Here are some free video editors that you can try:
- Shotcut
- VSDC Free Video Editor
- Avidemux
- Videopad
1] Shotcut
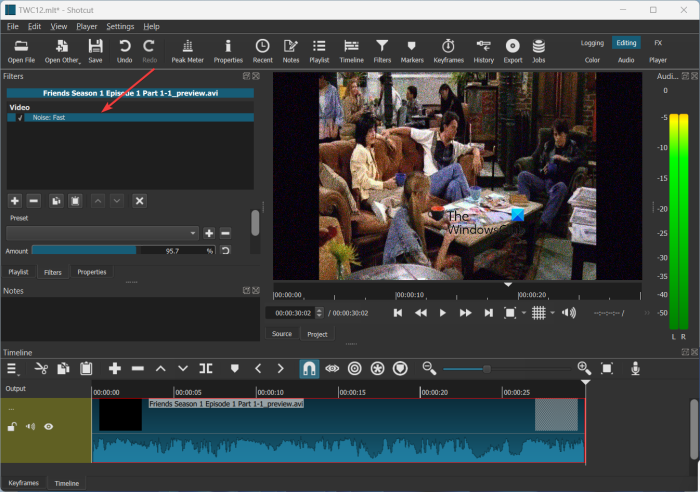
Shotcut is a free open-source video editor that also lets you add noise to videos. It provides a dedicated noise filter to add roughness to your videos. Let us check out how to use this filter.
How to add noise to videos in Shotcut?
- Open Shotcut and add a video file.
- Go to the Filters tab.
- Press the + button.
- Select the Noise: Fast or Noise: Keyframes filter.
- Set up the filter amount.
- Save the final edited video.
Launch Shotcut and press the Open file button to import the source video file to this video editor.
Afterward, move to the Filters tab and click on the + button. You will see a list of video and audio filters that you can apply to your videos. From the list, select the Video category and scroll down to the Noise filter. You can now choose the Noise: Fast (apply noise to entire video) or Noise: Keyframes (add noise filter with smooth transition) filter. The filter will be added to the video that you preview in real-time.
You can now adjust the amount of noise you want to add to your video. Meanwhile, you can also check how the output video looks in its Player window.
Once done, you can save the final video in various formats including MP4, AVI, MOV, FLV, and more. To do that, click on the File > Export > Video option and then press the Advanced option. Then, set up the output video format, codec, quality, etc. Finally, press the Export file button to save the final video with the noise filter.
Shotcut is a popular video editor that lets you add noise to video clips. The good thing is that it comes in both installer and portable packages. So, you can use a preferred version to edit your videos.
See: How to add Sound Effects to a Transition in PowerPoint?
2] VSDC Free Video Editor
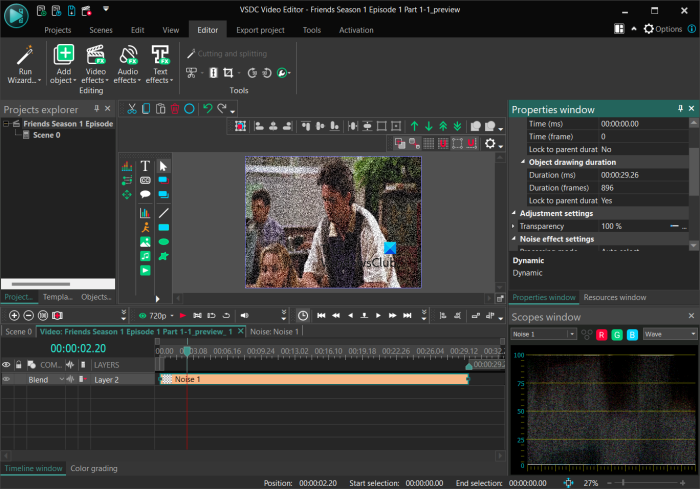
VSDC Free Video Editor is another good software to add noise to videos. It is primarily a video editor for Windows with several handy editing tools and features. It also provides a noise filter that you can apply to your videos. Let us check out the steps to do that.
How to add noise to videos in VSDC Free Video Editor?
- Launch VSDC Free Video Editor and add the source video file.
- Go to the Editor tab.
- Tap on Video effects.
- Click on the Filters > Noise option.
- Customize the duration of the noise filter as per your requirement.
- Preview the resulting video.
- Export the output video.
First, you need to download and install VSDC Free Video Editor on your PC, and then open the software. After that, click on the Import content option and add the input media files. While doing so, you can set up video properties like resolution, framerate, background, size, metadata, etc.
Once you upload the video, it will be opened in its editor and added to the timeline. Now, from the Editor tab, click on the Video effects button. Then, select the Filters > Noise option and customize Object position settings. You can add the noise filter to a specific part of the video or to the entire video. As you do that, the filter will be applied to your video and you can preview the edited version in its Player window.
Furthermore, you can customize the noise filter from the Properties window. It lets you adjust the noise levels and other settings like Red levels, Green levels, Blue levels, Processing mode, transparency, etc.
When you are done adding a noise filter to the video, you can export it in a supported format. Move to its Export project tab and click on the desired target format from AVI, MPG, MKV, MOV, SWF, FLV, and more. After that, configure output properties as per your requirements and then press the Export project button to save the final video. You can also export the video compatible to platforms like Web, Android, iPad, Xbox, etc.
If you want a straightforward video editor to make your videos look noisy, I recommend using this one.
Read: How to Split a Video into parts in Windows?
3] Avidemux
Avidemux is a free and open-source video editor using which you can add noise to videos. In it, a dedicated Noise filter is provided that you can add and customize accordingly. It offers a number of noise filters to apply to videos including Gaussian Convolution, Large Median, Mean Convolution, and Median Convolution. On the other hand, it also provides denoise filters to reduce noise from a video like Mplayer Denoise, Wavelet denoiser, etc. Let us check out how to add noise to videos using this free video editor.
How to add noise to video using Avidemux?
- Launch Avidemux and open the source video file.
- Choose the output video codec.
- Go to the Video menu and choose Filters.
- Navigate to the Noise section.
- Select the desired noise filter.
- Preview the output video.
- Export the video.
Firstly, open the Avidemux GUI and then add the source video file using the File > Open option. After that, select the desired output video codec by clicking the drop-down button present below the Video output option.
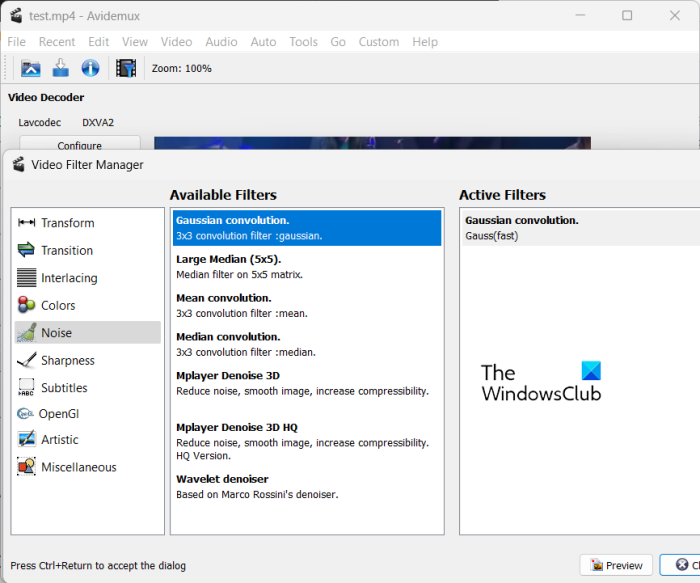
Now, move to the Video tab and click on the Filters option. In the Video Filter Manager window, go to the Noise section and double-click the desired noise filter. You can then enable or disable the Process luma and Process chroma options as per your requirements.
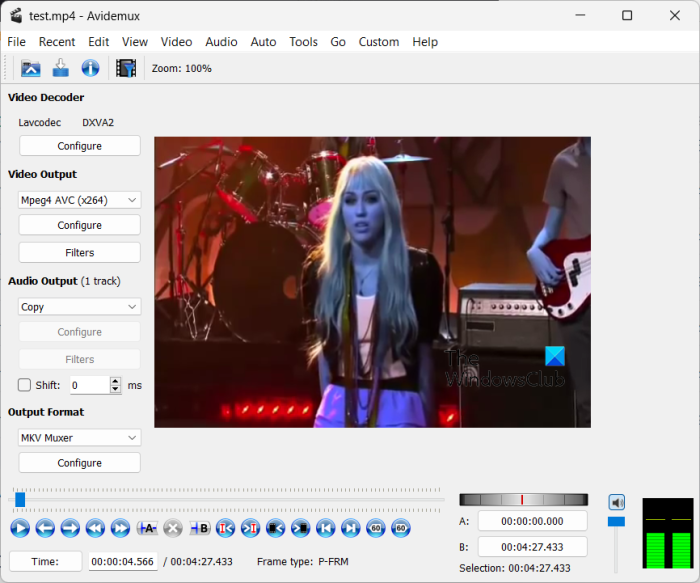
Next, you can press the Preview button in the filters window and play the output video before exporting it. If it looks fine, you can save the video by clicking on the File > Save option.
It is quite a simple video editor with some noise and denoise filters that you can apply to your videos.
Read: How to add Cartoon effect to videos in Windows?
4] Videopad
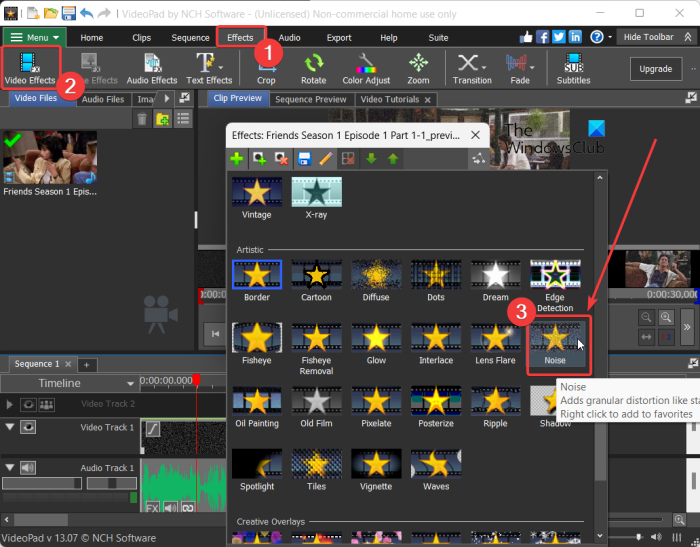
The next video editor you can use to add noise to videos is VideoPad Video Editor. It provides a lot of filters that include a noise filter too. This video editor is very easy to use. All its main features can be directly accessed from its toolbar. Let us check out a sorted procedure to apply a noise effect to videos in this video editor.
Firstly, open this video editor and click on the Add files button to browse and choose the input video files that you want to edit.
Now, click on the Effects tab from the top of its interface and then select the Video effects button. It will show several video effects and filters that you add to your videos to customize their look and feel. In the Effects prompt, scroll down to the Artistic category and click on the Noise effect.
After that, you can edit some parameters to customize the noise effect. These parameters are Intensity, Saturation, and Coverage. Simply adjust the value of these parameters as per your requirements and preview the output video.
Finally, you can save the resulting video by clicking on the Export Video button. It lets you save edited videos in formats like MP4, AVI, 3GP, ASF, MKV, WMV, RM, SWF, etc. If you want to make a video compatible with platforms like Android, iPod, iPad, Xbox, iPhone, PSP, etc., you can do that too.
It is a featured yet easy-to-use video editor to apply noise effects to videos. It can be used for free, however, the free version is available for non-commercial use only.
See: How to add Mirror effect to Videos in Windows?
Can you add noise in After Effects?
Yes, you can add noise to your animations and videos in After Effects. You can simply add your content as layers and then select the layer. After that, click on the Effect > Noise & Grain option and select Noise. It will apply a noise effect to your animation. You can even import a noise effect and then apply it to your video.
How do I make a picture noisy?
To add noise to a picture, you can use an image editor like GIMP or Paint.NET. These image editing software provide a dedicated noise filter that you can apply to your images and make them look noisy. If you use Paint.NET, open an image and go to the Effects menu. After that, select the Noise > Add Noise option and then edit values like Intensity, Color Saturation, and Coverage. You can then save the final noisy image in a supported image format.
Now read: Best free Video Editor with zoom in and out effect.