Portable apps are apps that require no installation. Simply download them and run the executable file. Portable apps are the best because they do not need to be installed, do not add anything to the Registry, and can be placed on any drive easily. Apart from that, you can take portable apps with you in your Pen Drive or another USB mass storage drive, and run them on another computer without installing them. There might be some apps on your system that you use daily. In this case, you can make these programs start automatically on system startup. What if you want to add those apps to Windows Startup that do not require installation? In this article, we will see how to add Portable Apps to Windows Startup.
How to add Portable Apps to Windows Startup
You can add Portable Apps to Windows Startup by using the:
- Startup folder
- Task Scheduler
- Freeware
Let’s see all these methods in detail.
1] Add Portable Apps to Windows Startup using the Startup folder
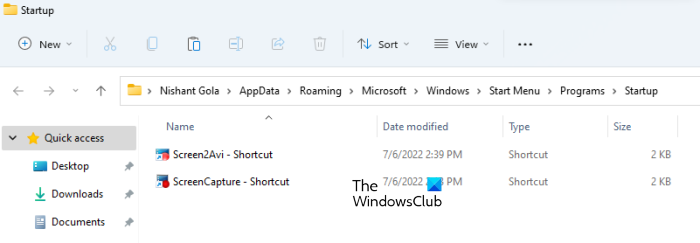
In Windows operating systems, there is a Startup folder. The files and programs placed inside the Startup folder start automatically on system startup. This is the easiest method to start programs automatically on system startup. You can also use the Startup folder to start the Portable Apps on system startup. The following steps will show you how to do that.
- Open the folder inside which you have placed the portable app.
- Locate the executable file of the portable app.
- Right-click on the executable file and go to “Send to > Desktop (create shortcut).” Windows 11 users have to select the Show more options in the right-click context menu to see the Send to option.
- Now, go to Desktop and copy the shortcut of the portable app.
- Open the Run command box by pressing the Win + R keys. Type shell:startup and click OK. This command will open the Startup folder.
- Once the Startup folder opens up, paste the copied shortcut there.
After performing the above steps, Windows will open the portable app automatically every time you start your system.
2] Add Portable Apps to Windows Startup using the Task Scheduler
Task Scheduler is a built-in tool in Windows devices that allows users to schedule tasks as per their requirements. You can use this tool to open portable apps on system startup. To do so, first, you have to create a BAT file to launch the portable app. After that, you have to schedule this BAT file in the Task Scheduler. The following steps will show you how to do that.
Open Notepad and type the following script.
Start Drive Letter:\"Program Path\file name.exe"
Let’s understand the above script. We have taken here an example of a portable screen recorder software. Have a look at the following script.
Start F:\"The Windows Club\Software\Screen2Avi\Screen2Avi.exe"
In the above script, F represents the drive letter (the drive partition where the screen recorder software is saved). After the drive letter, I wrote the complete path of the portable software and the name of the executable file. You have to write the path and the name of the executable file under quotations.
When you are done, go to “File > Save As,” name this file as abc.bat and click Save. You can give any name to the file but the extension (.bat) should remain the same. After creating the BAT file, open the Task Scheduler and follow the steps written below:
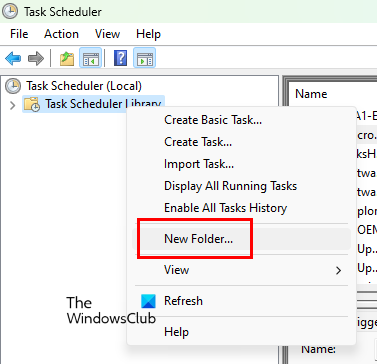
Right-click on the Task Scheduler Library folder and select New Folder. This is a custom folder for all your custom tasks. Name this folder. I named it Custom Tasks.
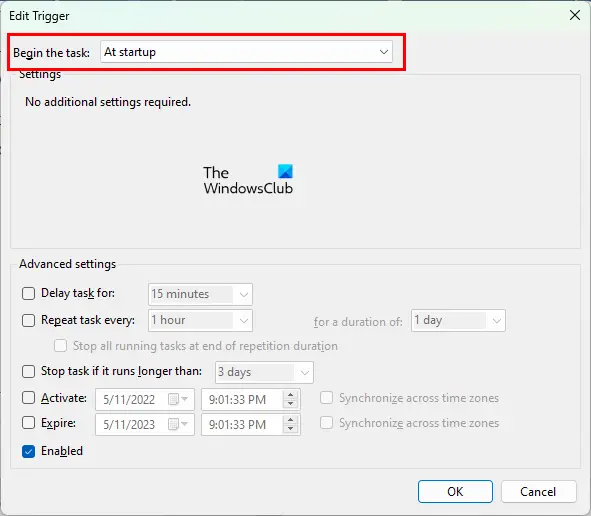
Now, right-click on the newly created folder and select Create Task. Under the General tab, name your task. After that, select the Triggers tab and click on the New button (available on the bottom left side). Click on the Begin the task drop-down and select At startup.
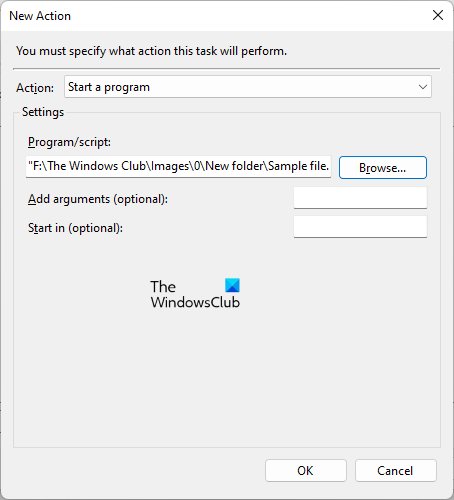
Select the Actions tab and click on the New button. Select Start a program in the Action drop-down. Now, click on the Browse button and select the BAT file. Click OK to save.
Close the Task Scheduler. Now, Windows will open the portable app every time you start your system.
3] Add Portable Apps to Windows Startup using Freeware
You can also make portable apps to start on system startup by using freeware. If you search online, you will find many free Startup Manager tools or software. You can use these free tools to manage startup apps. Glarysoft Quick Startup is a free Startup Manager software that lets you manage startup apps on Windows devices.
Read: How to register a Portable app as a Default program in Windows
How do I add apps to startup in Windows 11/10?
You can add apps to startup in Windows 11/10 by adding their shortcuts to the Startup folder. To open the Startup folder, first, open the Run command box, then type shell:startup, and then click OK. After that, copy the shortcut of the app and paste it into the Startup folder.
TIP: Ultimate Windows Tweaker and FixWin are two of the most useful portable apps for Windows 11/10 that you need to download.
How do I install portable apps?
Portable apps are apps that do not require installation on Windows. Therefore, you cannot install portable apps on your Windows 11/10 computer. When you double-click on the executable file, Windows will launch the portable app. You can place portable apps in any partition of your hard drive. Moreover, you can also take portable apps with you in your Pen Drive and open them on another computer without installing them.
Read next: How to Pin Portable Apps to the Start Menu in Windows.
Leave a Reply