Adobe Premiere Pro is considered the best video editing software in the market. While it has many options, it lacks a bit with the shapes. We will discuss the shapes it allows and a workaround to add more shapes to the Adobe Premiere Pro Timeline. Other than this, we will also discuss how to add effects to shapes in Adobe Premiere Pro.

How to add shapes in Premiere Pro
Let us take a look at how to add a rectangle, an ellipse or polygon, shape effects to rectangle, ellipse, or polygon shapes & other shapes in Adobe Premiere Pro.
Add a rectangle to Adobe Premiere Pro

The procedure to add a rectangle to Adobe Premiere Pro is as follows:
- Add a sequence to the Adobe Premiere Pro timeline.
- Now, place your play hit at the point on the timeline from where you wish for your rectangle to appear.
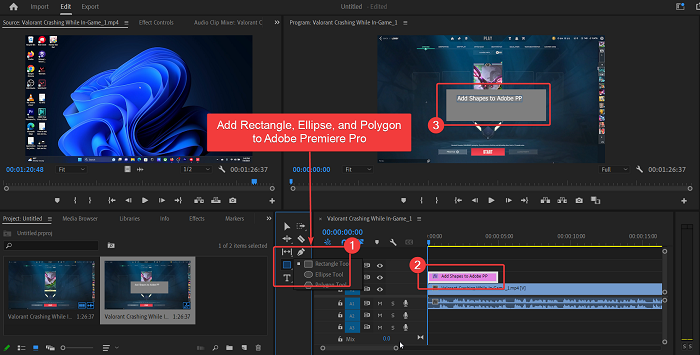
- Just left to the timeline window, you will notice a few elements. One of these elements would be of the shape of a rectangle.
- Pick the Rectangle shape.
- Now, you can create a rectangle of any size in the program window of Adobe Premiere Pro.
The rectangle will appear from the second you create it to a few seconds later. It will appear as a pink layer on top of your timeline.
You can increase or decrease the length of the pink layer to increase or decrease the duration of the appearance of the rectangle.
Add an ellipse or polygon to Adobe Premiere Pro
An ellipse is the basic shape of an oval and a circle. It can be used to create ovular and circular shapes. The procedure to add a circle or oval to Adobe Premiere Pro is as follows:
- Add a sequence to the Adobe Premiere Pro timeline.
- Now, place you playhit at the point from which you want your circle to start appearing.
- Click and HOLD on the rectangle symbol on the tray just right of the timeline window.
- You will notice the option for ellipse shape and polygon. Choose the shape of your choice.
- Now, add the shape to the video on the Program window.
- The shape will appear as a surplus pink layer over the timeline.
You can drag to increase or decrease the length of the pink layer to increase or decrease the duration of the shape that will appear.
Add shape effects to rectangle, ellipse, or polygon shapes in Adobe Premiere Pro
If you wish to add shape effects to rectangle, ellipse, or polygon shapes in Adobe Premiere Pro, then the procedure is as follows:
- Click on the pink layer of the shape in Adobe Premiere Pro to highlight the shape.
- Click on Effects control in the Source window.
- You can change the color filled in the shape with a color of your choice.
After this, you can change the color of the border and its thickness from the Stoke column.
Add other shapes to Adobe Premiere Pro

While it is easy to add a rectangle, ellipse, and polygon to the Adobe Premiere Pro timeline, we can add other shapes too. These shapes are not available in Adobe Premiere Pro, thus we can import them.
- Find these shapes on Canva. You can use the free version.
- Download the shapes from Canva keeping the background transparent.
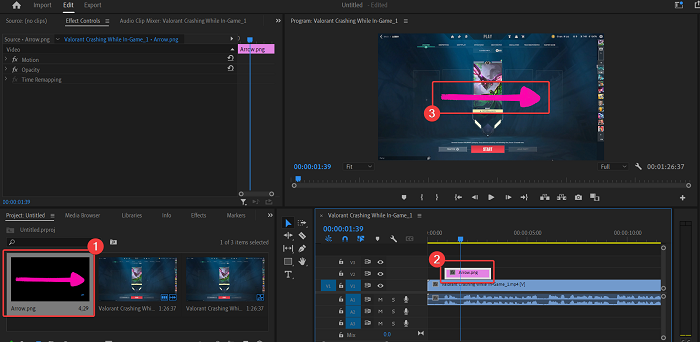
- Now, go to the Project window in Adobe Premiere Pro.
- Double-click on the pane and import the shape you downloaded.
- Now, add that shape to the timeline as an extra pink layer.
Please note that you cannot change the effects of these shapes in Adobe Premiere Pro. Thus, it must be done in Canva itself.
Can you add shapes in Premiere Pro?
You can add limited shapes in Adobe Premiere Pro. Eg. The shapes that can be added are those of rectangle, ellipse, and polygon. If you are an artist, then you can also use the pen tool for creating shapes. Lastly, you can create shapes on third-party software products and import the same.
How do you add animated shapes in Premiere Pro?
To animate shapes, you can first create shape effects by making changes in the Effects control column. Then, you can change the position and other effects as you move across the timeline. Other than this, you can create animations in Canva for free and then add them to your Adobe Premiere Pro timeline.
Leave a Reply