Looking for a solution to add subtitles to your videos in Windows 11/10? We got you covered! Here is a tutorial to insert subtitles in your video files on Windows 10 PC. In this article, I have mentioned two methods to add subtitles to videos. Let’s check them out!
How to Add Subtitles to your Videos in Windows 11/10
The two methods to add subtitles to your videos in Windows 11/10 are:
- Add subtitles to Videos using existing SRT or another subtitle file.
- Create your own subtitles and add them to your videos.
Let’s discuss these two methods in elaboration.
1] Add subtitles to Videos using existing SRT or another subtitle file
If you already have a subtitle file saved on your PC, you can add it directly to your video. Now, to add subtitles to videos using an existing subtitle file, you can use a free software. Here, I am going to use XMedia Recode which is a portable video processing utility. It can be used for many purposes including video conversion and video editing. In it, you can also find a dedicated option to add subtitles to your videos using an existing file.
How to add a subtitle file to your video using XMedia Recode:
Here are the main steps to do so:
- Download and install XMedia Recode or use the portable edition.
- Launch the software
- Import Video files.
- Go to the Subtitle tab.
- Import a Subtitle file in a supported format.
- Setup output video configuration.
- Press Encode button to save the output video.
Now, let’s talk about these steps in detail!
Firstly, you need to install XMedia Recode on your Windows 10 PC. It also provides a portable version that you can download and use from its official website.
Now, click on the Open File button and import the source video file from your PC. You can import multiple videos at a time.
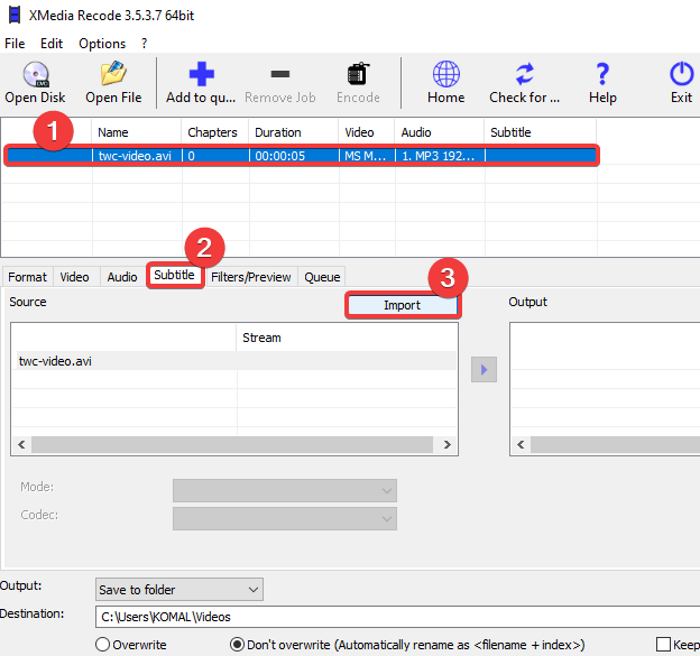
Next, select the video file and move to the Subtitle tab. And, press the Import button. You will be able to import a subtitle file in a supported format like SRT, SSA, ASS, JSS, JS, etc.
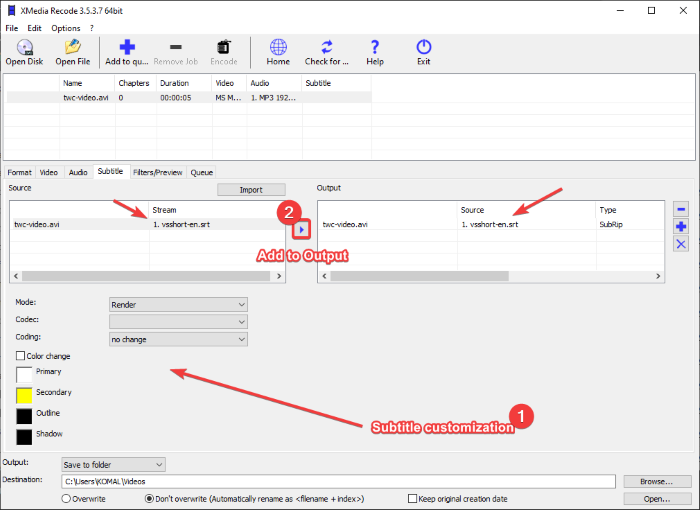
After importing the subtitle file, you will be able to view it in the Source panel. You can customize various subtitle options including Encoding, Colors, Mode, etc. Set up these options accordingly and click on the Add to Output button to add the video to the Output panel.
You can repeat the same process for all the added video files to add subtitles to all of them.
If needed, you can further edit a video by going to the Filters/ Preview tab. You can find editing options like resize, rotate, flip, crop, invert, clip speed, mirror effect, sharpness, blur, and more in it.
Next, go to the Format tab and there you can customize a lot of output video configurations, like output video format, output destination, etc.
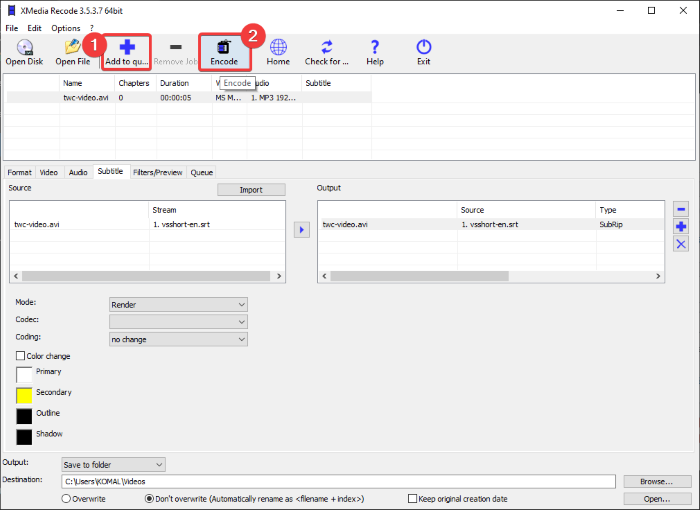
Finally, select videos and click on the Add to queue option and then press the Encode button. It will process your video files and add subtitles to them.
You can get this software from xmedia-recode.de.
2] Create your own subtitles and add them to your videos
If you don’t have any existing subtitle files, you can create a new one. For that, I will be using a free video editor with a subtitle editing feature. This free software is called VSDC Video Editor. This software lets you create and add subtitles to videos. Apart from creating new subtitles, you can also add an existing subtitle file to the video. Let’s check out how you can do that.
How to create subtitles and then add subtitles to videos using VSDC Video Editor:
- Download and install VSDC Video Editor.
- Open the software.
- Import Video file.
- Use the text tool to add subtitles from one specific point to another.
- Save the video.
Firstly, you will have to download and install this free video editor on your PC and then launch its main interface. After that, click on the Import Media Content button from its main screen and open a video file.
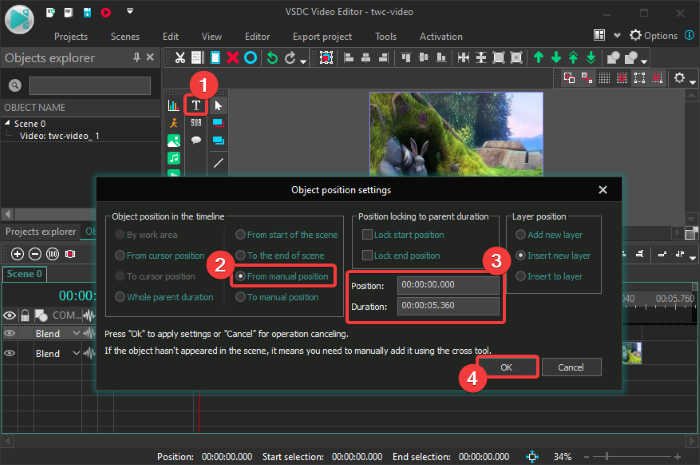
In its main video editing window, you will see the video is added to the timeline. Now, simply click on the Text tool from the toolbar, and an Object position settings window will open up. In this window, click on the From manual position option and then add subtitle position (starting time) and total duration.
Next, click on the video preview and drag the cursor to create a text frame. After that, you can type the subtitle text in the text box. To edit the subtitle text, go to the Editor window and click on the Font drop-down button. Then, customize the font type, font color, subtitle alignment, bold, italic, and many more options.
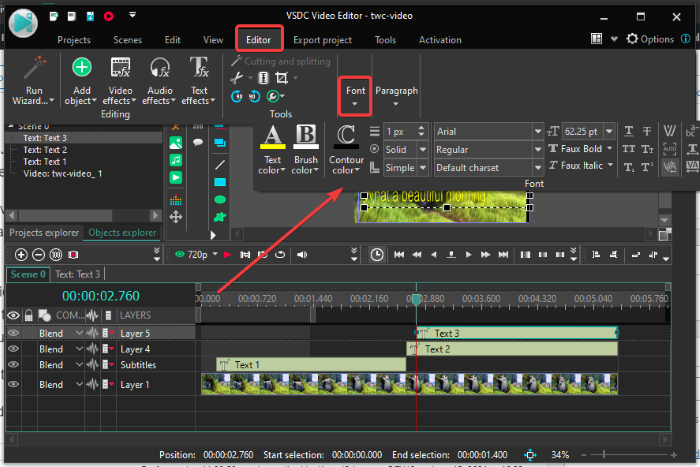
In a similar manner, you can add multiple text layers to add subtitles to your video.
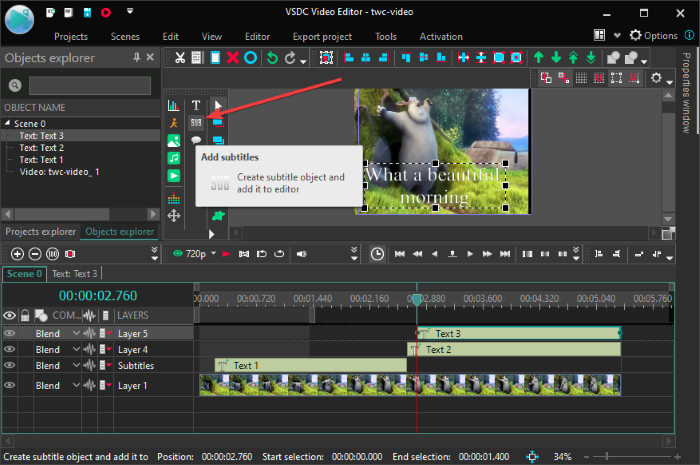
Alternately, you can click on its SUB tool to import a subtitle file in SRT format and add to the video.
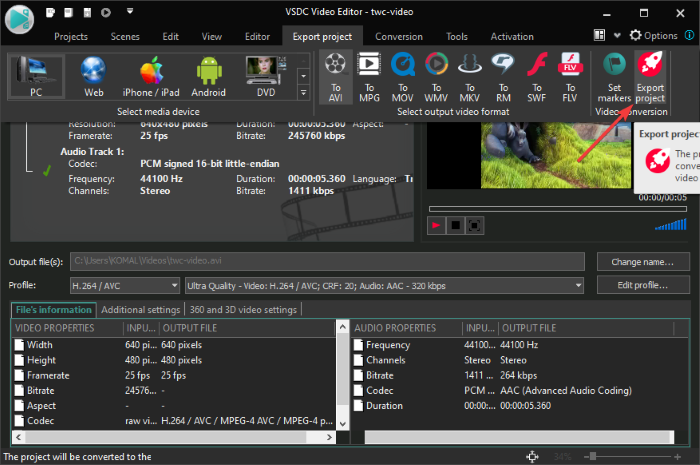
When done, go to the Export Project tab, select a video format, set up output configurations and profile, enter destination location, and then click on the Export Project button. On the next prompt, choose the Continue option and save the subtitled video.
You can download VSDC Video Editor from here.
That’s it!
Now read:
Leave a Reply