If you work with PDFs in, you will at some point want to know how to add or remove a watermark in Acrobat. A watermark is an image or text added in front or behind the contents of a document. Watermarks are used to show ownership and status, or indicate the confidentiality of a document. Watermarks usually have a level of transparency to allow the content of the document to show properly.

Acrobat allows for adding and removing watermarks from documents. If the watermark is added, then there are cases when you may want to remove or even edit the watermark. Watermarks may be removed if the document is bought or is no longer a draft. It is also possible to add multiple watermarks to one or more PDFs in Acrobat. The multiple watermarks must however be added separately. Adobe Acrobat Pro, Acrobat 2020, and Acrobat 2017 can be used for watermarking. Adobe Acrobat Reader (the free version) cannot be used for watermarking. This article will show how to add edit or remove watermarks in Acrobat.
How to add a watermark in Acrobat
The types of watermarks that can be added to a document can be either images or text. You can use the built-in watermark feature in Acrobat to add the watermark when you are editing it. use the following steps to add the watermark to your PDF.
Open the PDF file that you want the watermark to be added to.
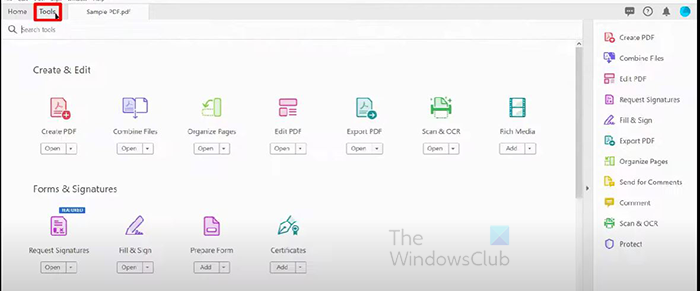
Go to the top of the window and select the Tools tab. The tools page will open and you will see the available tools for you to open or add.
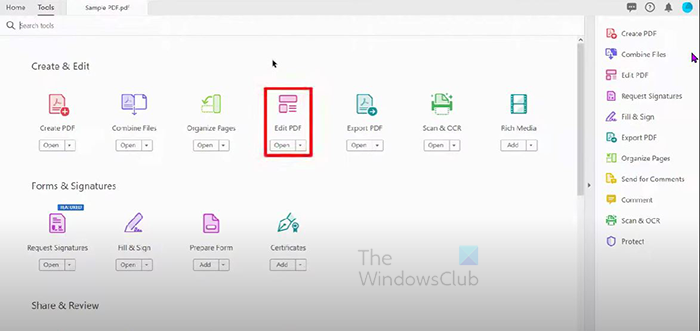
Under the Create and Edit PDF heading click on Edit PDF.

Within your document, the Edit PDF toolbar will appear at the top, click on the Watermark button. A drop-down menu will appear with three options – Add, Update and Remove. In this case, you want to add a watermark to the PDF so click Add.

When the Add option is chosen, the Add watermark window will open.
Adding text watermark
If your watermark is text, ensure that the text option is selected. You then write the text that you want to use as the watermark. You can choose the color you want, underline the text, and choose the text size. You can also choose the alignment whether left, center or right. You can also choose to underline the text.
Adding image watermark
If the watermark is an image, ensure that the File option is selected. When the File option is selected, click the Browse button. When the Browse button is selected the window will appear for you to choose the image file. Choose the file that you want to use then select it and press Open.
Note: Only JPEG, PDF, and BMP files can be used as watermarks in Acrobat.
Adjust the appearance of the Text or Image watermark
Rotation
Under the appearance heading in the Add watermark window, you can adjust the Rotation (angle) of the image or text watermark. The rotation angles available are -45 degrees, None, 45 degrees or Custom, if you select Custom you can adjust the desired degree of rotation using the custom degree value box beside Custom.
Opacity
You can also change the opacity of the watermark image or text. remember that the opacity of the watermark will affect the visibility of the text on the document. You can change the opacity while watching the live preview. You can use the opacity that best fits your document.
Scale Percent
You should then select Scale relative to target page. This will make the waterpark a percentage of the page that it will be placed on. Choose the percentage that you want it to be. This is great because if you change the page size of the document, the watermark will automatically be scaled to fit the new page size.
Location
This is where you choose where you want the watermark to appear in relation to the text in the document. You can choose Appear behind page or Appear on top of page. If you choose Appear behind page the watermark will be placed behind the text or images in the document. If you choose Appear on top of page the watermark will appear on top of the text and image in the document.
Appearance options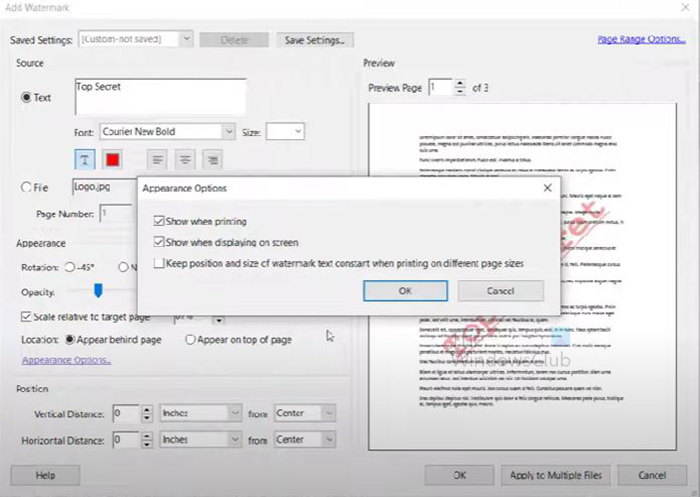
The appearance options is a link that you can click to get more appearance options. When you click the appearance options link, a menu will appear. the options on the menu are – Show when printing, Show when displaying on screen and, Keep position and size of watermark constant when printing on different page sizes. You can make the choices you want then click ok to accept and close the menu.
Position
Here you can choose the unit of measurement that you want the Vertical or Horizontal positions to be measured. The horizontal and Vertical position would be the distance from the Top, Centre, or Bottom.
Page range options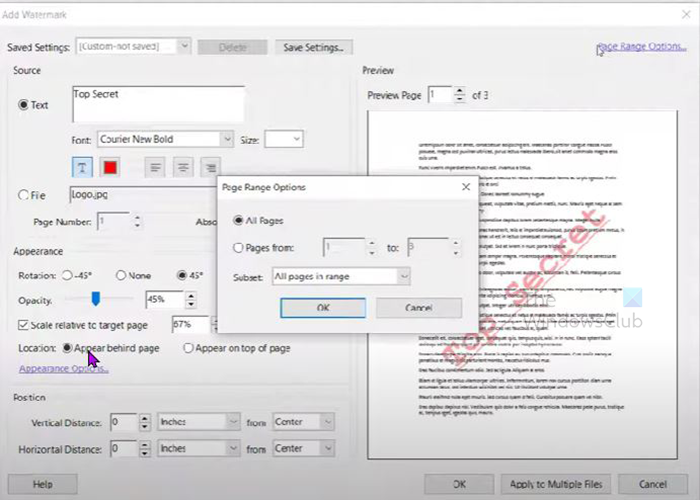
The Page range options is a link that you click so that you can choose where you want the watermark to appear. This option comes in handy if you want to place the watermark on specific pages or a range of pages. If you do not want the watermark on all the pages, click Pages from and choose the range of pages that you want the watermark to appear on. If you have a multi-page PDF document and you want the watermark to be on only one-page place the same number in both boxes. For example, if you want the watermark to appear on page 3 only, place the number 3 in both value boxes for the range.
Subset
The subset option is a part of the Page range options. The Subset option allows you to choose if you want the watermark to appear on all pages in range, even pages only, or odd pages only. To get these options to click the drop-down arrow beside the Subset value box. When you have made your choice select Ok to confirm the choices and close the Page range options window.
When you are satisfied with the watermark options, click OK to close and accept the changes you have made. You will see the watermark appear in the PDF document with the options you have chosen.
You cannot do multiple watermarks at the same time. However, you can repeat the steps to add more watermarks to the document, including texts and images.
How to update a watermark in Acrobat
This allows you to make changes to the watermark that you made. The limitation to this is that you can only edit the first watermark that you made and it will not edit any of the additional watermarks in the document. There is currently no way to edit the additional watermarks that you made in the document.
To begin the update process go to the top of the window and select the Tools tab. The tools page will open and there you select Edit PDF.
The edit PDF toolbar will appear at the top of the document. From the toolbar select Watermark then from the dropdown menu select Update.

The Update watermark window will appear. The Update watermark window offers all the same options as the add watermark window. Make all the necessary updates that you want then click Ok to close and confirm the updates, or click Cancel to close without keeping the updates.
How to remove a watermark in Acrobat
You may want to remove the watermarks from the document for any reason. To remove the watermarks, follow the instructions below. Note that the removal process will remove all the watermarks in the document. There is currently no way to remove a specific watermark from the document.
To remove the watermark, go to the top of the document and select the Tools tab. The tools page will open and there you select Edit PDF.
The edit PDF toolbar will appear at the top of the document. From the toolbar select Watermark then from the dropdown menu select Remove.
When you select Remove, a dialogue box will appear asking you to confirm that you want to remove the watermark permanently. If you are sure that you want to remove the watermark, press Yes or select No to cancel the removal. If you choose Yes, the watermark will be removed from the document.
Read: Best tools to add Watermark to Image online free
How to add watermark to multiple PDFs at once using Adobe Acrobat
If you work with lots of PDF documents, you may want to add watermarks to multiple documents at once. For example, you may want to add Confidential, Draft, or any other watermark to multiple PDFs at once. Acrobat allows you to add one watermark to multiple PDFs at once. Follow the steps below to add one watermark to multiple documents at once.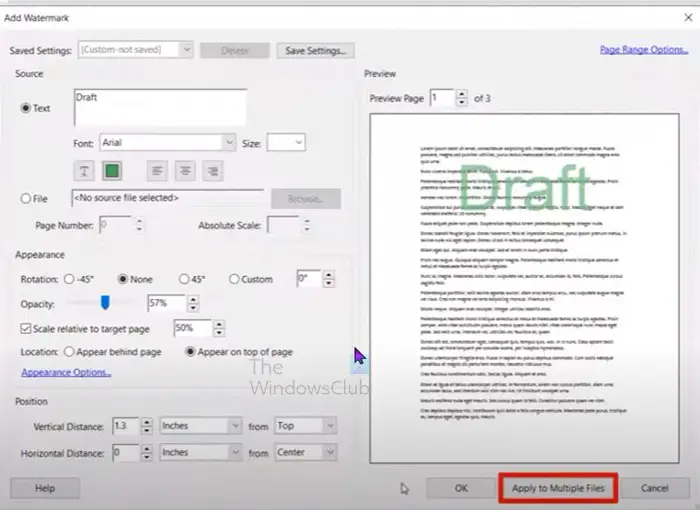
Create the watermark on the PDF as you did in the Adding watermark section of this article. When you are finished creating the watermark click the Apply to multiple files button in the Add watermark window.
The Watermark add window will appear showing the current document that you are in. Click the Add files button to get to the next step.
An option will drop down with Add files and Add open files. You can then click on any one and a dialogue box will appear for you to choose the files or the Open files to add the watermark to. You can click one then hold Ctrl and click the others to add. Click Ok on the window to get the files into the Add window then Click Ok on the Add Watermark window.
When you click Ok an Output options window will appear. Here you can choose the options for the output of the PDFs that you are adding the watermark. You can choose the target folder for the files to which the watermark is added. You can choose to keep the original file names. You can choose to overwrite the original files. When you have chosen the options that you want, click Ok to confirm. When you click Ok the PDFs that had the watermark added will be opened as tabs or as separate windows depending on your software settings. You can then choose to save the PDF files as you wish.
Read: Adobe Acrobat Reader DC not showing bookmarks
What is the difference between a watermark and a stamp in Acrobat?
A watermark is integrated into PDF pages as a fixed element. Watermarks are used to show ownership, and status, or indicate the confidentiality of a document. A stamp is a type of PDF comment, that others reading the PDF can open to display a text annotation, move, change, or delete.
Read: Best Free Watermark software for Windows
Are there other ways to add a watermark to a document?
There are other ways to add a watermark to a document. You can add a watermark in Microsoft Word or another Microsoft Office app. If you want this document to be a PDF, you can convert it to a PDF using Acrobat Pro or using Microsoft Print as a PDF feature. Graphic software such as Photoshop and others can be used to add a watermark to a document that can later be saved or converted to PDF. The advantage of using Acrobat to add the watermark to the PDF is that you can delete or edit the watermark in Acrobat. A great feature of graphic software like photoshop is that you can create images that you can use for your unique watermark in Adobe Acrobat.
Read next: Free Watermark Remover software & Online tool for PC.
Leave a Reply