WSL or Windows Subsystem for Linux for Windows 11/10 support multiuser capabilities. And when it comes to user management for software, various aspects of software management can be discussed. Adding a user to the Windows Subsystem for Linux on Windows 11/10 is one of those aspects. It is worth noting that this method will work only after the distro is all set up.

How to add Users to WSL Distro
There are two main methods to add users to Windows Subsystem for Linux distro on Windows 11/10. They are the following:
- When logged in as a SUDO user.
- When logged in as ROOT.
1] When logged in as a SUDO user

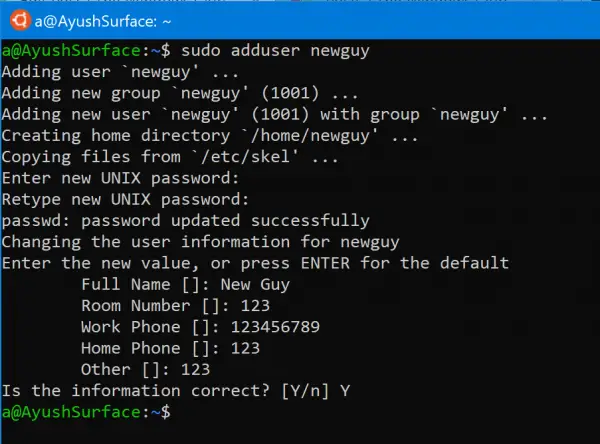
After you have opened your Linux distro and logged in as a SUDO user, enter the following command to add a user:
sudo adduser <USERNAME>
It will ask you to Enter new UNIX password. After you have entered that, you will have to Retype new UNIX password.
Then it will ask for the following details:
- Full Name.
- Room Number.
- Work Phone.
- Home Phone.
- Other.
Then press Y when you get the prompt asking Is the information correct? [Y/n]. Your new user will be added now.
Read: How to import and export WSL distros
2] When logged in as ROOT

In case you are logged in as ROOT, you need to refer to our guide to set a default user. This default user will be the one that you need to use to add a new user. Then, you need to execute the following command to add a user in the same Linux distro:
adduser <USERNAME>
Similar to being signed in as a SUDO user, you need to set up a password and give details like Full Name, Room Number, Work Phone, Home Phone, Other.
Enter Y to confirm the details that you just entered.
Voila! You can now set it back to create another default user if you want.
I hope you found this guide useful.
Read next: How to set default user, switch user, and remove a user for WSL.
Leave a Reply