BITS or Background Intelligent Transfer Service uses Windows BranchCache in Wide Area Network (WAN). It uses the BranchCache when a remote computer requests data from the host computer in an office or big organization. If you want to allow or block the BITS client from using Windows Branch Cache across all computers in your organization, here is how you can do that.
What is Windows BranchCache?
Windows BranchCache is a wide area network (WAN) bandwidth-optimization feature in Windows operating system. When users access the content on the remote servers, this feature fetches content from hosted cloud content servers or the main office and caches the content to access content locally instead of WAN.
Allow or block BITS client from using Windows BranchCache
To allow or block BITS client from using Windows BranchCache using Group Policy in Windows 11/10, follow these steps:
- Press Win+R to open the Run dialog.
- Type gpedit.msc and press the Enter button.
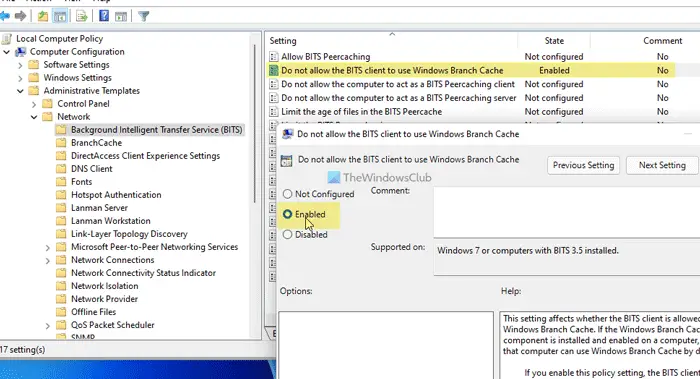
- Navigate to Background Intelligent Transfer Service in Computer Configuration.
- Double-click on the Do not allow the BITS client to use Windows Branch Cache setting.
- Select the Enabled option.
- Click the OK button.
At first, you need to open the Local Group Policy Editor on your computer. For that, press Win+R to display the Run dialog. Then, type gpedit.msc and press the Enter button. Once the Local Group Policy Editor is opened, navigate to this path:
Computer Configuration > Administrative Templates > Network > Background Intelligent Transfer Service (BITS)
Here you can see a setting called Do not allow the BITS client to use Windows Branch Cache. You need to double-click on it. Then, choose the Enabled option to allow and Disabled option to block BITS clients to use Windows Branch Cache on Windows 11/10 PC.

Click the OK button to save the change.
In case you want to revert the change, you need to open the Local Group Policy Editor > navigate to the same path > open the Do not allow the BITS client to use Windows Branch Cache setting > and choose the Not Configured option.
Allow or block BITS client to use Windows Branch Cache
To allow or block BITS client to use Windows Branch Cache using Registry, follow these steps:
- Press Win+R to open the Run prompt.
- Type regedit and hit the Enter button.
- Click on the Yes option.
- Navigate to the Windows in HKLM.
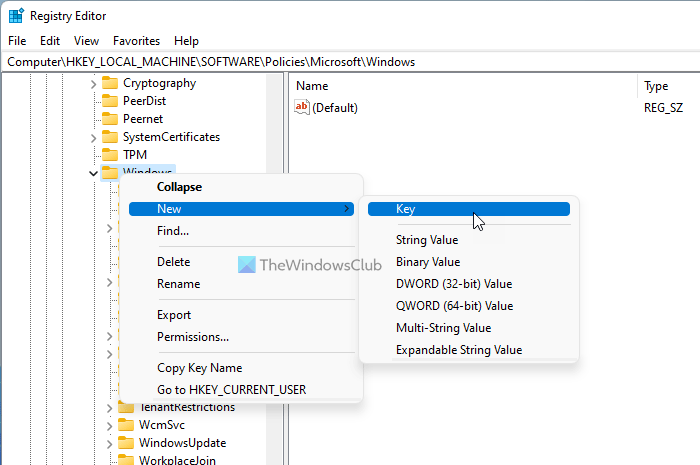
- Right-click on Windows > New > Key.
- Name it as BITS.
- Right-click on BITS > New > DWORD (32-bit) Value.
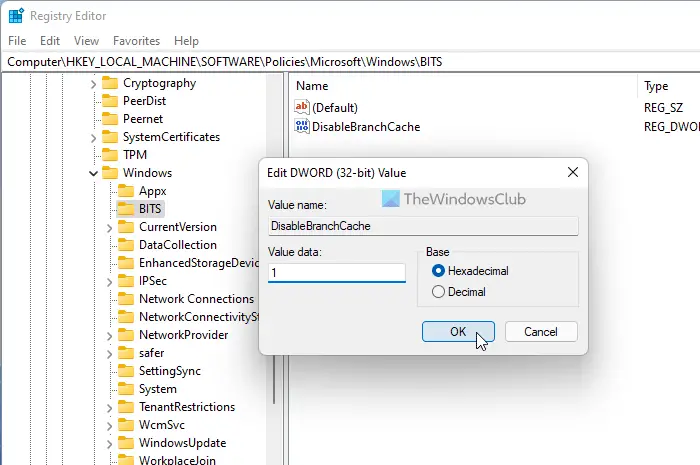
- Name it as DisableBranchCache.
- Double-click on it to set the Value data.
- Enter 1 to block and keep it 0 to allow.
- Click the OK button.
- Restart your computer.
Let’s check out these steps in detail.
To get started, press Win+R to open the Run prompt, type regedit, and press the Enter button. Click on the Yes button in the UAC prompt. After opening the Registry Editor, navigate to this path:
HKEY_LOCAL_MACHINE\SOFTWARE\Policies\Microsoft\Windows
Right-click on the Windows key, select New > Key and set the name as BITS.

Here you need to create a REG_DWORD value. For that, right-click on the BITS key, select New > DWORD (32-bit) Value, and set the name as DisableBranchCache.
Then, double-click on this REG_DWORD value to set the Value data. Enter 1 to block and keep it 0 to allow the BITS client to use Windows Branch Cache.

Once done, click on the OK button and reboot your computer.
Read: Background Intelligent Transfer Service stopped & not working.
How do I enable BranchCache?
To enable BranchCache, you can use Windows PowerShell on the server. For this, run Windows PowerShell as administrator, and execute the following command:
Enable-WSSBranchCache
To disable or turn BrachCache off, use this command:
Disable-WSSBranchCache
That’s all! Hope this guide helped.
Read: Block Firefox from using Windows BITS Service to download updates
Leave a Reply