If you want to know how to apply Shared Mailbox Retention Policy in Office 365, then please read this post. A retention policy is a collection of retention tags that define how folders and individual items (such as email and voice mail) are retained in the shared mailbox in Office 365 before being archived or erased permanently. Many business organizations require proactively retaining their mailbox content for compliance reasons. Retention policies help in managing the risks involved with loss of information that may cause legal complications.
How to apply Shared Mailbox Retention Policy in Office 365
To apply a retention policy to a shared mailbox, you need to create retention tags and a new retention policy, attach the tags to the policy, and then apply the policy to the shared mailbox.
Here’s how you can apply a shared mailbox retention policy in Office 365:
- Log in to the Exchange Admin Center.
- Create personal retention tag(s).
- Create a new retention policy.
- Attach personal tag(s) to the retention policy.
- Apply the retention policy to shared mailbox.
Let us see this in detail.
1] Login to the Exchange Admin Centre
Log in to the Exchange Admin Center (https://outlook.office365.com/ecp) using your administrator credentials.
Tip: Use your browser in private/incognito mode to access your Exchange admin account. This will prevent the browser from automatically picking your current credentials while you’re being directed to the site.
2] Create personal retention tag(s)
A retention tag can be one of the following three types:
- Default Policy Tag (DPT) – applied automatically to the entire mailbox.
- Retention Policy Tag (RPT) – applied automatically to a default folder (Inbox, Sent Items, etc.), and
- Personal Tag – applied manually by users to individual items and folders.
Using a personal tag, you can create an exception to a default policy tag or a retention policy tag. For example, if a DPT says delete all items in 5 years, you can create an exception for ‘notifications’ to be deleted in 7 days, using the personal tag.
To create a personal tag, follow these instructions:
- Click on compliance management on the left panel of your Exchange Admin Center dashboard.
- Then click on retention tags tab on top of the page.
- You will see a list of existing retention tags. Click on the plus (+) icon on top of this list.

- Select applied by users to items and folders (personal) in the dropdown that appears.
- Enter Name, Retention Action, and Retention period for the tag in the new tag applied by users to items and folders (personal) window.
- Click on the Save button.
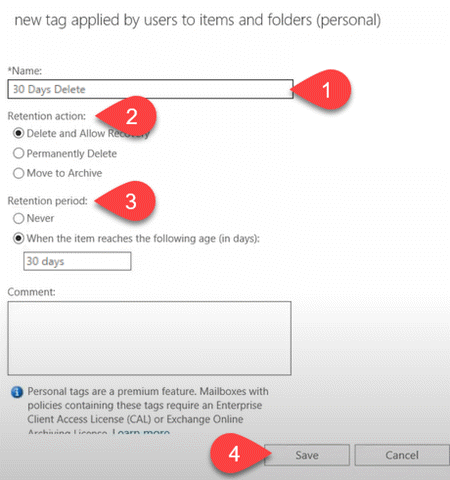
Similarly, you may create more tags to be attached to your shared mailbox’s policy.
Also Read: What is the difference between Microsoft Office and Microsoft 365?
3] Create a new retention policy
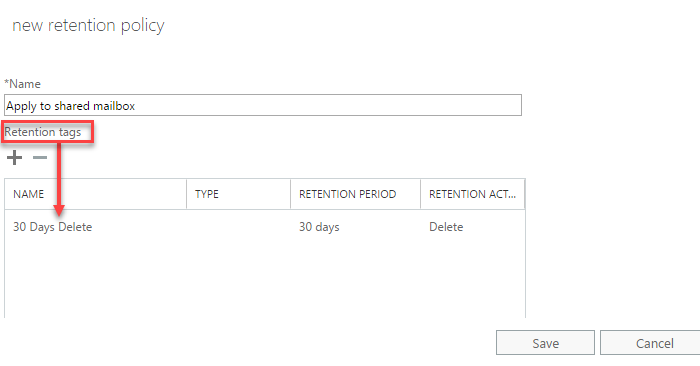
- Go to the retention policies tab that appears on top of the compliance management page. You will see a list of existing policies.
- Click on the plus (+) icon to create a new policy.
- Enter a suitable Name for the policy.
- Attach one or more tags to the policy (as described in the next section).
- Click on the Save button.
Also Read: Install Group Policy Management Console in Windows 11/10.
4] Attach personal tag(s) to the retention policy
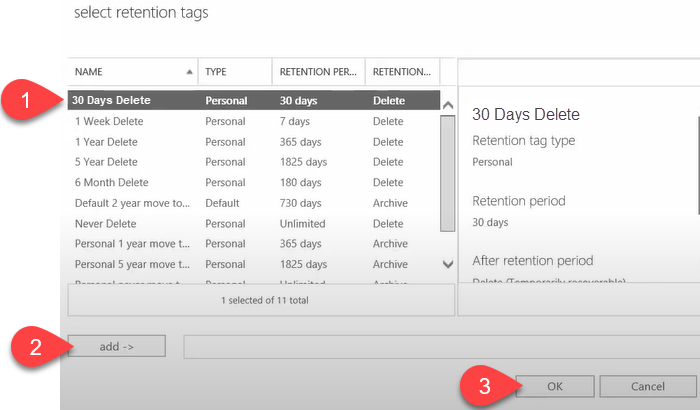
- In the retention policy window, click on the plus (+) icon. This will open a select retention tags window, displaying a list of available tags.
- Select the personal tag(s) you’ve created and click on the Add button.
- Then click on the Ok button.
5] Apply the retention policy to shared mailbox.
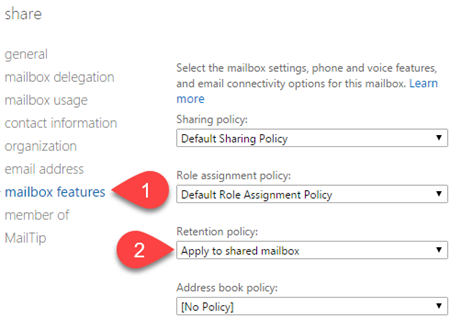
- On the left panel of your Exchange admin account, click on recipients.
- Then click on the shared tab on top. You will see a list of existing shared mailboxes.
- Double-click on the shared mailbox to which you would like to apply the policy.
- Click on mailbox features on the left panel.
- Select the policy using the Retention policy dropdown.
- Click on the Save button.
Notes:
- Only administrators can create and apply retention policies to shared mailboxes in Office 365.
- It is required to have at least 10 MB of data in mailboxes before retention policies can be applied to them.
- A retention policy usually takes up to 7 days to come into effect.
- You can create one or more retention tags, but apply only one retention policy to a mailbox at a time. So link all the tags that you want to apply to the mailbox to a single retention policy.
Can we apply retention policy to shared mailbox?
Yes. You can apply a retention policy to a shared mailbox using the mailbox features option. This can be found by double-clicking the shared mailbox under the shared tab in the recipients section of the Exchange admin center. Bear in mind that only one policy can be applied to a mailbox at a time. So you need to link all necessary tags to a single policy that you are going to apply to the mailbox.
How do I change the default retention policy in Office 365?
How do I apply a retention policy in Office 365 mailbox?
You can apply a retention policy to a single mailbox or multiple mailboxes in Office 365 using the Exchange admin center. To apply a retention policy to a single mailbox, go to Recipients > Mailboxes. Then select the desired mailbox and click on the edit icon on top. Click on Mailbox features on the left. Select a retention policy using the available dropdown and click on Save button. To apply a retention policy to multiple mailboxes, select multiple mailboxes using the Shift or Ctrl key. Then select More Options > Retention Policy > Update. After this, select the desired policy in Bulk Assign Retention Policy and click on the Save button.
Leave a Reply