In this post, we will show you how to blur or pixelate an image on Windows 11/10. If you want to hide part of an image from the viewers, you can blur or pixelate that part, leaving the rest of the image intact. The blur effect fades that specific part into the background, bringing the rest of the image into focus (and vice versa). Pixelate effect stretches the image to a point where individual pixels become visible. Both of these photo effects work like charms to conceal specific parts in an image, such as a face or some other sensitive part or information that you don’t want to disclose to the viewer.
![]()
Pixelated and blurry are two different things, though they may appear similar. Blur happens when the image appears to be out of focus, whereas pixilation happens when the pixels that make up the image are stretched to an extent that they become visible to the naked eyes. Pixilation creates a jagged effect in the image as compared to blur, which creates a soft grainy effect.
How to Blur or Pixelate an Image on Windows 11/10
In one of our previous posts, we’ve covered the best free online tools that let you blur or pixelate images. In this post, we will show you how to blur or pixelate an image on Windows 11/10 using Windows built-in apps and some third-party image editing software for PC. Here’s the list of tools we are going to cover in this article:
- Microsoft Paint
- Microsoft Word/PowerPoint
- GIMP
- Paint.NET
- Photoshop Express
Let us have a look at how these tools can help in blurring or pixelating part of an image, or the entire image.
1] Microsoft Paint
![]()
MS Paint is Microsoft’s classic image editing software that comes pre-installed in all versions of Windows. It offers some basic image editing functions, such as crop, resize, flip, rotate, and annotate. Though it doesn’t have a dedicated blur or pixelate feature, if you want to blur an image without downloading a specialized tool, you can use a simple trick to create a pixelate effect in images using MS Paint. Here’s the trick:
- Launch MS Paint.
- Open the desired image in MS Paint using the File > Open option.
- Select the area that you want to blur using the ‘Select‘ tool listed in the toolbar. You can choose between Rectangular or Free-form selection.
- Take your cursor to the bottom-right corner of the selection.
- Click and hold, and drag the selection inwards.
- Decrease the size of the selection to about 10% of its original size.
- Do not deselect.
- Now again take your cursor to the bottom-right corner of the selection.
- Drag it outwards to bring it back to its original size. This will create a pixelated effect on the selected area.
- Repeat steps 3-9 to deepen the effect.
Keep in mind that this is just a trick and not a permanent solution to blur images. If you want a proper blur effect, move to the next option.
2] Microsoft Word/PowerPoint
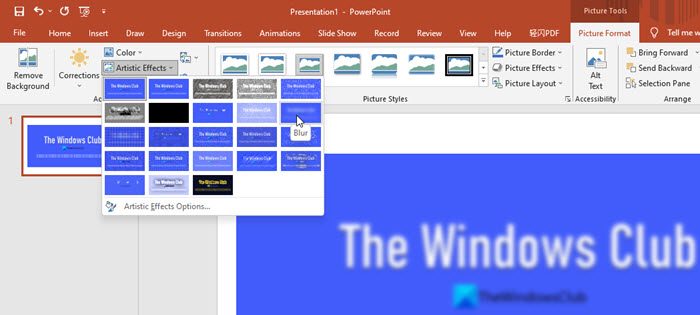
Both Microsoft Word and PowerPoint feature a Blur artistic effect that can be applied to the images used in Word or PowerPoint. If you occasionally need to blur an entire image, you can use either of these software, which are part of the Microsoft Office suite that you might already be having on your Windows 11/10 PC. Here’s how you can blur images using Microsoft Word or PowerPoint:
- Launch Word or PowerPoint.
- Open a blank document or presentation.
- Insert the desired picture in the document or presentation using the Insert > Pictures option.
- Go to the Picture Format tab.
- Under the Adjust section, click on the Artistic Effects dropdown.
- Select the Blur effect (fifth option in the second row).
- To modify the blur effect, select the Artistic Effects options. A panel will appear on the right.
- Adjust the Radius slider to increase or decrease the blur effect.
You can also create this blur effect in Microsoft Word/PowerPoint using the Picture Correction options as explained below:
- Select the picture.
- Switch to the Picture Format tab.
- Click on the Corrections dropdown within the Adjust section.
- Select ‘Picture Correction Options…‘.
- In the Format Picture panel on the right-hand side, move the Sharpness slider to the left till you get the desired blur effect.
Note: The blur effect works on the entire image in MS Word/PowerPoint. In case you want to blur only a specific part, you can use MS Paint or download one of these image editing tools we are going to suggest next.
Also Read:
3] GIMP
GIMP is a powerful open-source image editing software available for Windows 11/10 both. It offers a wide variety of tools that lets you edit images with ease. You can read GIMP’s complete review here. Interestingly, you can use more than 1 tool in GIMP to create a blur effect. Let’s see how to blur or pixelate an image in Windows 11/10 using GIMP.
- Click on this link to open the GIMP app page in Microsoft Store.
- Click on the Get button to download and install GIMP on your system. Since GIMP is a heavy software, the download and installation will take a little bit of time.
- Once the installation finishes, click on the taskbar Search icon.
- Type gimp and select the program from the list of search results. GIMP will launch on your Windows PC.
- Open the desired image in GIMP using the File > Open option.
Once the image is opened, you can use one of the following three methods to create the blur or pixelate effect:
A] Blur part of the image using the Blur tool
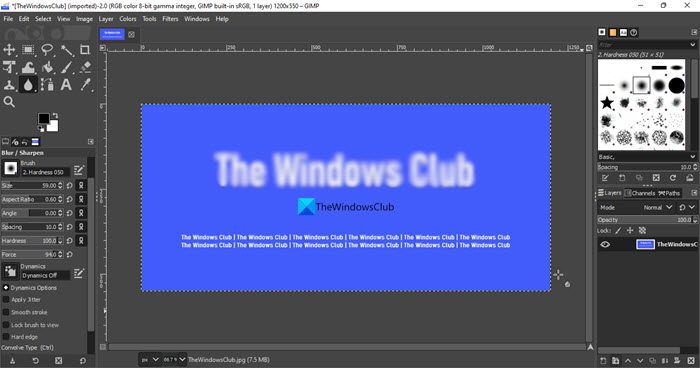
- Click on the Tools menu.
- Select Paint Tools > Blur / Sharpen.
- From the settings panel on the left, move the Size slider to adjust the brush size.
- Scroll down to the bottom and increase the Rate option to 100.
- Now using your mouse, take the blur tool over the area of the image which you want to blur.
- Click and hold, and move the tool over the area repeatedly till you get the desired blur effect.
B] Blur part of the image using the Smudge tool
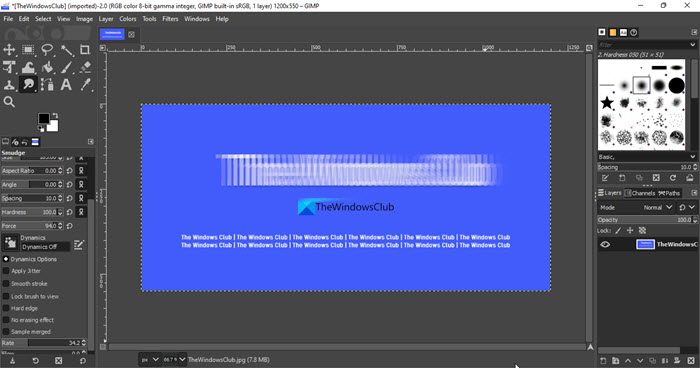
- On the tools panel on the left-hand side, right-click on the Blur tool to view other tools in the same tools group.
- Select the Smudge tool.
- Adjust the value of the Rate option to 40 or something.
- Take your mouse pointer to the beginning (middle-left) of the section which needs to be blurred, and do a left mouse click.
- Press the Shift key; a line will appear as you move the pointer (keeping the shift key pressed).
- Move the pointer to make a horizontal line.
- Left-click again and release the Shift key.
C] Blur/ Pixelate an entire image using the Blur filters
![]()
The above 2 methods will help you blur a specific part of the image in GIMP. If you want to blur the entire image, you can use the Blur filters.
GIMP offers more than one blur filters (such as Focus Blur, Gaussian Blur, Lens Blur, Median Blur, etc.) that help in creating different blur effects on the given image. It also offers a Pixelize feature that’s part of its Blur effects.
To apply a blur effect, select Filters > Blur > Focus Blur. To apply the Pixelate effect, select Filters > Blur > Pixelize.
Note: To pixelate a specific part of the image, select that part using the selection tool and then apply the Pixelize effect.
You may also adjust the filter settings to make things more blurry or pixelated, as per your requirement.
4] Paint.NET
Paint.NET is yet another free image editing software that you may install to blur or pixelate an image on Windows 11/10. It offers a wide range of powerful tools and features that makes it comparable to some premium photo editors, such as Adobe Photoshop and Corel PaintShop Pro. Read more about Paint.NET here. Let us now see how the Blur and Pixelate features work in Paint.NET.
- Click on this link to visit the official download page for Paint.NET.
- Download the free version of Paint.NET. A zip file will be downloaded on your PC.
- Unzip the file and double-click on the Installer.
- Wait for it to download, install, and finish setting up Paint.NET.
- Launch Paint.NET.
- Open the desired image using the File > Open option.
Now use one of the following methods to create the blur or pixelate effect:
A] Blur an image using Paint.NET
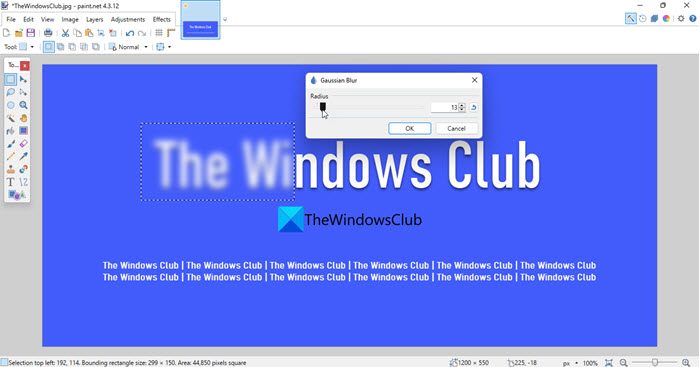
- Click on the Effects menu on top.
- Select Blurs > Unfocus. You can also try Gaussian Blur or Motion Blur.
- Move the Radius slider to adjust the blur effect as per your need.
B] Pixelate an image using Paint.NET
![]()
- Click on the Effects menu.
- Select Distort > Pixelate.
- Move the Cell size slider to adjust the pixelate effect.
Note: To apply the blur/pixelate effect to a specific area in the image, select the area using the selection tool listed in the toolbar on the left side of the Paint.NET window, and then apply the effect.
5] Photoshop Express
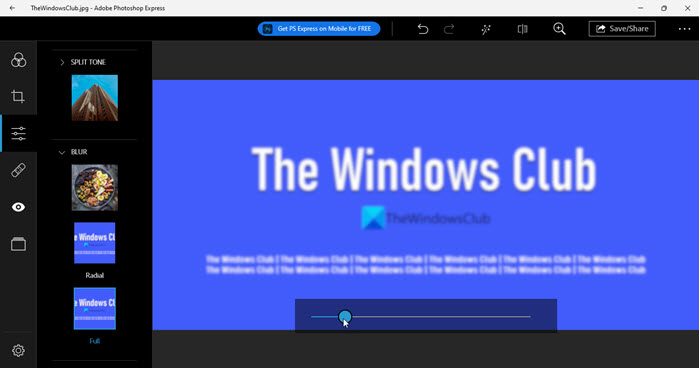
Last on the list is the Photoshop Express app for Windows 11/10. This app is a simpler version of the Adobe Photoshop app. The app was primarily designed for mobile photography. Later, Adobe released a stable version of it for Windows 11/10. Photoshop Express can be used to do basic editing with images. Here’s how you can use the app to blur images:
- Click here to download and install Photoshop Express from the Microsoft Store.
- Once installed, launch the app.
- Sign up or sign in using your Google, Facebook, or Adobe account credentials.
- Click on the Picture Library icon to browse and open the desired image.
- Select the Corrections option on the left panel.
- Scroll down to locate Blur.
- Click on the right arrow (>) icon to view all available Blur effects.
- Click on the Full option. The image will be blurred.
- Adjust the slider to deepen the blur effect as per your need.
Photoshop Express will blur the entire image. If you need to blur a specific part or instead pixelate the image, use other tools discussed in this post.
This sums up the list of apps that can be used to blur or pixelate an image on Windows 11/10 PC. Hope you find these apps useful. Do share your feedback or queries in the comments section below.
How do I pixelate an image in Windows 11?
You can pixelate an image in Windows 11/10 using MS Paint, which is a native Windows app. Launch the Paint app and open your image in it. Then select the area which you want to pixelate using the selection tool. Now take your mouse pointer to the bottom-right corner of the selection, click and hold, and drag the selection inwards to reduce its size. Leave it for a moment but do not deselect. Then move the selection outwards to bring it back to its normal size. This will create a pixelated effect in the selected area.
How do I blur part of a picture in Windows 11/10?
To blur a picture, you can open it in Microsoft Word or PowerPoint and apply the Blur Artistic effect on the picture. If you want more control over blur, download GIMP or Paint.NET. Both of these apps are free and can be used to apply the blur or pixelate effect over part of an image or the entire image. You can follow the instructions described in this post to blur the picture as per your requirement.
Read Next: Best free Batch Photo Editor software for Windows 11/10.
Leave a Reply