Although Windows 11/10 enables Battery Saver automatically when it reaches 20%, there is no option to change the percentage of the brightness of your screen. That is why you can follow this tutorial to change the percentage of brightness when using Battery Safer in Windows 11 or Windows 10.

Battery Saver is an important feature on your Windows laptop, which allows you to save battery by reducing the background process and screen brightness. No matter whether you have 100% or 50% brightness when Battery Saver kicks in, it reaches 30% automatically. There is no option in Windows Settings to change the brightness level when the Battery Saver sets off. That is why you can use this step-by-step guide to get the job done.
For your information, we are about to use the Windows Terminal for this purpose. Although the Windows PowerShell instance is not mandatory, it is recommended to use the Windows PowerShell in Windows Terminal to set the brightness percentage.
Change Brightness when using Battery Saver in Windows
To change the percentage of brightness when using Battery Saver in Windows 11/10, follow these steps:
- Press Win+X to open the WinX menu on your PC.
- Select the Windows Terminal (Admin) option.
- Click on the Yes option.
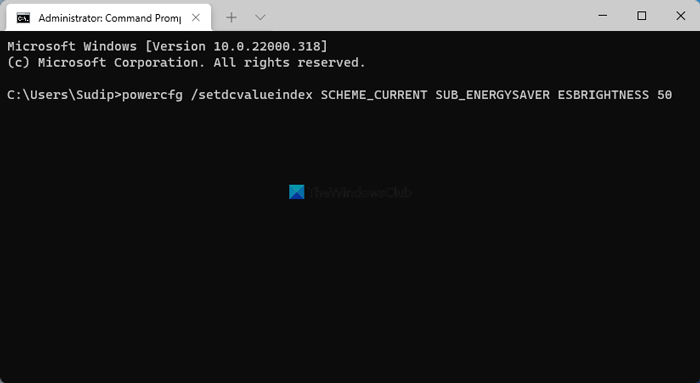
- Type this command: powercfg /setdcvalueindex SCHEME_CURRENT SUB_ENERGYSAVER ESBRIGHTNESS <brightness-percentage>
- Press the Enter button.
To learn more about these steps, continue reading.
At first, you need to open Windows Terminal with administrator privilege. Although there are multiple methods, you can use the WinX menu to get it done. To get started, press Win+X to open the WinX menu on your computer. Following that, select the Windows Terminal (Admin) option. If the UAC prompt appears, click on the Yes option to open the elevated Windows Terminal window.
After that, type the following command:
powercfg /setdcvalueindex SCHEME_CURRENT SUB_ENERGYSAVER ESBRIGHTNESS <brightness-percentage>
Don’t forget to replace <brightness-percentage> with the desired brightness percentage you want to enable. For your information, you can enter any number from 0 to 100 – 100 being the brightest.

Press the Enter button.
From now onwards, whenever your computer enables the Battery Saver, it will set the screen brightness as the predefined percentage.
Read: Prevent Windows from decreasing brightness when using Battery Saver.
How do I change brightness when charging?
To change the brightness when charging your Windows 11 or Windows 10 laptop, you can use the same method as you do when not plugged in. In other words, you can change the brightness using the brightness slider. To get the brightness slider, you can click on the Quick Actions panel and use your mouse to increase or decrease the brightness.
How do I adjust the brightness on my Windows 11/10 battery?
To adjust the brightness on your Windows 11/10 battery, you need to use the brightness slider. It is available in the Quick Actions panel. You can click on your battery icon on the Taskbar and use the mouse to increase or decrease the brightness. Some laptops also offer hardware control that helps you adjust the brightness by 10% every time you press it.
That’s all! Hope this guide will be helpful for you.
Leave a Reply