Windows Terminal provides a built-in feature to change the appearance of a profile (Command Prompt, PowerShell profile, etc.) using the different options. For example, there are options available to change font size and font weight for a profile, change background image, turn on retro terminal effects, and more. The option to change the color scheme for a profile is also available in Windows Terminal. So, if you want to use Windows Terminal with a different color scheme for a profile on a Windows 11/10 computer, then this post is helpful.
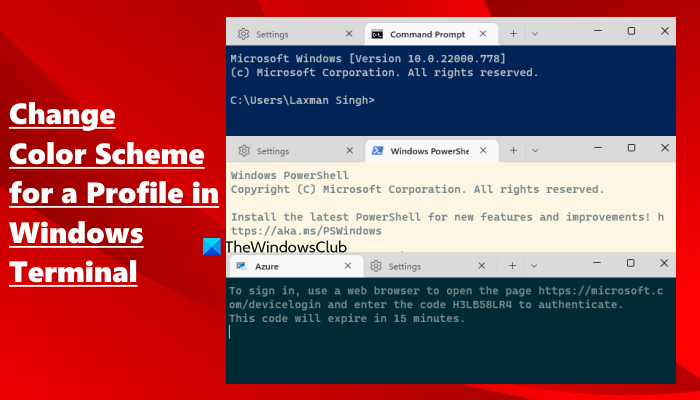
There are a total of 9 color schemes to choose from that include One Half Dark, Solarized Dark, Campbell, Tango Dark, Vintage, Campbell Powershell, Tango Light, Solarized Light, and One Half Light. You can select the same or different color scheme for Windows Terminal profiles. Apart from that, you can also create and set a custom color scheme for a profile. This post has covered all these options separately with step-by-step instructions.
How to change Color Scheme for a Profile in Windows Terminal
There are two ways to change the color scheme for a Windows Terminal profile on a Windows 11/10 computer:
- Using Windows Terminal Settings
- Using Command Palette.
1] Using Windows Terminal Settings
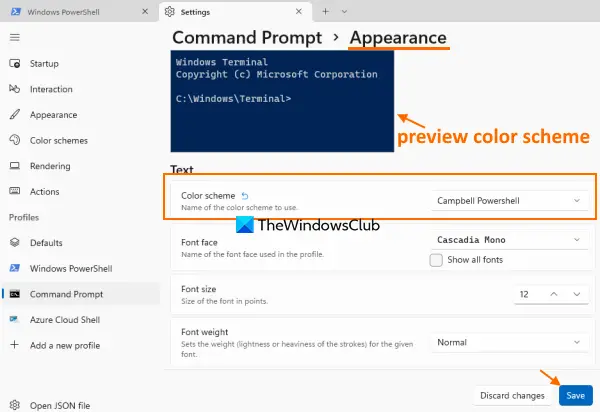
Follow these steps:
- Type windows terminal in Windows 11/10 Search box
- Press the Enter key to open Windows Terminal
- Click on the drop-down icon
- Click on the Settings option
- In the Settings tab, select a profile (available under the Profiles section) from the left side
- On the right-hand part, access the Appearance section. It is available under Additional settings for that profile
- Open the drop-down menu available for the Color scheme
- Select a color scheme
- Press the Save button.
Now whenever you will open that particular profile, the selected color scheme will be visible there. You can repeat the above steps to change the color scheme for another profile in Windows Terminal.
2] Using Command Palette
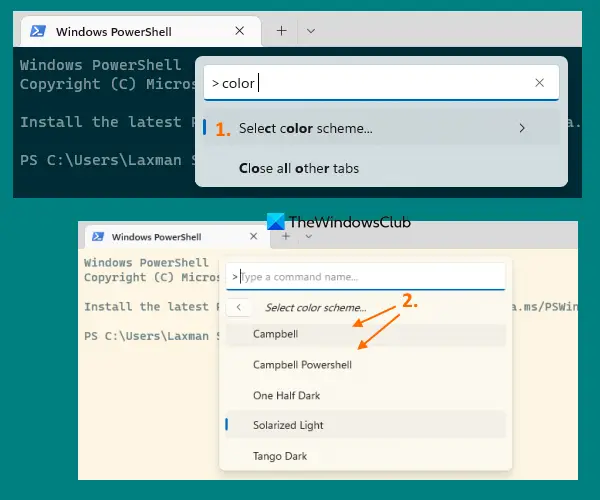
Command Palette feature in Windows Terminal is also helpful to change the color scheme for a profile. However, the change will remain temporary. As soon as you close the tab or Windows Terminal, the color scheme will be gone. This is good when you want a different color scheme for the time being while working on a Windows Terminal profile. Here are the steps:
- Launch Windows Terminal application
- Open a profile
- Open Command Palette using Ctrl+Shift+P hotkey
- Type color scheme in the text box of Command Palette
- Press the Enter key
- Now all the available color schemes will be visible to you in the Command Palette panel. Use the Up and Down arrow keys to preview a color scheme
- Press the Enter key to apply the selected color scheme for that profile.
Related: How to change cursor shape for a Windows Terminal profile.
Create and set a Custom Color Scheme for a Windows Terminal Profile
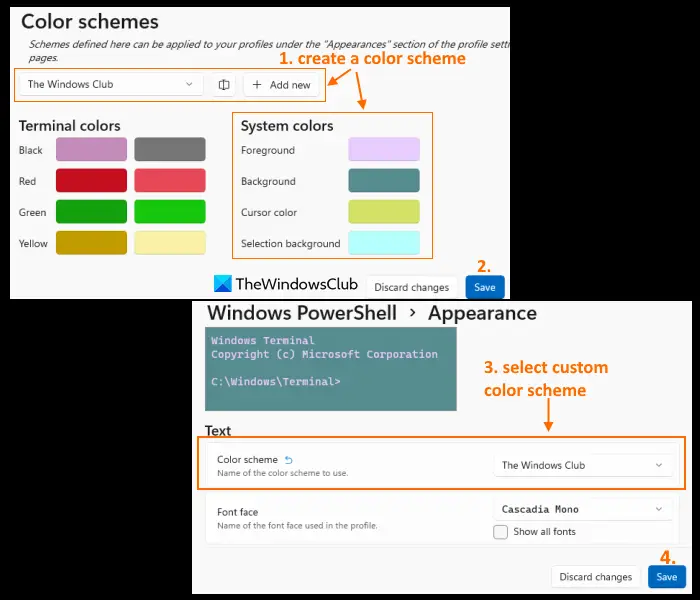
You can create a color scheme with the custom foreground color, background, cursor color, and selection background color. After that, you can set that color scheme for any profile you want. The steps are as follows:
- Open Windows Terminal application
- Use Ctrl+, hotkey to open Settings
- Access the Color schemes section from the left side
- Click on the Add new button available in the top right section. This will add a new color scheme with a default name. You can rename that color scheme using the available option
- There is a separate color bar available for Foreground, Cursor color, Background, and Selection background. Click on a color bar and a color palette will open. Use it to select a color of your choice. Do this for all the available options to create a color scheme
- Press the Save button
- Select a profile from the Profiles section present in Windows Terminal settings
- Access the Appearance section for the selected profile
- Open the drop-down menu for the Color scheme option
- Select the color scheme created by you
- Hit the Save button.
Apply a Color Scheme to all Profiles in Windows Terminal
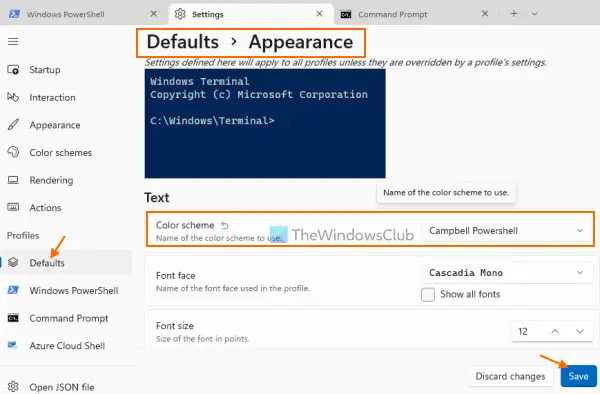
This option will help you set a specific color scheme (pre-added or custom color scheme) for all profiles created by you in Windows Terminal. But, as we have already mentioned above, you can also change the color scheme for a profile anytime you want. Also, if you have already applied some other color scheme to a profile, then it won’t work for that profile.
For applying a color scheme to all profiles, use these steps:
- Launch Windows Terminal
- Press Ctrl+, hotkey to open Windows Terminal Settings
- Access the Defaults section from the left side
- Click on the Appearance option available for that section
- Under the Text section, open the drop-down menu available for the Color scheme option
- Select a color scheme
- Click on the Save button.
Do read: How to set a Custom Theme in Windows Terminal
How do I change the default color in Terminal?
You can easily change the default color scheme in Windows Terminal using its Settings. Access the Color schemes section present in the Settings and select any of the available color schemes. Here, you can also create a custom color scheme with a custom name and apply it to Windows Terminal or a particular profile.
How do I change the default profile in Windows Terminal?
If you want to change the default profile in Windows Terminal, then you can do that by accessing Settings of Windows Terminal. Access the Startup section present in its Settings and then use the drop-down menu for the Default profile option to select a profile. Finally, press the Save button to change the default profile.
Hope this is helpful.
Read next: Windows Terminal Tips and Tricks to make you work like a Pro.
Leave a Reply