PC users can run games/apps in Compatibility Mode or run the Program Compatibility Troubleshooter to detect and fix common compatibility problems on their devices if some older games or apps created for earlier versions of Windows runs poorly or do not run at all in Windows 10 or Windows 11 or newer versions. In this post, we will outline the methods for how you can change Compatibility Mode settings for apps in Windows 11/10.

In the Windows operating system, compatibility mode, older software programs designed for use in a specific version of Windows may require compatibility mode to be used which allows the software to run as if it were doing so in an older version of Windows.
How to change Compatibility Mode settings in Windows 11/10
PC users can change compatibility mode settings on older desktop apps for your account or all users in Windows 11/10 in any of the following ways:
- Via the Program’s Properties
- Using Program Compatibility Troubleshooter
- Using Registry Editor
Compatibility mode is not available for all software programs. If you cannot see the compatibility mode option on your software program, it indicates that this option is unavailable, and the app/program/game may only run on the current Windows version. You cannot use compatibility mode for Microsoft Store apps. And to prevent potential data loss or to avoid leaving your PC to security risks, it’s recommended not to use compatibility mode on antivirus programs, firewall software, backup software, disk utilities, or on system programs that shipped with the Windows OS.
1] Change Compatibility Mode settings for an app via the Program’s Properties

To run old Games and Software in Windows 11/10 you can use its Properties to change Compatibility Mode settings:
- You’ll need to be logged in as Admin
- Right-click or press and hold on to the .exe file or shortcut of classic desktop software that you want to change compatibility mode settings.
- Click/tap on Properties.
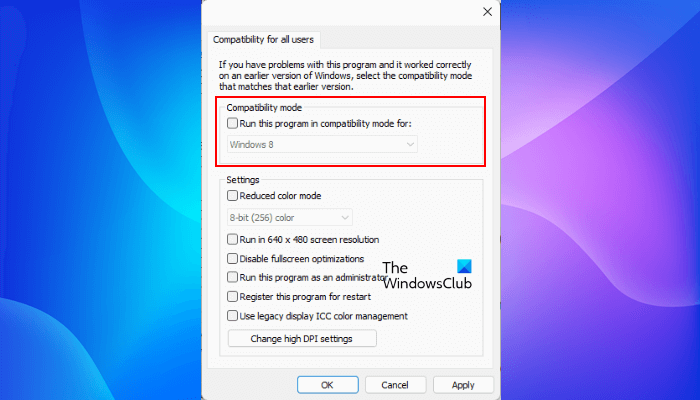
- Now, for the currently logged-in account, click/tap on the Compatibility tab, and/or for all users, click/tap on the Change settings for all users button.
- Next, check the Run this program in compatibility mode for box, and select the latest version of Windows that you know the app is designed for or worked in.
- Now under Settings, check or uncheck the options per your requirement.
- Click/tap on OK when done and exit.
2] Change Compatibility Mode settings for an app using the Program Compatibility Troubleshooter

To change Compatibility Mode settings for an app using the Program Compatibility Troubleshooter in Windows 11/10, do the following:
- Right-click or press and hold on a desktop app or its shortcut that you want to change compatibility mode settings, then do either of the following:
- Click/tap on Troubleshoot Compatibility OR click/tap on Properties > Compatibility tab > Run the compatibility troubleshooter button.
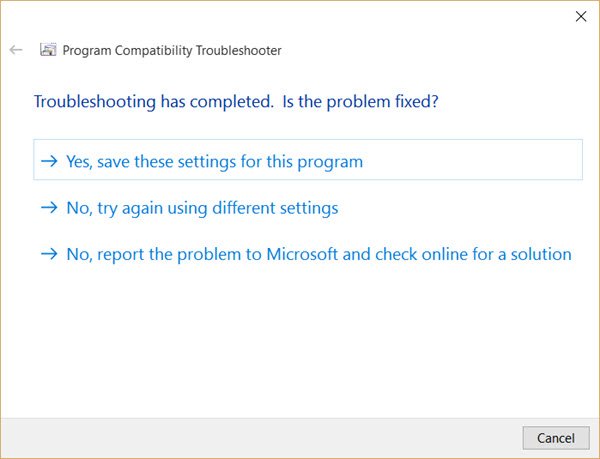
- Next, click/tap on the troubleshooting option you want to use.
- Follow the onscreen instructions in the troubleshooter until you are finished troubleshooting the compatibility issue with the selected app.
Alternatively, instead of right-clicking or pressing and holding on the desktop app, you can do the following:
- Open the Control Panel in Large or Small icons view.
- Click/tap on Troubleshooting > Run programs made for previous versions of Windows link.
- Next, click/tap on the Advanced link.
- Now, uncheck the Apply repairs automatically option.
- Click/tap on Next. You will need to be signed in as an administrator to be able to use the Run as administrator option if you like.
- Next, select the desktop app you are having compatibility issues with.
- Click/tap on Next.
- Checkmark the Fix program option.
- Click/tap on Next > preferred troubleshooting option to run the troubleshooter.
3] Change Compatibility Mode settings for an app using the Registry Editor

You can change Compatibility Mode settings for an app using the Registry Editor in Windows 11/10. Since this is a registry operation, it is recommended that you back up the registry or create a system restore point as necessary precautionary measures. Once done, you can proceed as follows:
- Press the Windows key + R to invoke the Run dialog.
- In the Run dialog box, type regedit and hit Enter to open Registry Editor.
- Navigate or jump to the registry key path below:
For the currently signed-in user
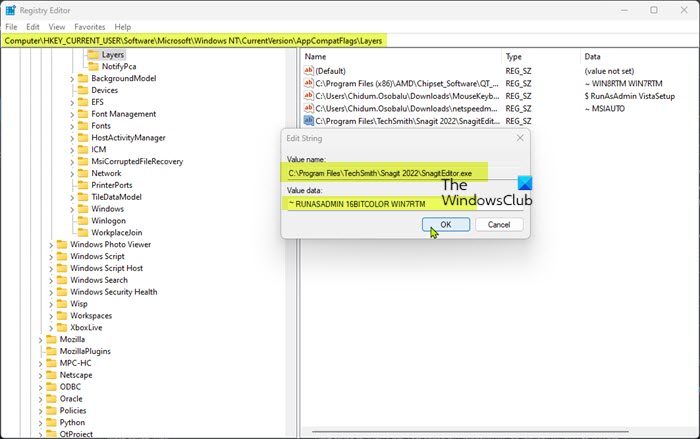
HKEY_CURRENT_USER\Software\Microsoft\Windows NT\CurrentVersion\AppCompatFlags\Layers
OR
For all users
HKEY_LOCAL_MACHINE\SOFTWARE\Microsoft\Windows NT\CurrentVersion\AppCompatFlags\Layers
- At the location, in the right pane, right-click or press and hold on an empty area, then click/tap on New > String Value.
- Now, type in the full path of the app’s exe file you want to change compatibility settings and hit Enter.
- Next, double-click/tap on the full path in the right pane to modify its properties.
- Type in one or more combinations of data values from the table below for how you want to run the program as.
| Settings | Data value |
| Disable fullscreen optimizations | DISABLEDXMAXIMIZEDWINDOWEDMODE |
| Run this program as an administrator | RUNASADMIN |
| Run in 640 x 480 screen resolution | 640X480 |
| Override system DPI (build 17063) Windows logon Application start |
– PERPROCESSSYSTEMDPIFORCEOFF PERPROCESSSYSTEMDPIFORCEON |
| Override high DPI scaling behavior. (build 15002) Scaling performed by: Application Scaling performed by: System Scaling performed by: System (Enhanced) |
– HIGHDPIAWARE DPIUNAWARE GDIDPISCALING DPIUNAWARE |
| Reduce color mode (8-bit 256) | 256COLOR |
| Reduce color mode (16-bit 65536) | 16BITCOLOR |
| Use legacy display ICC color management | TRANSFORMLEGACYCOLORMANAGED |
| Compatibility mode | Data value |
| Windows 95 | WIN95 |
| Windows 98 / Windows ME | WIN98 |
| Windows XP (Service Pack 2) | WINXPSP2 |
| Windows XP (Service Pack 3) | WINXPSP3 |
| Windows Vista | VISTARTM |
| Windows Vista (Service Pack 1) | VISTASP1 |
| Windows Vista (Service Pack 2) | VISTASP2 |
| Windows 7 | WIN7RTM |
| Windows 8 | WIN8RTM |
So, assuming you want to run a program as if it was in Windows 7 (Compatibility mode), and Reduced color mode 16-bit (Settings), and to run as administrator (Privilege level), type in the following in the Value data field:
~ RUNASADMIN 16BITCOLOR WIN7RTM
If you want to add Run in 640 x 480 screen resolution (Settings) with the above example, then type in as follows:
~ RUNASADMIN 640x480 16BITCOLOR WIN7RTM
- Click/tap on OK when done to save changes.
- Exit Registry Editor
To remove the compatibility mode settings for the app, navigate to the registry path above, and then delete the string value you created with the full path of the app.
That’s it! If changing compatibility settings doesn’t fix the problem you may have, then you can head over to the app developer’s website and check if a new or updated version of the app is available for the latest version of Windows.
Read next: How to add or remove the Compatibility Tab from File Properties
Where are compatibility view settings in Windows 11?
Compatibility view (or mode) is a feature of Windows Internet Explorer that forces the browser to render a webpage as a legacy Internet Explorer would render it (IE version 7). To change your Compatibility View settings, open Internet Explorer for the desktop, click Tools and then click Compatibility View settings. In the Compatibility View Settings box, type in the problematic website URL, and then click Add. Once done, Compatibility View is now turned on for this single website, for this specific computer.
Read: How to run old DOS Programs in Windows 11
Will all my apps work on Windows 11?
Most apps and devices that work with Windows 10 should work as expected under Windows 11. The new operating system is sufficiently similar to its predecessor that the differences shouldn’t pose a problem for most apps. Windows 11 supports Android apps through the Amazon App Store, which is one of the biggest differences between Microsoft’s latest operating system and Windows 10. It’s not as simple as downloading Android apps and using them, though. You need to know how to install Android apps on Windows 11.
Leave a Reply