In this post, we will show you how to change the Copilot Key action in Windows 11. Microsoft introduced a dedicated Copilot key on certain new devices (like the Surface Pro), which initially launched the Copilot app. However, soon, the company shifted its approach to integrating AI into Windows. Instead of embedding the Copilot AI chatbot directly into the operating system, they transitioned to offering it as a web-based app, making the Copilot key lose its default functionality. As a result, Microsoft introduced the option to customize the key’s action.
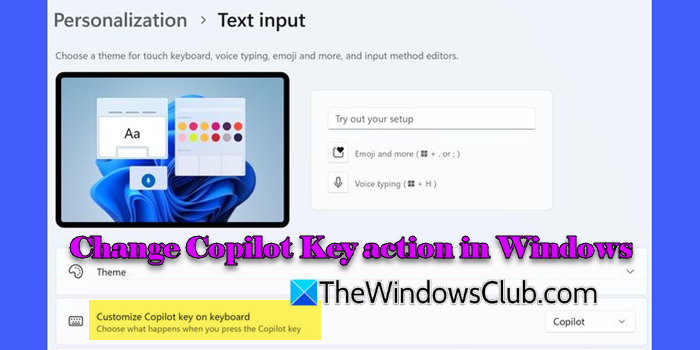
While the Copilot key still has its original purpose (the key will continue to launch Copilot on devices that have the Copilot app installed), users will have the flexibility to customize the Copilot key to open Windows Search or any app that uses the MSIX package format (a type of app package format used for Windows apps).
Change the Copilot Key action in Windows 11
To change the Copilot Key action on your Windows 11 PC, you may use one of these methods:
- Use the Settings app
- Use Group Policy Editor
Let’s have a look into this in detail.
1] Use the Settings app
Press Win + I to open the Settings app. Click the Personalization option in the left pane. Scroll a bit and click Text input in the right pane.
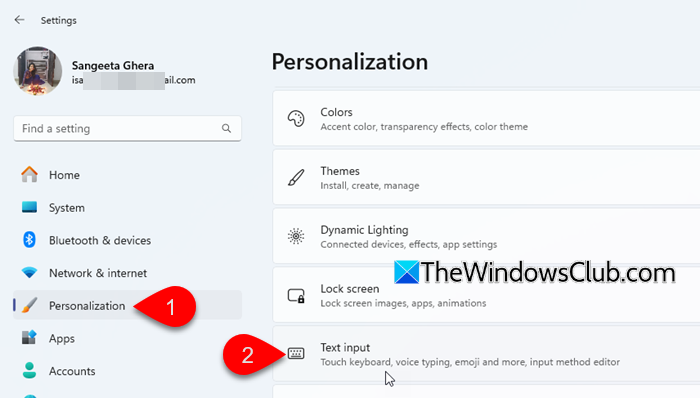
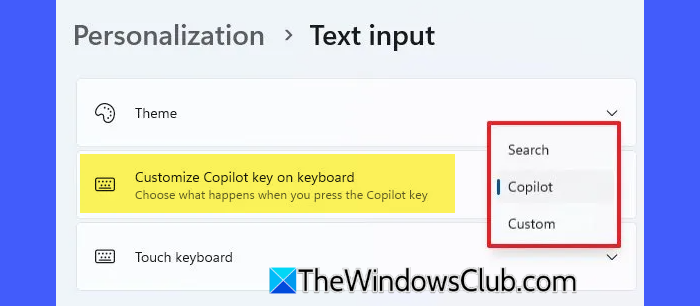
Next, click the dropdown next to the ‘Customize Copilot key on keyboard‘ option. You’ll see three options:
- Copilot: Launches the Windows Copilot app when the key is pressed.
- Search: Opens the Windows Search experience with the Copilot key.
- Custom: Allows you to select a specific app (installed via Microsoft Store or those using the signed MSIX package format) to launch with the Copilot key.
Select the desired option.
If you select ‘Custom’, a popup menu will appear. Choose an app and click Select to submit your choice. Close the Settings app.
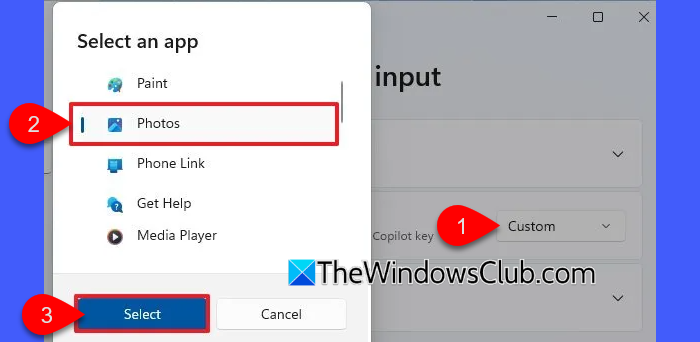
The next time you press the Copilot physical key on the keyboard, it will launch the specified app.
If you do not see this setting, update your Windows and make sure you have installed KB5044380.
2] Use the Group Policy Editor
This method applies system-wide to all user accounts on the device. However, you must be signed in as an administrator to make these changes. Additionally, note that the Local Group Policy Editor is only available in Windows 11 Pro, Enterprise, and Education editions, so this option won’t be accessible on Home editions of Windows 11 unless you enable GPEDIT.MSC manually.
Press Win + R, type gpedit.msc in the Run dialogue and press Enter.

This will open the Local Group Policy Editor. Navigate to the following location in the left panel of the policy editor window:
User Configuration > Administrative Templates > Windows Components > Windows Copilot
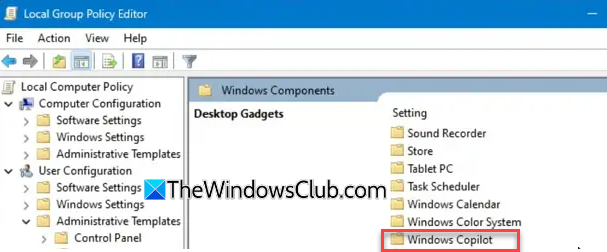
In the right panel, double-click Set Copilot Hardware Key to modify the policy.
To change the app the Copilot key opens, select the Enabled option. Enter the Application User Model Id (AUMID/AppId) of the specific app in the options box, and click Apply, followed by OK.
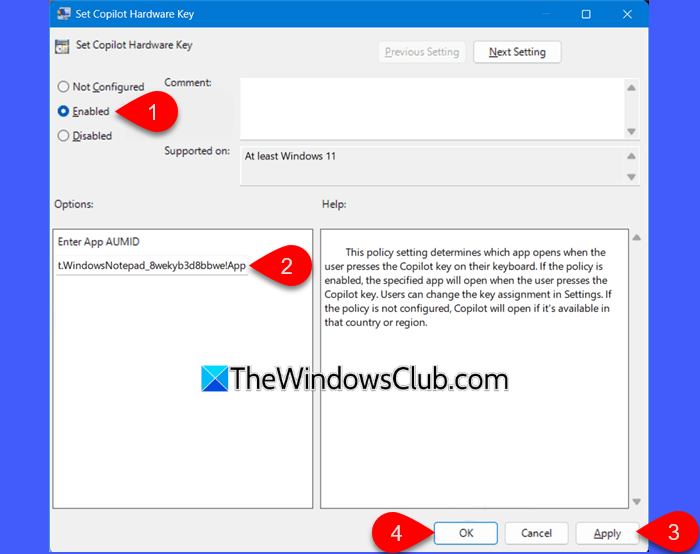
We had published a separate post covering how to check the Application User Model ID of installed apps in Windows 11. You may refer to the post to find the AUMID of the app you’d like to open by pressing the Copilot key, such as Microsoft Edge or any other MSIX-packaged app.

Close the Local Group Policy Editor and reboot your PC to apply changes.
The configuration made through the Local Group Policy Editor regarding the Copilot hardware key is stored in the Windows Registry. Specifically, the above setting is saved as a String Value called SetCopilotHardwareKey (REG_SZ) within the following registry path:
HKEY_CURRENT_USER\Software\Policies\Microsoft\Windows\CopilotKey
Setting the Set Copilot Hardware Key policy to Not Configured (back to default) will delete the SetCopilotHardwareKey string value (REG_SZ) in the registry key.
Disable Copilot hardware key for specific apps
If you want to disable the Copilot hardware key, preventing it from launching any app, including Windows Copilot, follow these steps:
Open Local Group Policy Editor and navigate to User Configuration > Administrative Templates > Windows Components > Windows Copilot.
In the right pane, double-click on the Set Copilot Hardware Key policy and select the Disabled option. Click OK to save changes and reboot your PC.
Once the setting is applied, the option to customize the Copilot key in Settings will be disabled (grayed out) and no longer available for individual users to modify.
Note:
- If the policy is set to Not Configured, Copilot will open if it is available in that country or region.
- The customization option for the Copilot key is only available on keyboards designed with a dedicated key for the chatbot.
- If the setting isn’t visible on your Windows 11 PC, it may be due to not running the latest preview build that includes this feature. Check the version of Windows you’re running and install the latest updates if any.
- Only Microsoft Store apps or those packaged in the signed MSIX format can be assigned to the Copilot key, excluding many commonly installed apps like Google Chrome, Mozilla Firefox, and VLC.
Read: How to disable Windows Copilot in Windows 11?
How do I change the copilot button?
To change the action of the Copilot button on your Windows 11 device, you can either customize it through Settings or use the Local Group Policy Editor. In Settings, navigate to Personalization > Text input, and select the action for the Copilot button. For more advanced control, the Local Group Policy Editor allows you to configure the button to launch any app by enabling the Set Copilot Hardware Key policy and entering the app’s AUMID.
How to change Copilot key to Control key?
To change the Copilot key to function as the Control (Ctrl) key, you can remap the key using Microsoft PowerToys. Download and install PowerToys from the Microsoft Store or GitHub. After launching the app, go to the Keyboard Manager section and enable Keyboard Manager. Then click Remap a key and press the + Add key remapping button to add a new key mapping. In the left column, click Select and press the Copilot key on your keyboard. In the right column, click Select and press the Control (Ctrl) key. Once you save the changes, pressing the Copilot key will now function as the Ctrl key.
Read Next: Add Copilot to Context Menu on Windows Desktop.