You can change the Screen or Display Resolution in Windows 11/10 using Windows Settings, PowerShell, HRC, QRes command-line or a QRes script. We will show you how to do this and check the current Sreen Resolution of your display.
Display Resolution or Screen Resolution is basically defined as the number of pixels spread horizontally and vertically. It is one of the prominent metrics in a computer and it determines text and graphics clarity shown on your desktop screen. It refers to the clarity of the text and images displayed on your Windows PC screen.
While using the Recommended value is always the best option, you can adjust your Monitor for better resolution by switching from one display resolution to another as per your preference in Windows 11/10.
How to change Screen Resolution in Windows 11/10
These are the four ways to change the display resolution in Windows 11/10:
- Check and change Screen Resolution using Windows Settings
- Check and change Screen Resolution using PowerShell
- Use HRC – HotKey Resolution Changer
- Change Display Resolution using Command Prompt.
- Change screen resolution using a QRes script.
Let’s discuss these methods in detail!
1] Check and change Screen Resolution using Windows Settings
Windows 11
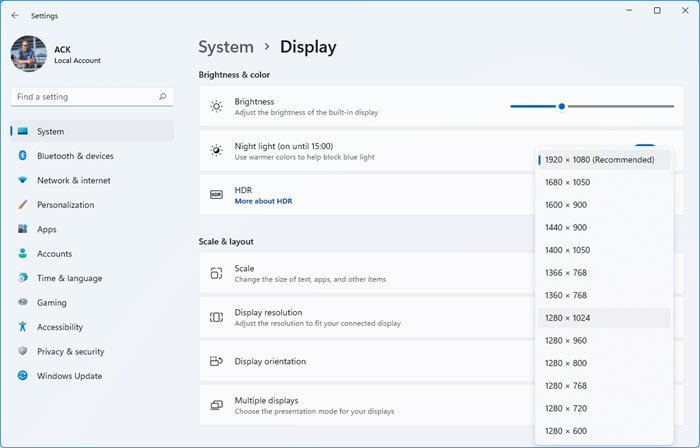
The procedure to change the Display Resolution in Windows 11 is as follows:
- Right-click on the Start button and select Settings.
- In the Settings window, select System on the list on the left-hand side.
- In the right pane, click on Display to open the Display setting.
- Scroll down a little to the Scale & layout section.
- You will find the option to change the Display resolution.
Windows 10
One of the most common ways to change screen resolution is using the Settings app in Windows 10. You can tweak some display settings to switch to the desired screen resolution. Follow steps below to use this method:
Open Settings app by pressing Windows + X hotkey and selecting Settings option.
Now, click on System > Display option.
In the Display settings, scroll down to Scale and Layout section. Here, you will see a Display resolution option.
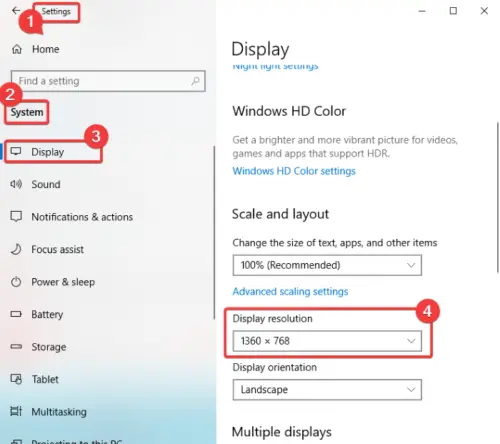
Click on the Display resolution drop-down menu and you will see a list of available screen resolution presets. Select any of them as per your requirement.
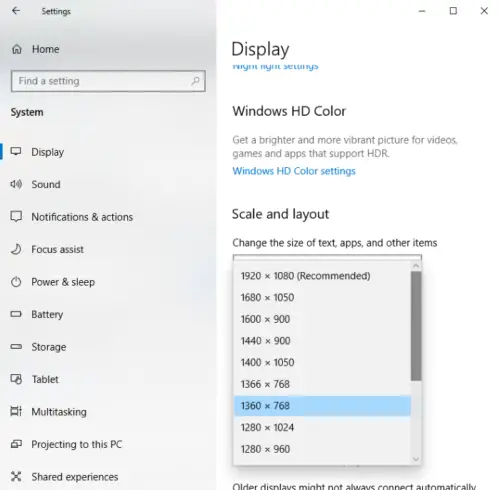 As you select a resolution, Windows will show you a preview of how the selected screen resolution will appear.

If you want to keep the screen resolution, click on the Keep Changes option. Else, you can tap on the Revert option and then choose a different screen resolution.
Read: Display Screen Resolution changes on its own automatically.
2] Check and change Screen Resolution using PowerShell

To check and change Screen Resolution via Windows Terminal in Windows 11, do the following:
- Press Windows key + X to open Power User Menu.
- Then press I on the keyboard to launch Windows Terminal.
- In the Windows Terminal console, type in or copy and paste the command below and hit Enter to get/check screen resolution.
wmic path Win32_VideoController get CurrentHorizontalResolution,CurrentVerticalResolution
- Exit Windows Terminal.
3] Using HotKey Resolution Changer
HRC – HotKey Resolution Changer is a dedicated software to change screen resolution in Windows 11/10. It is free and it comes in a portable package. You can simply run its application file and change screen resolution. You can also change color depth and refresh rate through it. The good part of this software is that it lets you customize hotkeys to switch screen resolution on your PC. It lets you modify resolution for multi-monitor setup too. Once you launch this application, you can easily access it from the system tray.
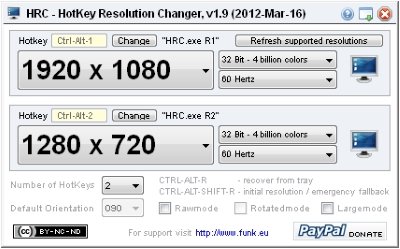
How to change screen resolution using free software called HRC – HotKey Resolution Changer
- Download this software from its official website funk.eu.
- Unzip the downloaded folder.
- Run HRC.exe file to open its interface.
- Select the desired screen resolution from the drop-down menu, and choose color depth and refresh rate as required.
- Click the computer icon present at the right to switch to the selected display resolution.
4] Change Display Resolution using Command Prompt
You will need to use QRes or Windows Screen Mode Changer, which you can download from sourceforge.net.
Download it to a suitable folder, extract its contents and open a command prompt in the destination folder, and run the following command:
qres x=1680 y=1050
This will set the display resolution to 1680×1050. You need to change the figures as per your requirements.
3] Change Screen Resolution using Script
QRes, discussed above, can be used to change screen resolution as well as color depth using a script. It is a free and open-source a lightweight application. Let’s check out how you can use it to change screen resolution using a script.
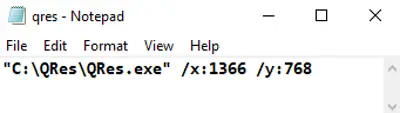
You will need to open Notepad on your PC and enter a command similar to this:
"C:\QRes\QRes.exe" /x:1366 /y:768.
This command will change your screen resolution to 1366×768.
In this command, change "C:\QRes\QRes.exe" to the path where you have extracted QRes archive, and, enter your screen resolution in place of /x:1366 /y:768.
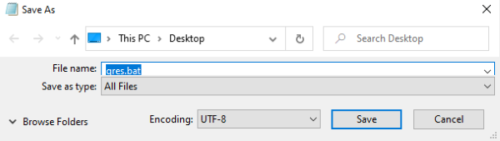
 After that, save the file by going to File > Save As option.
While saving file, select All File Types and then add .bat extension after the filename.
Run the created script file by double-clicking it, and it will change the screen resolution.
Hopefully, this article helped you find a suitable method to switch screen resolution in Windows 11/10.
Why does Display Resolution change by itself and what can I do to avoid such changes?
In most cases, third-party software products and games change the screen resolution. This is usually done only during the period you run the software, but at times, it extends even after closing the software/game and rebooting the system. In this situation, you would have to correct the display resolution manually.
What is the natural Display Resolution of Windows 11?
A Windows 11 device must have a minimum display resolution of 720p or 1280 x 720. Beyond that, there isn’t a specific standard. Computers and monitors come in different brands and sizes. You can choose as per your requirements. Usually, Windows 11 suggests a recommended display resolution and marks it as “Recommended.” You are advised to use the same.
Read: How to create and set Custom Resolution on Windows.
Should I change the Display Scale for Windows 11?
The default Display Scale for Windows 11 has been set to 150%, and it is highly recommended that it not be changed. However, if external software changes the scale, you can change it back to the recommended value.
How do I change my screen resolution to 1024×768?
To change your screen resolution to 1024×768 on your Windows PC, you can follow these instructions: Right-click your desktop, and then left-click Properties. Click the Settings tab to view display properties. Click the Advanced button. Click the Monitor tab. Move the slider underneath Screen resolution to 1024×768 or higher, and then click OK.
How do I change my screen resolution to 1920×1080?
To change your screen resolution to 1920×1080 in Windows, follow these instructions: Open the Settings app using the Win+I hotkey. Access the System category. Scroll down to the Display resolution section on the right side of the Display page. Use the drop-down menu available for Display resolution to select 1920×1080 resolution. Press the Keep changes button.
Related post: How to Change Color Calibration in Windows
How do I check my screen resolution settings in Windows 11?
To check your screen resolution settings in Windows 11/10, you can follow these instructions: Type Display Settings in the search bar from the Start Menu in the lower-left corner of your screen. Click to open. Scroll down to the Scale and Layout section and look for the resolution drop-down box. Make note of the resolution listed.
How do I fix my Display settings?
To fix your display settings on your Windows PC, follow these instructions: Right-click anywhere on your desktop and click “Personalize” to open the Personalization window. Click “Display Settings” at the bottom of the list. Adjust the resolution by clicking, holding, and dragging the slider under “Resolution.” The highest available resolution is your monitor’s native resolution.
Fix: Screen Resolution problems in Windows
Why can’t I change my Screen resolution?
The primary reason for this issue is driver misconfiguration. Sometimes Drivers aren’t compatible, and they choose a lower resolution to stay safe. So let’s first update the Graphics driver or maybe roll back to the previous version. This post will help you if you can’t change Screen Resolution in Windows 11.

Leave a Reply