If you want to change Firefox Cache Size on your Windows 11/10 PC, read this post. A large browser cache implies that a larger amount of offline data can be stored on your PC. This, in turn, enables the browser to load certain web pages more rapidly, but there’s a problem associated with this activity.

Whenever you try to open a few extra tabs, the browser slows down the whole system. It’s especially seen in Firefox. Here’s how you can limit or change Firefox cache size in Windows 11/10 to avoid slowing down your PC.
Change Firefox Cache size in Windows 11/10
In earlier versions of the browser, there was a dedicated setting to change the Firefox cache size to the desired value that can be accessed via Menu > Options > Advanced. This setting is no longer available. However, there’s still a way that allows you to increase or decrease your Firefox cache size.
To change Firefox cache size in Windows 11/10, you have to follow these steps:
- Open the Preferences page.
- Search for the entry – browser.cache.disk.capacity.
- Edit the value to the desired value in KB to use for the disk cache.
- Search for the entry – browser.cache.memory.capacity.
- Edit the value to the desired value in KB to use for the memory cache.
- Restart your browser.
Let us cover the above steps in detail.
Launch your Firefox browser. If it’s not updated to the latest version, update the browser.
Open a new tab in the browser. In the URL field of the address bar, type the following and press Enter:
about:config
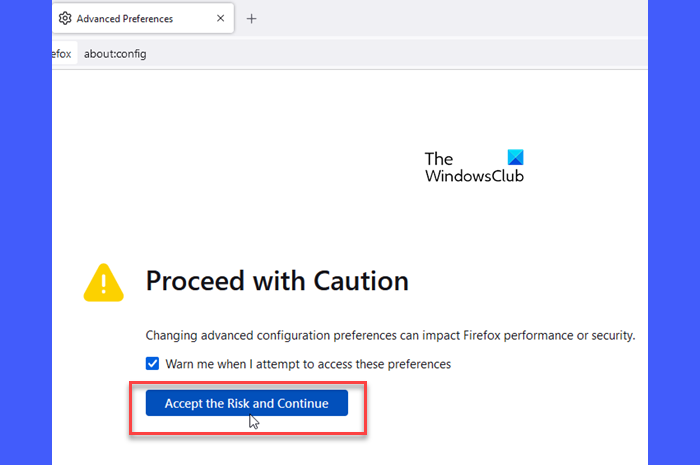
A warning message will appear. Click Accept the Risk and Continue button to open the ‘Advanced Preferences’ page.

Next, type browser.cache.disk.smart_size.enabled in the search bar on top. Once the setting appears, double-click on it to change its value to False. Now restart Firefox and again open the Advanced Preferences page.

Change the Browser Cache Disk Capacity
Next, search for the following entry ‘browser.cache.disk.capacity’ by entering it in the search bar.

Edit the value to the desired number by clicking the ‘Pencil’ icon.

The default value is 1048576, which equals to 1.048576 GB. Enter the maximum size you want in KB.
Change the Browser Cache Memory Capacity
Similarly, look for ‘browser.cache.memory.capacity’.

Choose the type of preference you are adding.
- String – any sequence of text
- Number – a number
- Boolean – true/false
For string or integer preferences, simply type in the new value in KB to use it for the memory cache. Now restart the Firefox browser.
Alternatively, If you would like to reduce the Firefox cache size or disable it completely, change the values for each of the entries indicated above to 0. You can also uninstall or disable Firefox extensions and themes that you don’t use as they can cause Firefox to use more RAM.
That’s all! I hope you find this useful.
Read: How to change Microsoft Edge Cache Size in Windows.
How do I clear cache in Firefox Windows 11?
Launch the Firefox browser and click the menu icon (three horizontal lines) in the top-right corner of the browser window. Select Settings. Click the Privacy & Security option on the left panel of the Settings page. Scroll down to the Cookies and Site Data section and click the Clear Data button. Select the Cookies and Site Data and Cached Web Content options in the Clear Data dialogue and hit the Clear button. Restart Firefox to apply changes.
How do I resize my Firefox browser?
You can use your mouse to drag the edges or corners of your Firefox browser window to the desired size. Take your mouse cursor to any edge or corner of the Firefox window. When the cursor changes to a double-headed arrow, click and hold down the left mouse button while dragging the edge or corner inward or outward. Once you’ve resized Firefox according to your preferences, release the mouse button.
Read Next: How to change Chrome Cache size for better performance on Windows.
Leave a Reply