The Guides in Photoshop and Illustrator are extremely important when you want your work perfectly aligned. Proper alignment of your work can make it look more attractive. Artwork that is out of alignment can be a turn-off for people, especially professionals.

Guides in Photoshop and Illustrator are very important for aligning your artwork properly. The default color for the guide in Photoshop and Illustrator is cyan. The cyan color can be a problem in cases where you are using certain color in your artwork. The ability to change the guide color and guides is very important because you will have to change them based on the color in your artwork. This article will show you how to change the color and style of guides in both Illustrator and Photoshop.
How to change Guides Color and Style in Photoshop
How to Access Guides in Photoshop
Enable Ruler
To change the guides, you need to be able to access them for use. Photoshop has two ways to access the guides.
The easy way is to enable the Ruler and then click on any of the rulers and drag from the ruler to the canvas. For a vertical guide click and drag from the left ruler, and for a horizontal guide click and drag the top ruler. This will place a guide on the canvas.
Here are the ways to enable the ruler in Photoshop.
Photoshop Rulers

To enable the Ruler in Photoshop, you go to View then go to Ruler. The ruler will appear at the top and left sides of the work area.
Photoshop Guides

Go to View then click New Guides.
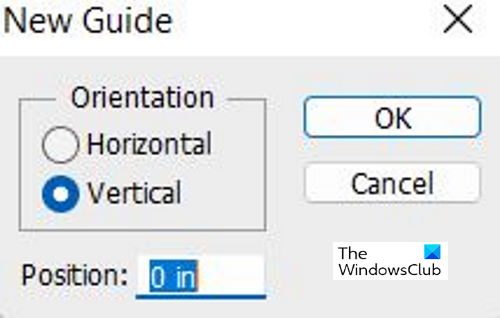
This will bring up the New Guides option, where you can choose whether you want a horizontal or vertical guide by clicking on the Orientation option. You can also choose where on the screen you want the guide to appear by putting a number in the position field that will represent the inch on the screen. The numbers on the ruler will represent the inch, so if you put 10, then the guide will appear at the 10-inch mark on the ruler and the 10-inch mark on your canvas. After you have chosen your options, press OK.
How to change Color and Style
To change the color and Style of the Guide in Photoshop you can Double Click on the guide and that will bring up the Preferences Options and Guides, Grids, and Slices will be selected.

You may also get to the Guide Preference by going to Edit then Guides, Grids, and Slices. You will see the Preferences window where you can make changes. 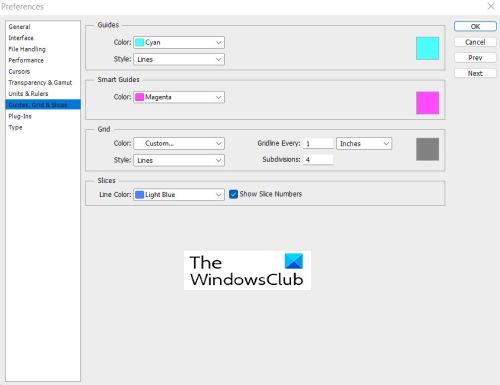
You can change the Guide color and Line option.
 Click the drop-down arrow at Guides color.
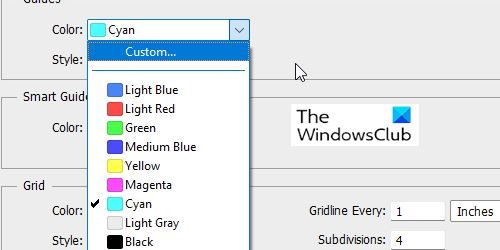
You will see a list of colors that can be used.

Click the Style and you can choose whether you want Lines or Dashes. When you have made all your choices, click OK.
How to change Guides Color and Style in Illustrator
How to Access Guides
Enable Ruler
To change the guides, you need to be able to access them for use. Illustrator has two ways to access its guides.
The easy way is to enable the Ruler and then click on any of the rulers and drag from the ruler to the canvas. For a vertical guide click and drag from the left ruler, and for a horizontal guide, click and drag the top ruler. This will place a guide on the canvas.
Here are the ways to enable the ruler in Illustrator.

To Enable the Ruler in Illustrator, you go to View then Rulers, Show Rulers. The ruler will appear at the top and sides of the work area.
Here is how you can enable the Guides in both Photoshop and Illustrator.
Illustrator Guides

Go to View then Guides then Show Guides. You can also press Ctrl + ; on your keyboard to show or hide the guide.
Illustrator Guides

To change the Guides Colors and Styles go to Edit then Preferences, Guides and Grids. 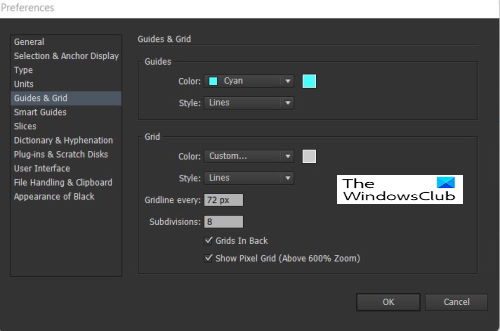
This is the Preferences window where the Guide colors and lines can be changed.
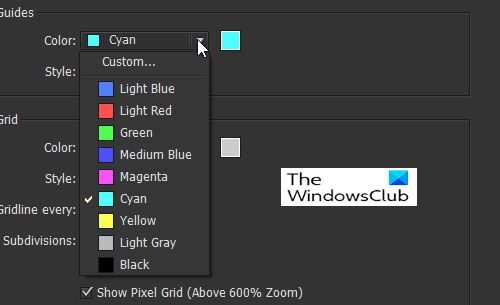
To change the color for the Guides, click on the Drop-Down arrow and you will see a list of the colors and names.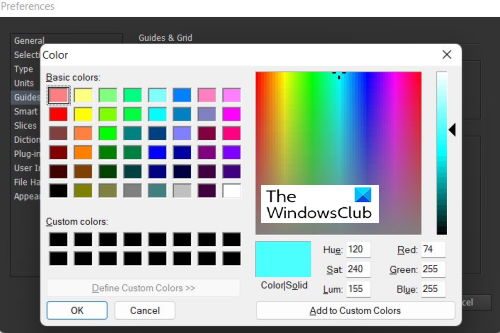
You can also choose the color for the Guides by clicking on the color swatch on the right to bring up a pallet. The color pallet will allow you to choose more colors and make custom colors.

To choose the line style for the Guide, click the drop-down arrow at Lines and choose Line or Dots. When you have made all your choices, click OK.
Read: Illustrator vs Photoshop – When to use each?
Why is it Important to be Able to Change the Guide Color and Style?
It is important to be able to change the Guide Color and Style because people will work with different colors. Guides are by default cyan; this will not show if you are working on a canvas or artwork that is cyan or a close color. Being able to choose different line styles makes it easy to have guides that will not look like the lines in your artwork.
How Do I Open Guides?
In Illustrator you get the guides by going to View then Guides then Show Guides. You can also press Ctrl + ; on your keyboard to show or hide the guide.
In Photoshop Go to View then click New Guides. This will bring up the New Guides option where you can choose whether you want a horizontal or vertical guide by clicking on the Orientation option. You can also choose where on the screen you want the guide to appear by putting a number in the position field that will represent the inch on the screen. The numbers on the ruler will represent the inch, so if you put 10 then the guide will appear at the 10-inch mark on the ruler and the 10-inch mark on your canvas. After you have chosen your options, press OK.
Leave a Reply