Windows 11/10 file systems organize your hard disk based on cluster size (also known as allocation unit size). If you haven’t specified cluster size when you format a partition, it will select the defaults based on the partition size – and this is one of the reasons for which you need to change cluster size of the volume. In this post, we will show you how to change Hard Disk Cluster Size in Windows 11/10.
How to change Hard Disk Cluster Size in Windows 11
By default, the maximum cluster size for NTFS under Windows NT 4.0 and later versions of Windows is 4KB.
Cluster is the smallest unit to save and manage files on the disk in Windows OS. One cluster can only hold one file, even if it is only one byte. When you need to save small files, you need to configure a volume with small clusters, which can improve the disk space use ratio. If you need to save large files, the volume should be appointed with large clusters, which can optimize data read-write speed largely.
In common, 512b cluster is the old generation standard, 4k cluster is more common today, 64k cluster size is for big file storage like games, 3D movies, HD photos. You can change cluster size according to the file size for better performance.
We can change Hard Disk Cluster Size in Windows in 2 quick and easy ways. We’ll explore this topic under the methods outlined below in this section.
1] Change Hard Disk Cluster Size via File Explorer

To change the Hard Disk Cluster Size via File Explorer in Windows 11/10, do the following:
- Press Windows key + E to open File Explorer.
- Right-click on the partition you want to change cluster size, select Format.
- Click Allocation Unit Size (Cluster size).
- Select one cluster size you want to change to from the drop-down.
- Next, select Quick Format > Start.
- Click YES on the format warning prompt to continue.
Once the format is complete, you have successfully changed the cluster size.
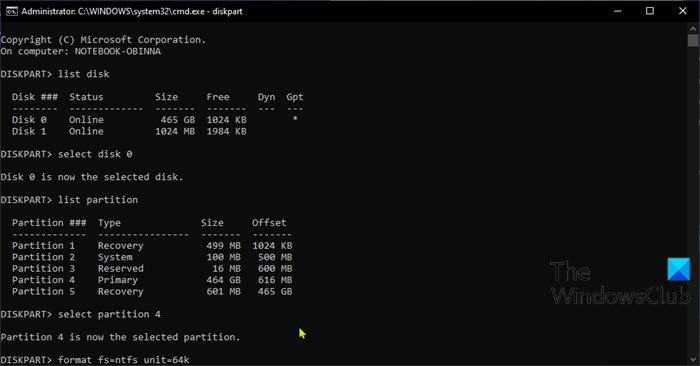
2] Change Hard Disk Cluster Size using DiskPart

To change the Hard Disk Cluster Size using DiskPart in Windows 10, do the following:
- Press Windows key + R to invoke the Run dialog.
- In the Run dialog box, type cmd and then press CTRL + SHIFT + ENTER to open Command Prompt in admin/elevated mode.
- In the command prompt window, type the command below and hit Enter to open the DiskPart utility.
diskpart
Now, type the following commands one after the other and hit Enter after each line:
list disk
select disk #
Replace the hashtag with the number listed for the disk you want to change the cluster size.
list partition
select partition #
Replace the hashtag with the number listed for the partition you want to change the cluster size.
format fs=ntfs unit=<ClusterSize>
Replace the <ClusterSize> placeholder with the actual cluster size you want.
Once the format is complete, you have successfully changed the cluster size.
That’s it!
How do I find disk cluster size in Windows?
To find the disk cluster size in Windows 11/10, use Windows PowerShell by typing fsutil fsinfo ntfsinfo C: (replace C: with the appropriate drive letter) and hitting Enter. This command will display the NTFS volume’s cluster size, helping you assess your drive’s allocation unit efficiently.
How do I change disk block size in Windows?
To change the disk block size, also known as allocation unit size, in Windows, you must format the disk. Open File Explorer, right-click on the drive, choose ‘Format’, select the desired file system, and pick a different allocation unit size from the drop-down menu. Note that all data on the drive will be erased during this process, so ensure you back up important files beforehand.
Leave a Reply