If you are running low on disk space in your Virtual Machine, we can easily resize the hard disk in VMware to accommodate the storage needs by adjusting the Virtual Machine’s disk settings. This process allows users to increase or decrease the storage space allocated to the VM without affecting its performance. This guide will walk us through the steps to resize a virtual hard disk in a Virtual Machine.
How to change hard disk size in VMware?
To change the hard disk size in VMware, follow the steps mentioned below:
- Expand the Virtual Disk
- Extend the partition
Let’s get to know how to change the hard disk size in VMware.
1] Expand the Virtual Disk

Expanding a Virtual disk is quite helpful when the Virtual Machine is running out of storage space or requires more capacity for apps and data. Moreover, executing this allows users to allocate additional storage without creating a new disk. To do the same follow the steps mentioned below.
- First and foremost, it’s necessary to power off the Virtual Machine whose Virtual disk you want to expand, and not in a suspended state.
- Once done, launch the VMware Workstation, find the Virtual Machine, and click on Edit Virtual Machine Settings.
- The Virtual Machine Settings window will appear on the screen, click on Hard Disk, and select the Expand option placed next to Expand disk capacity.
- Now, set the new disk size in the Maximum disk space section, click on Expand, and then click the OK button once the process is done.
This way, we will allocate more space to the virtual machine’s hard disk. It’s like installing more physical storage units on your computer; however, this will be unallocated to the partitions on your computer. Therefore, we need to extend the partition now to actually extend the usable hard disk.
Read: How to delete Recovery Partition in Windows
2] Extend the partition
Once, we have expanded the Virtual Disk, the next step is to extend the partition, within the guest operating system. This action ensures the OS recognizes the additional space and makes it usable for apps and data storage. We are going to talk about two of the most common operating systems used as guest OSs – Windows and Linux.
If you want to extend Windows Partition, you can follow the steps mentioned below.
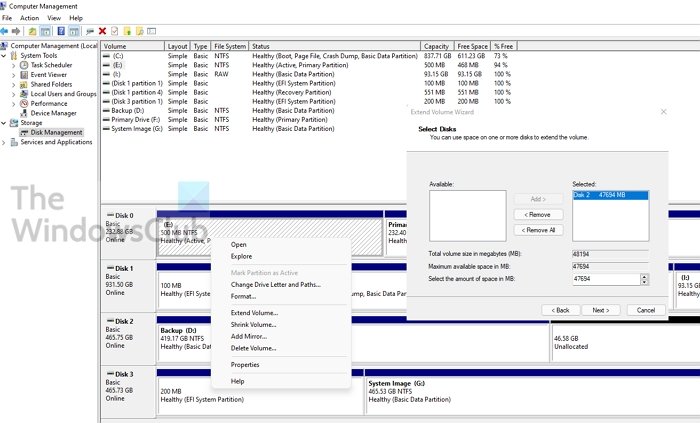
- Search and open the Disk Management utility by searching it out of the Start Menu.
- Now, right-click on the partition you want to extend, and then select Extend Volume.
- Select the amount of unallocated space to add to the volume and click Next.
- Finally, click on Finish.
This is how you can extend volume in volume for a Windows guest.
If you have a Linux guest, you can follow the steps given below.
- Boot into the Linux guest OS and run the following command to detect the new disk size.
sudo fdisk -l
- Now, use a partitioning tool like fdisk or parted to resize the partition. Make sure to replace sdX with your disk identifier
sudo fdisk /dev/sdX
- After resizing the partition, resize the filesystem using.
sudo resize2fs /dev/sdXn
- Check the updated disk size using
df -h
Hopefully, with the help of this guide, you will be able to allocate more disk space.
Read: Windows Recovery Partition is in the way, can’t extend C drive
How do I change the Hard disk type in VMware?
Users can easily change the Hard disk type in VMware, however, doing so can cause compatibility issues with the guest OP system or data loss if not backed properly. Now, shut down the VM properly before changing the hard disk type. Once done, launch the VMware Workstation or vSphere Client, right-click the VM, and select Edit Settings. In the Hardware tab, choose the hard disk and click the Advanced option. Change the disk type, save the changes, and power on the VM. After changing the Hard disk type, users need to ensure that the guest operating system recognizes the new disk type.
Read: How to increase Disk size in VirtualBox
How to reduce the VMDK size?
Before delving into the process, note that reducing the VMDK size can be risky. It can lead to data loss if backups are not made properly, and can be time-consuming depending on the disk size. Moreover, the VM can become unstable if the shrinking process isn’t completed properly.
Once backups are in place, go to the Defragment and Optimize Drives tool in the guest OP, select the drive, and click on Optimize. Wait for the process to complete, then zero out the free space via ‘sdelete’ by running the command, sdelete -z C: and shut down the VM. Launch VMware Workstation, go to VM settings> Hard Disk> Utilities> Compact. Now, restart the VM, check the integrity of the data, and verify that everything is working correctly.
Also Read: Ceate and set up new VHD or VHDX File in Windows.