Internet Protocol (IP) is a numerical identifier for every gadget or network for users accessing the internet. The IP address of a user contains information like location, network identification, online activities, etc. It’s issued by your Internet Service Provider (ISP), but did you know you can manually change it without using a VPN? In this article, we will look at how to change IP address without VPN in Windows 11/10. Do note that one of the methods will only change the IP address of your computer on your network, and not the IP address that is set by your ISP when you use the internet.

As long as you are accessing the internet or network, your IP address defines the virtual location and other details, and you are still specific to such details. But if you want to change your IP, changing your IP address is the only surest way to achieve that.
Why do I need to change my IP address?
The main reason why you should change your IP address is to protect your privacy while accessing any Network or internet. When you change your IP address you hide your virtual location, protect yourself from sites that track your online activities, mask yourself from ISP and hackers, etc. Also, changing your IP address protects you from bots and people who spy on your internet traffic.
Other reasons why you need to change your IP address are to avoid site bans by restricted websites, or government-restricted internet access, bypass geo-blocking of certain content or sites, and troubleshoot internet issues especially when a new router gives a wrong IP address.
How to change IP address without VPN in Windows 11/10
If you don’t have a VPN or maybe you just don’t want to use it, you can manually change your IP address without VPN on Windows 11 and Windows 10. To change IP address without VPN, try the following methods:
- Restart your router
- Use Command Prompt to change IP address without VPN
- Use a free online Proxy website or service
- Use Tor browser
- Set up a Proxy Server
- Edit IP settings to change IP address without VPN
Let us look at these two methods in detail.
1] Restart your router
If your ISP has provided you with a dynamci IP address then the easiest way to change your IP is to restart your router. When you do this you will be alloted a new IP address.
2] Use Windows Command Prompt to change IP address without VPN

You can run some commands to renew your IP address. Once the process is successful, you will get a new IP address assigned to your device. To change the IP address using Command Prompt, follow the steps below:
- Search CMD on the Windows search box and hit Enter. Alternatively, you can press the Windows key + R, type CMD and click OK.
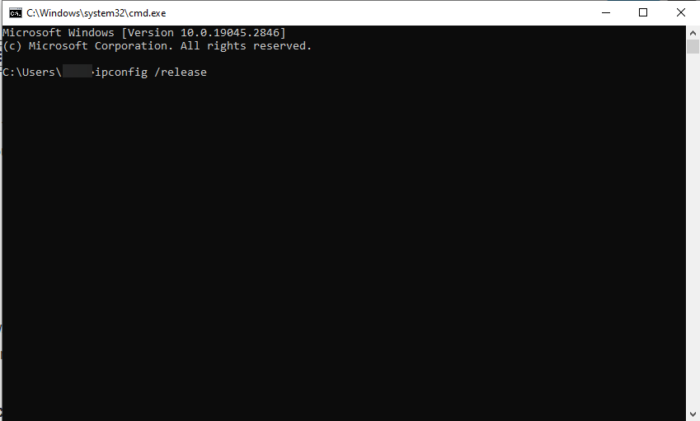
- Copy and paste the following command line in the Command Prompt and press Enter on your computer keyboard:
ipconfig /release
- Once the process is complete, copy and paste the following command and press Enter:
ipconfig /renew
This method releases your current IP address and gives you a new one. It also verifies your new network configuration details.
3] Use a free online Proxy website or service
You can use a free online proxy server like Hide.me or HideMyAss.com. You can also use a browser extension like KProxy anonymous web proxy service or a free proxy software.
4] Use Tor browser
Use a browser like Tor or Brave to hide you on the internet.
5] Set up a Proxy Server
You can set up a Proxy Server on your Windows computer.
6] Edit IP settings to change IP address without VPN

There is a slight difference in changing IP addresses between Windows 11 and Windows 10. To change IP address without VPN on Windows, follow the steps below.
This method will change your IP address on your internal network only and not the internet.
Manually change IP address in Windows 10
To change IP address without VPN in Windows 10, use the following steps;
- Open your Windows 10 Settings by pressing the Window key + I.
- Select Network & Internet, then locate your connection and click on the Properties option.
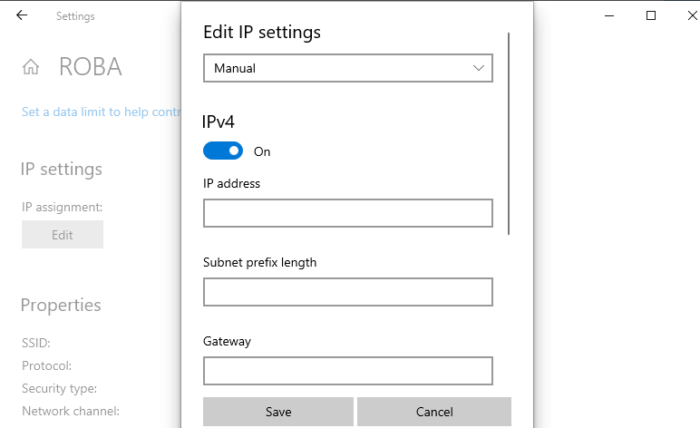
- Scroll down to locate IP settings and click Edit. A popup will appear; click the drop-down menu and select Manual.
- You will see to IP options turned off. Toggle the button next to IPv4 to turn it on.
- Next, type your IP numbers under the IP address option.
Manually change IP address in Windows 11
To change IP address without VPN in Windows 11, use the following steps;
- Open your Windows 11 Settings and go to Network & Internet.
- Select the Wi-Fi or Ethernet you are connected to and click Manage.
- Next to the IP assignment option, click Edit.
- Change the Edit network IP settings to Manual or Automatic (DHCP).
- For Manual settings, go ahead and toggle on the IPv4 button. Fill in the correct details in the Subnet mask, IP address, and Gateway options.
- Click the Save button to apply the new IP address you configured.
We hope you can now change your IP address without VPN in Windows 11 and Windows 10.
Read: How to set a Static IP Address in Windows
Can my IP address change on its own?
The IP address cannot change on its own. Your Internet Service Provider (ISP) can configure the IP address to be either dynamic or static. Dynamic IP is an IP address that can change while static remains the same. You can also use a VPN to change your IP address or you can also change your IP address without VPN on Windows, iOS, etc.
Fix: Cannot change Static IP address & DNS server
Which is the IP address for IPv4?
The IP address for IPv4 is a 32-bit value that identifies a network interface on your device. The IPv4 value is written in decimal points as four 8-bit areas separated by normal periods. Each area represents a byte of the IP address, a form known as the dotted-decimal format. These bytes are further separated into the host part and the network part.
Leave a Reply