The mouse pointer and cursor in Windows 11 and Windows 10 are very important aspects of the operating system. This can be said for other operating systems as well, so in truth, they are not unique to Windows. Many users of the popular operating system may have no idea of some of the customization that can perform on the mouse pointer and the cursor. If you’re someone who is sick and tired of looking at the same old thing every day, and want to customize Mouse Buttons, Pointer, and Cursor, then continue reading.
OK, so the mouse pointer and cursor are basic and don’t require change. However, a few things can be altered where these tools are concerned. You see, folks can change the size of the pointer, and the color of the cursor if they so wish. You’ll likely won’t do this, of course, but should the need ever arise, then after reading this article, you will have the knowledge and the know-how to complete the task.
Change Mouse Cursor size, color, and scheme on Windows 11
You can easily change the size, color, and scheme of your mouse cursor in Windows 11 via Settings. We will show you a detailed process to change:
- Mouse cursor size
- Mouse cursor color
- Mouse cursor scheme
Let’s start.
1] Change the default mouse cursor size in Windows 11
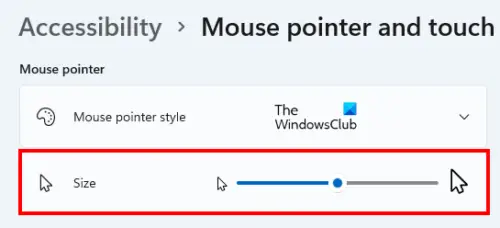
The instructions to change the default mouse cursor size in Windows 11 are given below:
- Right-click on Windows 11 Start menu and select Settings.
- In the Settings app, select Accessibility from the left pane.
- Now, click on the “Mouse pointer and touch” option on the right side.
- Move the slider next to Size to change the size of your mouse cursor.
You will see the changes immediately as you move the slider.
2] Change the default mouse cursor color in Windows 11
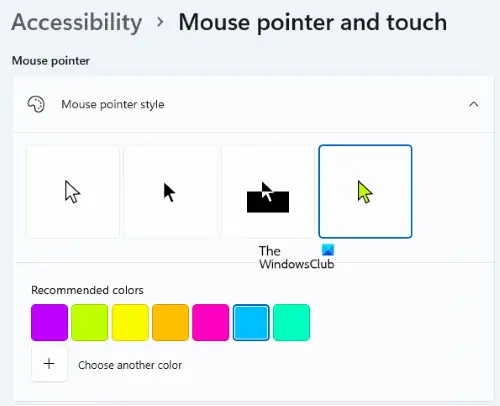
To change the default color of your mouse cursor, repeat the first three steps described above, then click on the Mouse pointer style tab to expand it. After that, you will see four options, white, black, inverted, and custom.
- White: It is the default color of the mouse pointer in a Windows OS.
- Black: This option changes the color of your mouse cursor into black with a white outline.
- Inverted: If you select this option, you will see your mouse pointer in the color inverted to the color of the background.
- Custom: This option lets you set the color of your choice. When you click on it, you will see some color palettes. If the color of your choice is not available in the color palettes, click on the Plus icon that says Choose another color.
3] Change the default mouse cursor scheme in Windows 11
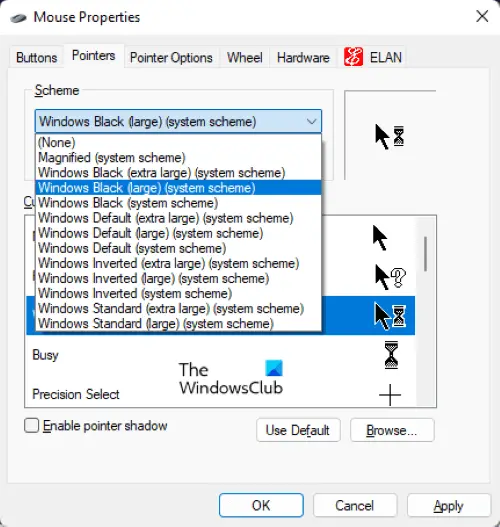
The following instructions will guide you on how to change the default mouse cursor scheme in Windows 11:
- Launch the Windows 11 Settings app by right-clicking on the Start menu.
- Select Bluetooth & devices from the left pane.
- Click Mouse on the right side. You might have to scroll down to find this option.
- Now, click Additional mouse settings in the Related settings section. This will open the Mouse Properties popup window.
- Under the Pointers tab in the Mouse Properties window, click on the drop-down menu in the Scheme section and select the cursor scheme of your choice. When you select a particular scheme, you will see its preview in the Preview box.
- Click Apply and then OK.
You can also customize the style of a mouse pointer for a particular action for the selected scheme. For this, first, select the mouse cursor action under the Customize box for which you want to define a new icon and then click on the Browse button. After that, select the icon of your choice and click on the Open button.
Read: How to get Crosshair Cursor or Pointer for Windows 11/10
Change Mouse Cursor size, color & scheme in Windows 10
1] Change the default size of the mouse pointer in Windos 10
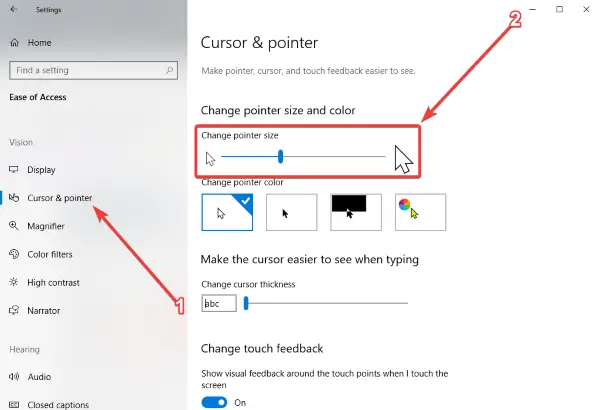
In order to change the mouse pointer size, please fire up the Settings app by pressing the Windows key + I. Navigate to the option that says Ease of Access, then select Cursor and Pointer from the list of features.
Go to the section that says Change pointer size and color, and move the slider up or down to change the size to your liking. Make it Solid Black if you feel!
2] Change the mouse pointer default color
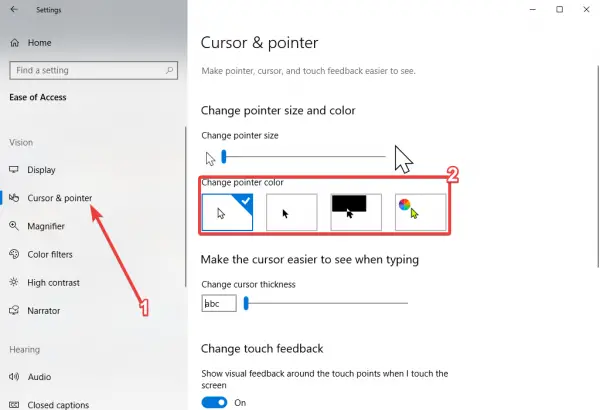
Again, one needs to open the Settings app, then navigate to Ease of Access. From there, click on Cursor and Pointer, the move along down to Change Pointer Color. From here, the user can change the color to whatever they want with relative ease.
Users can even use a custom color to truly make things the way they want. It’s quite impressive, and we suspect many will take the time out to give this a spin very soon.
Sadly, Microsoft hasn’t spoken much about these options, but that’s why we’re here. Here to set you free where Windows 10 is concerned, at least.
Related: Change Mouse Pointer color to red, solid black, etc, in Windows for better visibility.
3] Change the mouse pointer scheme
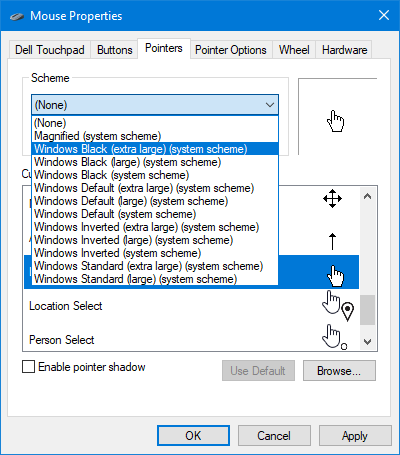
This is where thongs get a little bit interesting and more designed for the advanced user. With this option, the user can change the scheme of the mouse pointer, a feature that has been around long before Windows 10.
To do this, click the search box then type Mouse Properties. Fire up the app, and from there, select the tab that says Pointers. After that, hit the drop-down menu and select the preferred scheme.
Folks can also customize the pointer icon, which again, is nothing new.
How do I change my cursor size on custom color?
After selecting a custom color for your mouse pointer, move the slider next to the Size option to change the size of your mouse pointer. We have explained the entire procedure above in this article to change the cursor size and color on the computers running on Windows 11 and 10 Operating Systems.
How do I change my mouse cursor to a cross?
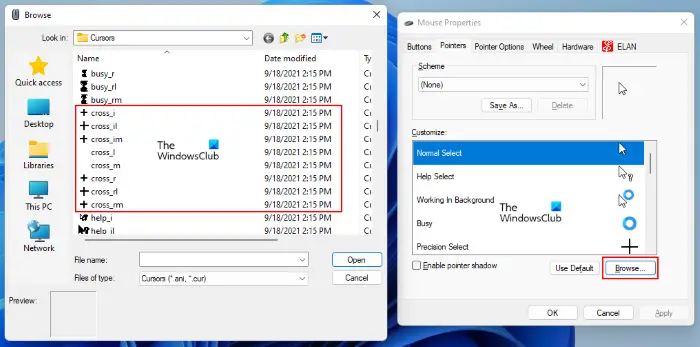
You can change your mouse cursor icon to a cross in the Mouse properties. We have explained the steps to open the Mouse Properties window in both Windows 11/10 Operating Systems above in this article. After opening the Mouse Properties window, follow the below-listed steps:
- Click on the cursor icon in the Customize box that you want to replace with the cross icon.
- After that, click on the Browse button.
- Now, scroll down the list until you see the cross icons.
- Select the cross icon and click Open.
- Now, click Apply and then OK to save the settings.
Related reads:
Leave a Reply