Sometimes, you may have noticed that some websites don’t function well on your broadband connection. While most websites run fine, certain seem to have an issue. If you have encountered this situation, it is time to change the Maximum Transmission Unit (MTU) on Windows 11/10 computers.
How to check current MTU settings?
MTU, or Maximum Transmission Unit, is necessary or responsible for this case because it is the parameter that defines the maximum packet size that can be transmitted over a network. So by optimizing MTU, you can enhance your network performance. As a result, you can browse the internet more efficiently.
But not many are aware of how MTU functions. There are two quick ways to check the current MTU settings, these are:
Use Windows Terminal to check the current MTU value
Windows Terminal has to be the easiest way to learn about your current MTU value. To get started, follow the below steps:
- Press Windows Key + X to access the quick menu.
- Click Windows Terminal (Admin).
- Now run the following command and press enter.

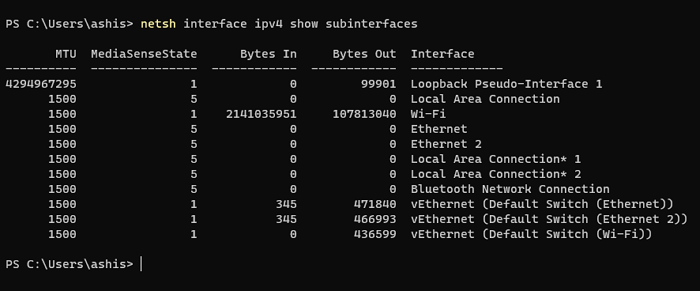
netsh interface ipv4 show subinterfaces
- Once done, you should see the MTU value of different networks under the MTU tab.
Check MTU network adapter settings
There is also an alternative option which is checking through the Network adapter settings. For this, you need to follow the below steps:
- Press the Windows key + R to launch Run.
- Type ncpa.cpl and press Enter, and you should see a list of different Network adapters.
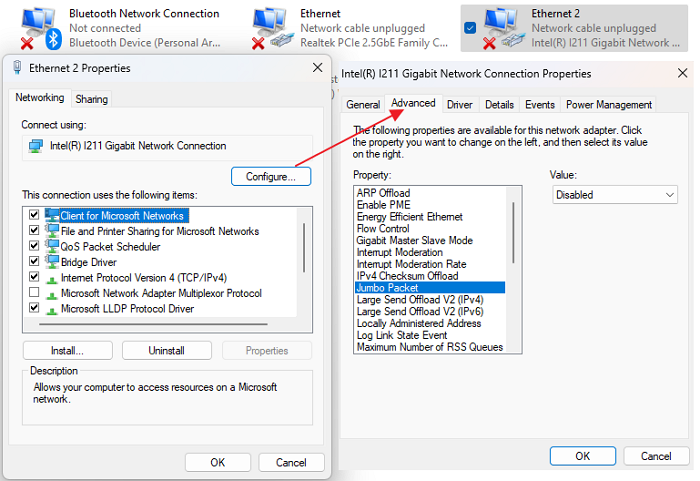
- Right-click on any of the adapters for which you want to check the MTU and then select Properties.
- Click the Configure button to open the adaptor connection properties
- Switch to the Advanced Tab and select Jumbo Frame

- Then select the higher value from the dropdown on the right.
Note: The adapter uses the default MTU value if you don’t see the Jumbo Packet option. It also means you cannot change through the control panel method.
How to Change MTU on Windows 11/10?
Now that you know your MTU value, you can increase or decrease the value per your needs. To do so, there are two methods that you can follow. These are:
- Using Windows Terminal
- Changing MTU through Network Adapter settings
Let’s now look at these methods one by one below:
1] Using Windows Terminal
Changing MTU using the command prompt has to be the easiest method. All you have to do is run two commands – one to identify the interface name and the other to change the MTU value, and you are good to go. So go ahead and follow these steps:
- First, press Windows Key + X to access the quick menu and launch Windows Terminal (Admin).
- Now run the following command to list down all the network adapters:
netsh interface ipv4 show subinterfaces
- Now note down the Interface name for which you want to change the MTU.
- Next, to change the MTU value of your preferred interface, run the following command:
netsh interface ipv4 set subinterface <subinterface name> mtu=9000 store=persistent
- Over here, replace <subinterface name> with the interface name. Also, you change the mtu=9000 value to something else per your requirements.
2] Changing MTU through network adapter settings
You can do it through Network Adapter settings to change your MTU value through a visual interface. For this, follow the below steps:
- Launch Run by pressing Windows Key + X.
- Type ncpa.cpl and press Enter.
- Right-click on your preferred Network adapter and go to Properties.
- Next, click on the Configure button.
- Next, select Jumbo Packet, and from the disable dropdown menu, select any of the MTU values.

- Once done, save the changes and reboot your computer.
How to determine the optimal MTU Value?
Now you might be wondering what would be the ideal MTU value. You can quickly figure that out by running a command in Windows Terminal.
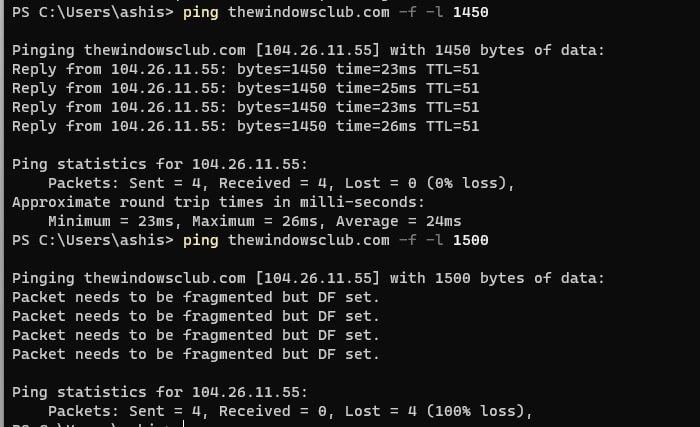
You need to run the ping command, which will send requests to the network and increase the size of the Packet till you get a message about the needed fragment of the Packet. So whichever website is not loading correctly, you can try the ping command with it by following the below steps:

Launch Windows Terminal, and run the following command:
ping [url] -f -l <packet_size>
Over here, replace [url] with your respective URL and set the <packed_size> to 1450. As you run your ping, keep increasing the size with each command until you see the Packet needs to be the fragmented message.
How to troubleshoot Common Issues around MTU?
While dealing with MTU, it is easy to mess things up. If you enter the wrong MTU value, it can impact the overall network performance.
In such a case, you can try restoring the default MTU value. The default MTU value on most computers is 1500. So you can follow the above steps to change the MTU value to 1500 and see if it helps you out.
If you still face any other internet issues, running Windows Troubleshooter might be helpful. To run it, follow the below steps:
- Press Windows Key + I to launch Settings.
- Navigate to System > Troubleshoot > Other troubleshooters.
- Over here, click on the Run button next to Internet Connections and let the troubleshooter run.
Conclusion
So that was all for how to change MTU on Windows 11/10. Changing MTU value using Windows Terminal is a much easier and straightforward process. While if you make the changes using Network adapters, you may not find the required options to make changes. So go ahead and try the above steps on your own and see if they are helpful to you.