Punctuality is an art that we all should master, but one can not be punctual if their clock shows the wrong time. That’s why in this post, we are going to see how to change or sync Time in Windows 11.

How to sync Time in Windows 11
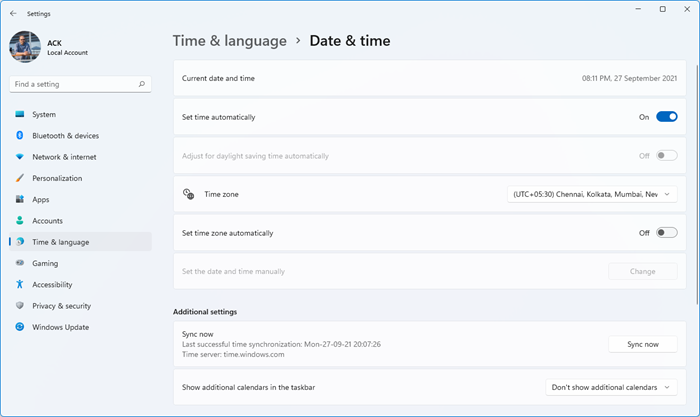
Syncing Time in Windows 11 is easy:
- Using the WinX Menu, open Windows 11 Settings
- Select System settings
- From the left, select Time and language settings
- Scroll down and locate Additional settings
- Click on the Sync now button.
Why is my Time not sync in Windows 11?
There can be multiple reasons why the time that your computer is showing is incorrect. Sometimes, installing a new update or a fresh installation can trigger this issue. In either of the cases, you can just change your time to make it right in Windows 11.
How to change Time in Windows 11
There are two ways by which you can change or sync time in Windows 11. They are.
- Manually
- Automatically
Let us talk about them in detail.
1] Manually

If you want to set time and date manually, then follow the given steps.
- Open Settings from the Start Menu or use the Shortcut, Win + I.
- Go to Time & Language and click Date & Time.
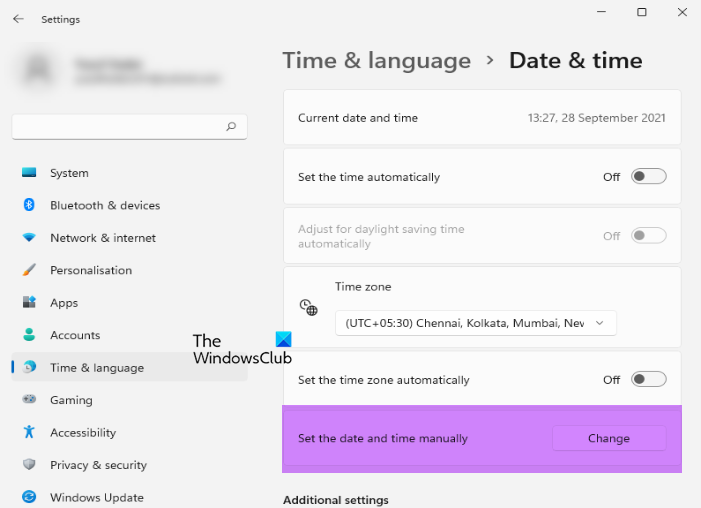
- Now, if Set the time automatically is enabled, turn it off
- Then click Change from the Set the date and time manually section.
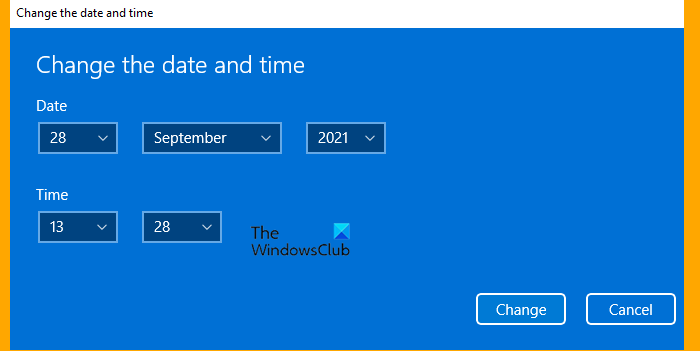
- Now, set the time accordingly and click Change.

This way you will be able to change your time manually.
2] Automatically

If you don’t want to set time by yourself and want Windows to do the work for you then we have a method for you.
To set the date and time automatically, you can follow the given steps.
- Open Settings from the Start Menu or use the Shortcut, Win + I.
- Go to Time & Language and click Date & Time.
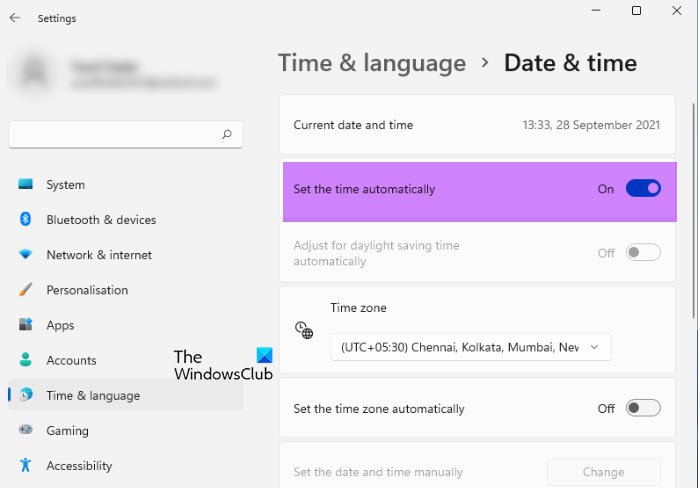
- Enable Set the time automatically from there.
- You can also change the Time Zone from there.
- Now, scroll down to Additional Settings and click Sync now.
Hopefully, now you know how to control your date and time in Windows 11.
How to change the Time format in Windows 11?
If you are not happy with the current Time format and want to change this guide is what you need. Following are the steps you need to change the Time format in Windows 11.
- Open Settings from the Start Menu or use the Shortcut, Win + I.
- Go to Time & Language and click Date & Time.
- Now, scroll down to Related links and click Language and region.
- Click on the down arrow of Regional format and click Change format.
- From there you can select the format of your choice.
How do I change Windows time sync?
To change the Windows time synchronization settings, you need to open the Windows Settings by pressing the Win+I buttons together. Next, switch to the Time & language setting and click on the Date & time menu. Here you can find an option named Set the time automatically. You need to toggle this button to turn on this setting.
How do I get my computer to sync the correct time?
To get your computer to sync the correct time, you need to open the Windows Settings panel first. Then, head to the Time & language section on the left-hand side. Next, find the Date & time menu and click on it. Therefore, toggle the Set the time automatically button to turn it on.
That’s all! Hope this guide helped you.
Read Next: How to open Windows Tools in Windows 11.
Leave a Reply