DPI or Dots Per Inch is the measurement of pixel density measured by the number of display pixels and their size. High DPI displays have high pixel density compared to the standard DPI displays. On a high DPI display, some applications may show blurry fonts, or the fonts appear small, which makes it difficult to read. Such problems can be fixed by changing the display scaling in Windows 11 Settings. But you must change the display scaling every time you use such applications. A simple solution is to change scaling for specific apps in Windows 11. In this article, we will explain how to do that.

How to change Scaling for Specific Apps in Windows 11
If an app is not rendered properly on a high DPI display, it shows you the blurry font or the size of the font becomes too small to read. You can fix this scaling issue on Windows 11 by changing the properties of the app. To change the Scaling for specific apps in Windows 11, follow the steps written below:
- Right-click on the desktop shortcut of the app.
- Select Properties.
- Go to the Compatibility tab.
- Change high DPI settings for that app.
Let’s see all these steps in detail.
Right-click on the desktop shortcut of the app. If its shortcut is not created on the desktop, follow the steps below:
- Click on Windows Search and type the name of the app.
- Right-click on the app from the search results and select Open file location.
- Now, locate the application file and right-click on it.
- Select Properties.

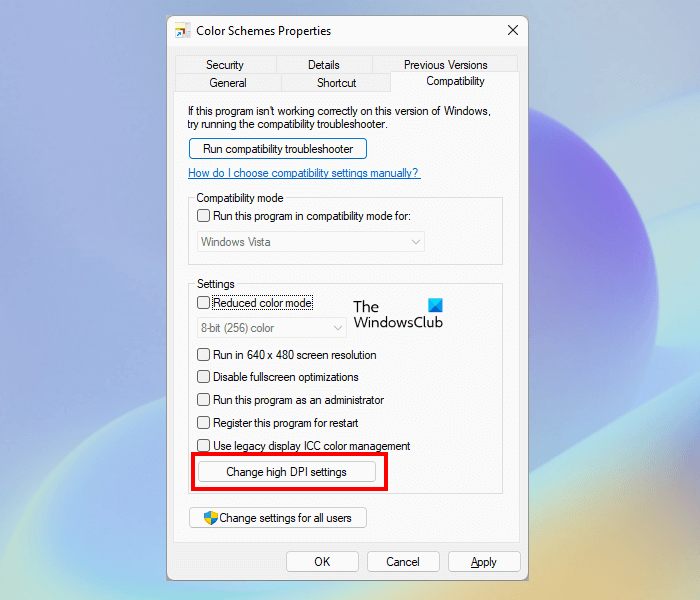
After opening the properties window, select the Compatibility tab and click on the Change high DPI settings button. If you want to apply these settings for all the users on your system, click Change settings for all users.

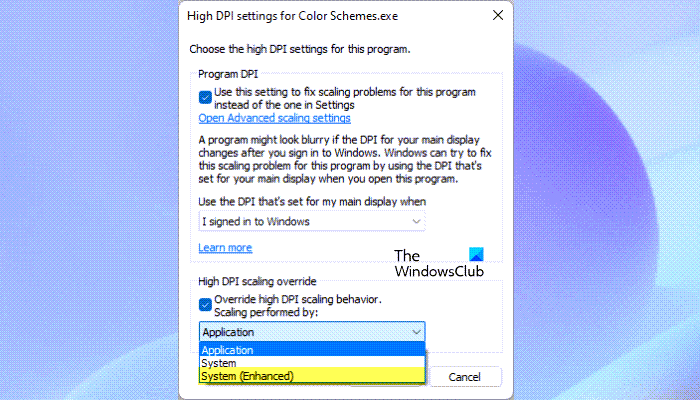
Now, under the Program DPI section, enable the checkbox that says Use this setting to fix scaling problems for this program instead of the one in Settings. Leave the drop-down to the default option “I signed in to Windows.” If you want to apply these DPI settings only when you open the program, select “I open this program” in the drop-down.
Under the High DPI scaling override section, enable the “Override high DPI scaling behavior” checkbox. In the drop-down, you will see these three options, Application, System, and System (Enhanced).
- Application: This setting was previously named “Disable display scaling on high-DPI settings.” It forces the app to run on a per-monitor DPI awareness mode. In other words, Windows will not stretch the user interface of the app when the DPI changes.
- System: This setting stretches the user interface of the app which makes the text in the application blurry.
- System (Enhanced): This setting resizes the user interface correctly and makes the interface looks crisper.
Let’s see when to select these options.
First, select the System (Enhanced) mode. If this does not work, switch to another mode and see if it works.
This is how you can scale specific apps on Windows 11. If this does not work, there is one more way to fix the app scaling issues on high DPI screens. We have described this below.
Apps appear small on high DPI Displays
On high DPI displays, the interface of some apps may appear small which makes the text unreadable. This issue mostly occurs with Photoshop and other similar applications. In this case, you can disable the Display Awareness for that particular app by modifying the Registry and creating an external manifest file for that program.
The following instructions require modification in Windows Registry. Therefore, before you proceed, we recommend you create a System Restore Point and backup your registry.
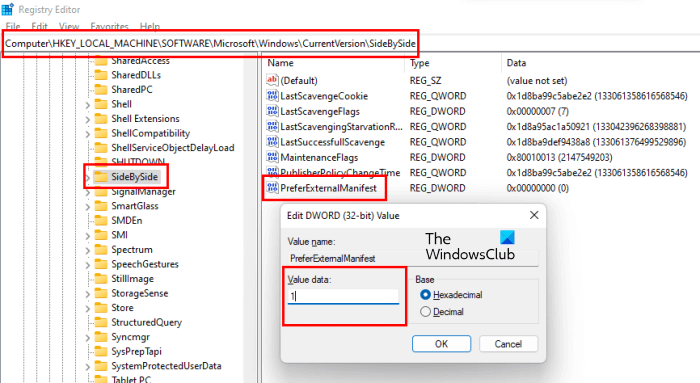
Press the Win + R keys to open the Run command box. Type regedit and click OK. Click Yes in the UAC prompt. When the Registry Editor opens up, copy the following path, paste it into the address bar of the Registry Editor, and hit Enter.
Computer\HKEY_LOCAL_MACHINE\SOFTWARE\Microsoft\Windows\CurrentVersion\SideBySide

Now, right-click on the SideBySide folder and select “New > DWORD (32-bit) Value.” This will create a new Value on the right side. Right-click on the newly created Value and select Rename. Type PreferExternalManifest and hit Enter.
Now, right-click on PreferExternalManifest and select Modify. Enter 1 in its Value Data and click OK.
Now, you have to create a manifest file for the application and place that manifest file in the root directory of the application (the directory in which the .exe file of the app is located). To open the installation directory of the app, right-click on its desktop shortcut and select Open file location.
Now, copy the following code and paste it into Notepad.
<?xml version="1.0" encoding="UTF-8" standalone="yes"?>

<assembly xmlns="urn:schemas-microsoft-com:asm.v1" manifestVersion="1.0" xmlns:asmv3="urn:schemas-microsoft-com:asm.v3">

<dependency>
<dependentAssembly>
<assemblyIdentity
type="win32"
name="Microsoft.Windows.Common-Controls"
version="6.0.0.0" processorArchitecture="*"
publicKeyToken="6595b64144ccf1df"
language="*">
</assemblyIdentity>
</dependentAssembly>
</dependency>

<dependency>
<dependentAssembly>
<assemblyIdentity
type="win32"
name="Microsoft.VC90.CRT"
version="9.0.21022.8"
processorArchitecture="amd64"
publicKeyToken="1fc8b3b9a1e18e3b">
</assemblyIdentity>
</dependentAssembly>
</dependency>

<trustInfo xmlns="urn:schemas-microsoft-com:asm.v3">
<security>
<requestedPrivileges>
<requestedExecutionLevel
level="asInvoker"
uiAccess="false"/>
</requestedPrivileges>
</security>
</trustInfo>

<asmv3:application>
<asmv3:windowsSettings xmlns="http://schemas.microsoft.com/SMI/2005/WindowsSettings">
<ms_windowsSettings:dpiAware xmlns:ms_windowsSettings="http://schemas.microsoft.com/SMI/2005/WindowsSettings">false</ms_windowsSettings:dpiAware>
</asmv3:windowsSettings>
</asmv3:application>

</assembly>
Save this text file with the name of the .exe file of the application. The following examples will help you understand this:
- photoshop.exe.manifest
- illustrator.exe.manifest
After saving this file, move it to the installation directory of the application. We have already talked about this above.
Read: Fix Resolution not supported Monitor error on Windows PC.
How do I scale apps in Windows 11?
You can scale all the apps in Windows 11 by using the Display scaling option in Windows 11 Settings. Open Windows 11 Settings and go to “System > Display.” Now, click on the Display drop-down and select the desired percentage value. Windows 11 also offers a custom scaling option. For this, click on the Scale tab and enter a value in the range of 100 – 500.
If you want to scale specific apps in Windows 11, you have to change the properties of that app. We have already talked about this in detail in this article.
Does Windows 11 fix scaling?
In Windows 11, you can change the Display Scaling and Text size in Windows 11 Settings. Windows 11 also has an option to set a custom Display Scaling. Display scaling issues for high DPI devices are among the complex issues and there is no single fix for that. Microsoft continuously improves Windows operating system in order to fix the scaling issues on high DPI displays. However, you can try the registry fix explained in this article to resolve the scaling issues on some apps on high DPI displays.
I hope this helps.
Read next: Fix High DPI issues with Remote Desktop.
Leave a Reply