If you want to change the Scratch Disk location in Photoshop, here is how you can do that. It is not possible to change the scratch disk location without opening Photoshop on Windows 11/10 PC. That is why you need to open the Photoshop Settings panel to get the job done. It is handy when you get the Scratch Disk Full error while using this photo editing application on your computer.
What is Scratch Disk in Photoshop?
Scratch Disk is a predefined disk that stores all the temporary files of Photoshop when it is running. If Photoshop is not running on your computer, this pre-selected disk is not being used at all. This disk could be a hard disk drive or solid-state drive. Photoshop uses this particular storage facility to keep its temporarily required files so that RAM doesn’t get full. As a high amount of RAM or Memory is required to run Photoshop smoothly even when multiple tabs are opened, Photoshop uses another drive to store temporary files in order to make the RAM run fluently.
By default, Photoshop uses the same drive as your system drives as the scratch disk. For example, if you have installed your operating system on the C drive, it will use the C drive as the scratch disk. No matter whether you use an older version of Photoshop or the latest one, this setting remains the same.
There is no specific amount of storage mandated earlier to be qualified as the scratch disk for Photoshop. However, as per the official statement, Photoshop calculates the free space this way:
Let’s say you have 20 GB of free space on your system drive. If so, Photoshop considers 20 – 6 = 4 GB as the free space on the scratch disk.
This calculation remains the same for the system drive as well as any other drive you choose. At times, you might get Scratch Disk Full error while using Photoshop on your computer. In such situations, you need to change the scratch disk location as the current drive is full, and there is no space to store any files. That is why you can follow this guide to change the scratch disk location in Photoshop on Windows 11/10.
How to change Scratch Disk location in Photoshop
To change the Scratch Disk location in Photoshop, follow these steps:
- Open the Photoshop app.
- Click on the Edit menu.
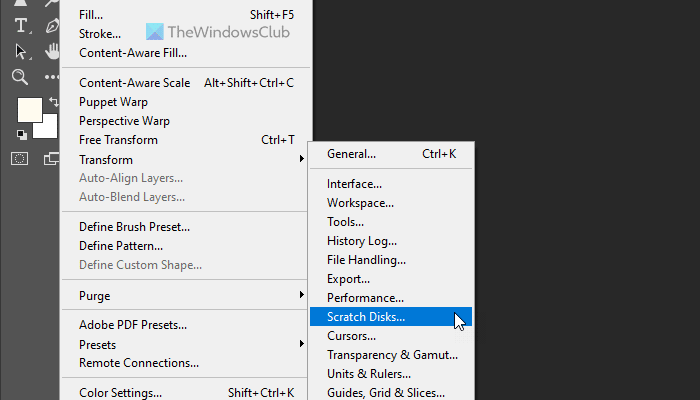
- Select Preferences > Scratch Disks.
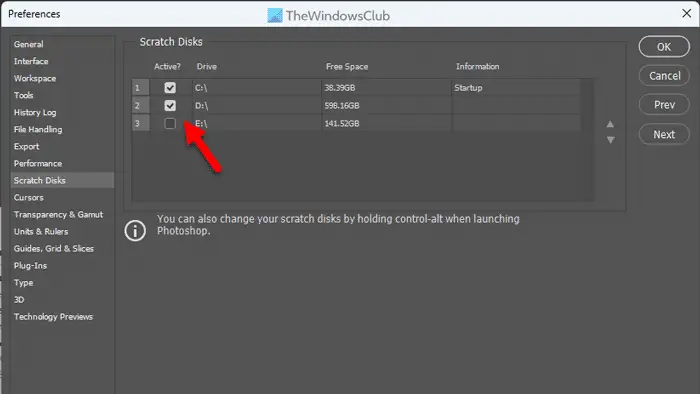
- Tick the drive you want to use as the scratch disk.
- Click the OK button.
- Restart Photoshop.
To learn more about these steps, continue reading.
To get started, open Photoshop on your computer and click on the Edit option in the top menu bar. Then, select Preferences and choose the Scratch Disks option.

Here you can find all the active drives installed on your computer. Whether it is an HDD or SSD, you can find it here. By default, the C drive or system drive is set to be the scratch disk. As you want to change, you need to tick on the corresponding checkbox of the desired drive and click the OK button.

Note: Don’t remove the tick-mark from the existing scratch disk drive checkbox.
Finally, close the Preferences windows and restart Photoshop.
Read: Photoshop crashes or freezes when Printing on Windows
I hope this guide helped you.
Leave a Reply