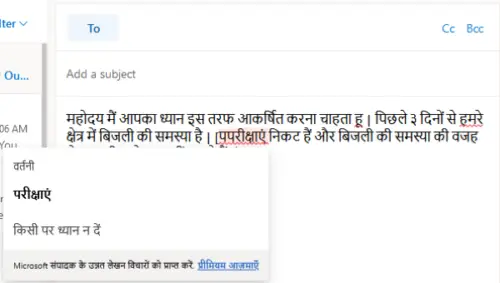
Auto spell check is a very useful feature as it highlights all the spelling mistakes so that you can correct them. In this post, we will see how to change spellchecking language in Outlook on the Web. By default, the spellchecking language is set to English. If you write emails in your native language (other than English), you can enable the spellcheck feature in the Outlook settings and save your time in proofreading.
How to change Spell Check language in Outlook
Follow the below-listed steps to change spellchecking in Outlook on the web.
1] Log into your Microsoft Outlook account on your web browser and click on Settings.
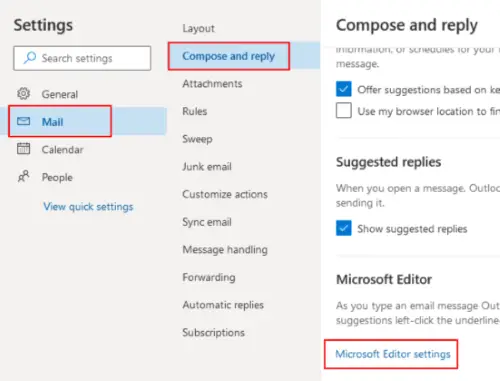
2] Now, scroll down and click the “View all Outlook settings” option. After that, go to “Mail > Compose and reply” and scroll down the right-hand side of the interface to view the “Microsoft Editor settings” option.

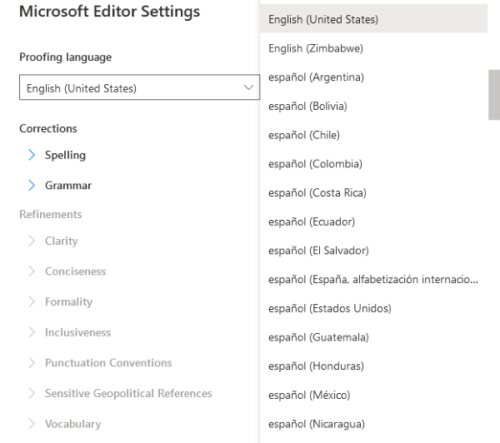
3] In the Microsoft Editor Settings, click on the Proofing language drop-down menu and select your preferred language. Click OK to save the settings.

Read: Configure Microsoft Outlook for Gmail – Manual Settings.
You can also make custom changes to the spellchecking language feature in Outlook. After selecting a language, expand the “Spelling” section. There you will find custom settings for spelling checks, like ignore words in uppercase, flag repeated words, etc. In some languages, the Grammar check feature is also available. But if you do not want it, you can disable it for a specific language.

If the spellchecking feature does not work in your web browser after selecting a specific language, restart your browser. In my case, it started working after I restarted my web browser.
Following the above steps, you can activate Outlook’s spellchecking feature for different languages. But you must restart your browser whenever you change the language for spell checking in Outlook online.
We hope you liked the article. You can share your views in the comments section.
Related post: How to customize the Spelling and Grammar Checking Settings in Outlook app.
How do I change my spell check language in Word?
To change the spell check language, go to Review > Language > Set Proofing Language in Word. Select your preferred language from the list. Languages in use appear at the top, and those with proofing tools downloaded have a checkmark. To exclude text from spell check, select “Do not check spelling or grammar.”
Leave a Reply