If you want to change the default character encoding in Notepad in Windows 11/10, this tutorial will guide you through the process. It is possible to change the default encoding from UTF-8 to ANSI or other using the Registry Editor. Notepad started using UTF-8 as the default character encoding – it used ANSI as the default encoding.
Let’s assume that you have a text file showing some unusual characters such as “ð???”. If you want to extract the original human-readable text out of these strange characters, you may need to switch between character encodings.
We have already shown the process to change the character encoding in the Outlook app, now let us see how to do it for Notepad. While Notepad allows you to change the encoding while saving the file, it is better to change it while creating or editing a file. The following character encodings are available:
- ANSI
- UTF-16 LE
- UTF-16 BE
- UTF-8
- UTF-8 with BOM
Precaution: As you will use Registry Editor, it is recommended to backup all Registry files and create a System Restore point.
How to change default encoding in Notepad
To change default encoding in Notepad, follow these steps-
- Press Win+R to open the Run prompt.
- Type regedit and hit the Enter button.
- Click on the Yes button.
- Navigate to Notepad in HKCU.
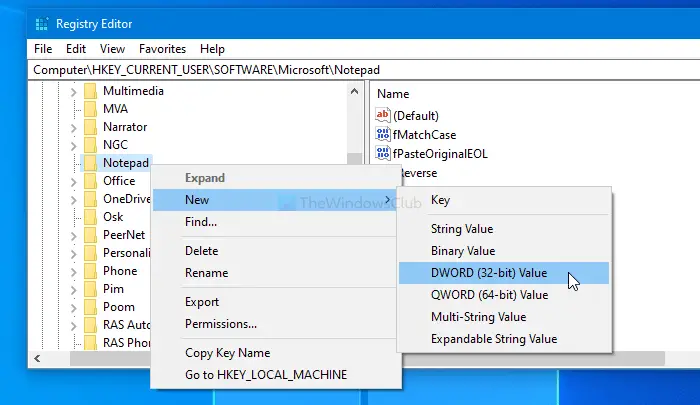
- Right-click on Notepad > New > DWORD (32-bit) Value.
- Name it as iDefaultEncoding.
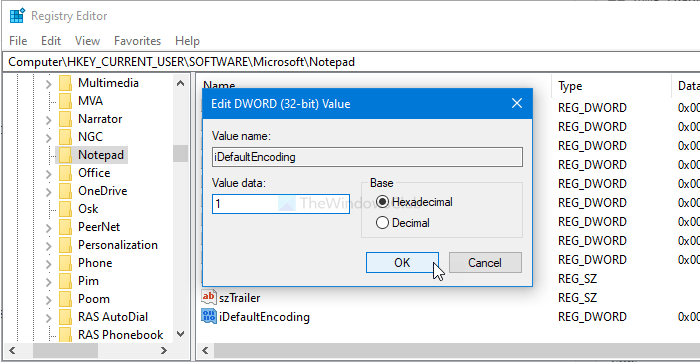
- Double-click on it to set the Value data.
- Click the OK button.
You will have to open the Registry Editor on your computer. For that, press Win+R, type regedit, and hit the Enter button. If the UAC prompt appears, click on the Yes button. After opening the Registry Editor, navigate to the following path-
HKEY_CURRENT_USER\SOFTWARE\Microsoft\Notepad
Right-click on Notepad and select New > DWORD (32-bit) Value.

Once it is created, name it as iDefaultEncoding. Now, double-click on iDefaultEncoding and set the Value data as following-
- ANSI: 1
- UTF-16 LE: 2
- UTF-16 BE: 3
- UTF-8 BOM: 4
- UTF-8: 5
After setting the Value data, click on the OK button to save the change.

Once done, restart the Notepad app to find the difference. You can see the selected character encoding in the Status Bar.
In case you want to get back to the original, navigate to the same path in the Registry Editor and right-click on iDefaultEncoding. Then, select the Delete button and confirm the removal.
I hope all goes well.
Read next: How to Find and Replace Text in Notepad on Windows 11.