If you want to change the Undo limit in Word, this guide will help you go through the process. Although Group Policy and Word Options panel do not have such an option, you can use the Windows Registry to modify the number of undo levels in Word. This article explains the exact method that you can follow.
Let’s assume that you have made a few unnecessary or incorrect changes in a Word document. There are two ways to rectify the mistake. First, you can change all the wrongdoings manually. Second, you can press Ctrl+Z to undo all the changes. However, if the number of mistakes is more than 20, you won’t be able to get things done.
In such situations, you need to increase the number of Undo limits in Word. The problem is that Word doesn’t come with any in-built option for modifying the undo limit. That is why you need to use the Windows Registry to make the change. Although the default number is 20, you can set almost 100 in some cases. However, the higher the number, the more RAM is required for storing the Undo histories.
It is highly recommended to backup Registry files and create a System Restore point before heading to the steps.
How to change Undo limit in Word
To change Undo limit in Microsoft Word document, follow these steps:
- Press Win+R to display the Run prompt.
- Type regedit > hit the Enter button.
- Click the Yes button.
- Go to Microsoft\office\16.0in HKCU.
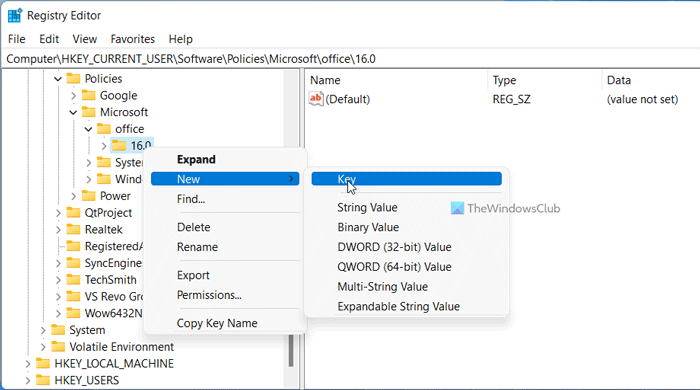
- Right-click on 0 > New > Key and name it as word.
- Right-click on word > New > Key and name it as options.
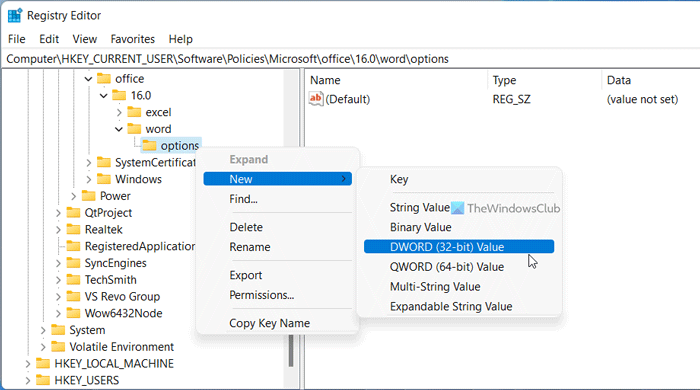
- Right-click on options > New > DWORD (32-bit) Value.
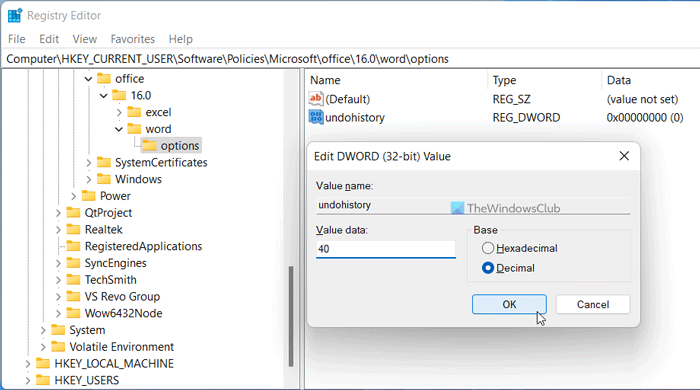
- Set the name as undohistory.
- Double-click on it and select the Decimal option.
- Set a Value data between 0 to 100.
- Click the OK button and restart your computer.
Let’s check out these steps in detail to learn more.
First, you need to open the Registry Editor on your PC. For that, press Win+R to display the Run prompt, type regedit, hit the Enter button, and click on the Yes option in the UAC prompt.
Then, navigate to the following path:
HKEY_CURRENT_USER\Software\Policies\Microsoft\office\16.0
Right-click on 16.0 > New > Key and set the name as word.

Then, right-click on word > New > Key and name it as options. Following that, you need to create a REG_DWORD value. To do that, right-click on options > New > DWORD (32-bit) Value and call it undohistory.

By default, it comes with a Value data of 0. However, you need to change it. For that, double-click on the REG_DWORD value and set a Value data anything between 0 to 100.

Finally, click the OK button and restart your PC to get the change.
Note: If you are unable to navigate to the aforementioned path, you need to create it manually. To do that, right-click on the Microsoft key > select New > Key and name it as office. Then, right-click on office > New > Key and set the name as 16.0. On the other hand, if you want to opt for the default setting, you need to delete this REG_DWORD value. To do that, right-click on the undohistory, select the Delete option and click the Yes button.
How do you undo further in Word?
To undo further in Word, you need to follow the aforementioned guide. In other words, you need to create a REG_DWORD value in the above-mentioned path called undohistory. Following that, set the Value data as anything between 0 to 100, as per your requirements.
How many times can you undo in Microsoft Word?
According to the official statement, Microsoft Word allows users to undo changes up to 20 times. However, it is possible to increase or decrease the number of undo limits with the help of the Windows Registry. A detailed guide is mentioned above, and it is recommended to follow the guide minutely.
Read: