This post will show you how to change your default Wi-Fi Router Name (SSID) as well as the Password.
Wi-Fi is undoubtedly a great way to keep connected to the internet wherever we go. Today, we can all interface multiple devices to the internet via the same network without any wires. All thanks to the Wi-Fi network that allows you to enjoy the internet at your fingertips from your Wi-Fi-enabled devices. However, allowing multiple devices to interface with the internet through poorly secured Wi-Fi can put you at risk from hackers and unauthorized neighbors trying to thieve your network bandwidth.

The Wi-Fi router comes with a default Wi-Fi name and password preconfigured when you purchase it. The first and foremost thing one has to do during the initial setup is to change the Wi-Fi name and password on your router to secure the network. The reason is quite simple. Hackers and other unauthorized users can easily look for your router’s name and admin password from the router’s manufacturer if you have never changed the default router password.
Moreover, it is imperative to change your password regularly to protect your Wi-Fi network as well as your data. Most of the time, users leak your password and misuse the network bandwidth. Regularly changing your password can secure your network data against thieving fingers. It also secures web surfing with good network bandwidth without any intrusion from unauthorized users.
You should know that your router username and password are different from your WiFi password. The router or admin password is utilized to access the router’s web interface for configuration purposes, while the WiFi password is used to connect WiFi devices to your network.
How to change WiFi Router Name and Password
That being said, it takes a few minutes to change the default Wi-Fi router password. To change the Wi-Fi router name and password, all one has to do is log in to your network router and configure the wireless network settings to a new Network Name and Wireless network password.
Login to Router Configuration page
The first and foremost thing you need to do is to log in to your router’s admin page through a web browser.
To log in to the router’s web interface, you need to know the router’s IP address. The router addresses mostly are 192.168.1.1, 192.168.0.1, or 192.168.2.1. If you are not sure of the IP address, you can find it in the Wireless IP configuration details using Command Prompt.
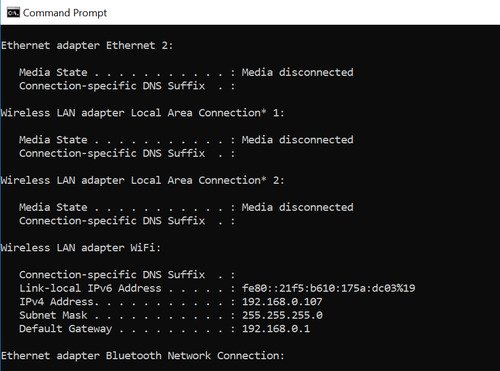
Open the Command Prompt and type the command ipconfig.
Click Enter. The command prompt will display the configuration details.
Under this, locate the option Default Gateway. The IP address of the default gateway is your router’s IP address. 
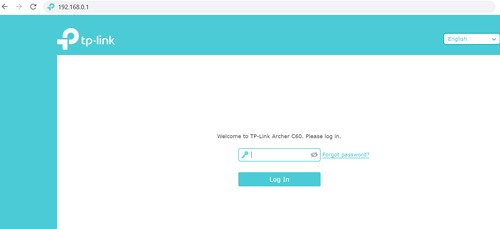
Now launch your web browser and enter the IP address in the address bar of the webpage. A Sign-in page opens up, asking you to enter the Username and Password.
In most cases, both the username and password will be set as admin. If this doesn’t work, you can look out for the password at the router manufacturer’s website else you can check out for the password at the back of your router. 
If you have forgotten your password, press and hold the Reset button for 5 seconds to restore the router to its factory defaults.
Configure the Wireless settings
Once you have successfully logged into the router configuration page, you can change the router settings by following the below steps.
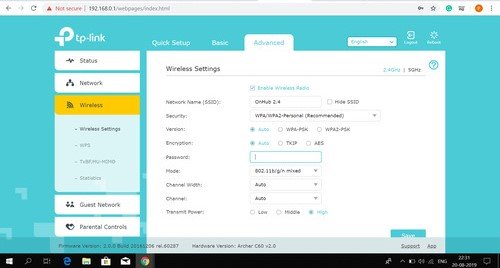
On the configuration page, navigate to the Wireless tab.
Under Wireless, select the option Wireless Settings from the drop-down menu.
To change the Network Name, look out for the option SSID. Type the name that you want to keep in the text box next to SSID. 
To change the Wireless network password, look out for the option Password, Shared Key or Passphrase. Type your new password in the text box next to Password. Make sure that you set a strong password to ensure a completely secure network.
Click Save to apply changes.
Once you change the router configuration, all the devices that are connected to the Wi-Fi network will be automatically disconnected. To access the internet again, all the Wi-Fi-enabled devices must provide a newly set password.
I hope you find the instructions easy to follow.
Leave a Reply