In this guide, we are going to discuss how to check and change image DPI in Windows 11/10. DPI that stands for Dots per Inch is basically a measurement for printing resolution of an image. In other words, it is the measure of the number of dots put together in a line within a span of an inch. It is an important factor in the graphics designing and printing industries as it affects the print size and quality of the output image. The higher the image DPI, the better the quality of the image.
How do I find the DPI of an Image in Windows 10?
You can use the Paint app of Windows 10 to find the DPU of an image. We have shared the steps to check image DPI in Paint earlier in this guide. You can check the properties of an image including DPI in the Paint app. Furthermore, software like GIMP and IrfanView can also be used to find the DPI of an image in Windows 10.
How do I change the DPI of an Image in Windows 10?
There are multiple ways and tools to change the DPI of an image in Windows 10. As discussed in this article, you can use GIMP, XnConvert, or IrfanView to do so. We have mentioned the exact steps to change the DPI of an image that you can check out above. Additionally, you can also use a free online service called Convert Town’s DPI Converter to change image DPI.
How to check Image DPI in Windows 11/10
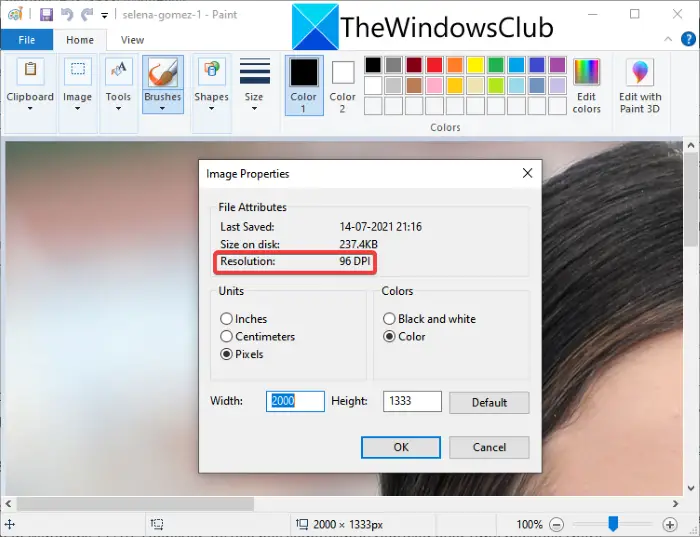
You can check image DPI in Windows 11/10 using Microsoft Paint. Microsoft Paint is a native image editing app in Windows 11/10 and older Windows versions. However, its use has significantly reduced over time because there are other alternatives to Paint with more powerful editing features. But, you can still use it for a lot of purposes including checking images’ DPI. Let us check out how!
Here are the steps to check image DPI in MS Paint:
- Firstly, launch the MS Paint application.
- Now, open the image whose DPI value you want to check.
- Next, go to the File menu.
- Then, click on the Properties option.
- Locate the Resolution field and check the current DPI of the imported image.
Now, if you want to modify the image DPI, check out the methods discussed below.
How to change Image DPI in Windows 11/10
Here are the methods that you can use to change Image DPI in Windows 11/10:
- Use an online service called DPI Converter to change Image DPI.
- Change Image DPI in GIMP.
- Use IrfanView to change image DPI.
- Change DPI of multiple images at once using XnConvert.
Let us discuss these methods in detail!
1] Use an online service called DPI Converter to change Image DPI

One of the easiest ways to change image DPI is using a free dedicated web service. Here, we will talk about this online website called Convert Town’s DPI Converter. This web service allows you to quickly change the DPI of an image in your web browser. Here are the main steps to change image DPI using DPI Converter:
- Launch your favorite web browser.
- Open the DPI Converter website.
- Click on the DPI value to which you want to change your image’s DPI.
- Select the source image from your PC.
- Wait for a few seconds and your output image with converted DPI will be downloaded to your PC.
Now, let’s talk about the above steps in detail!
Firstly, launch a web browser on your PC and then navigate to the DPI Converter website.
Now, you can view some standard DPI values to pick from, such as 72, 150, 200, 300, 400, etc. In case you want to change image DPI to a custom value, click on the other option and enter the required DPI value.
Next, click on the Choose Image button to browse and import the input image from your PC. As you select an input image, it will process it and change its DPI in a few seconds. The output image will be downloaded automatically in its native image format.
This handy online image DPI changer service supports a good number of image formats including jpg, .jpeg, .tif, .tiff, .bmp, .png, .bmp, .jpe, and .ico.
See: Remove.bg lets you remove background from Images & Photos online free.
2] Change Image DPI in GIMP
GIMP is a famous vector graphics and image editing software for Windows 11/10 and other platforms. It lets you crop, flip, rotate and change image size, remove image background, create new graphics, create animated GIFs, etc. If you didn’t already know, you can also use it to change image DPI. It provides a dedicated option that allows you to set a new DPI for your images. Let’s check out a step-by-step procedure to do so.
How to change image DPI in GIMP:
Here are the basic steps to modify the DPI of images in GIMP:
- Download and install and then launch GIMP on your PC.
- Import an image to it.
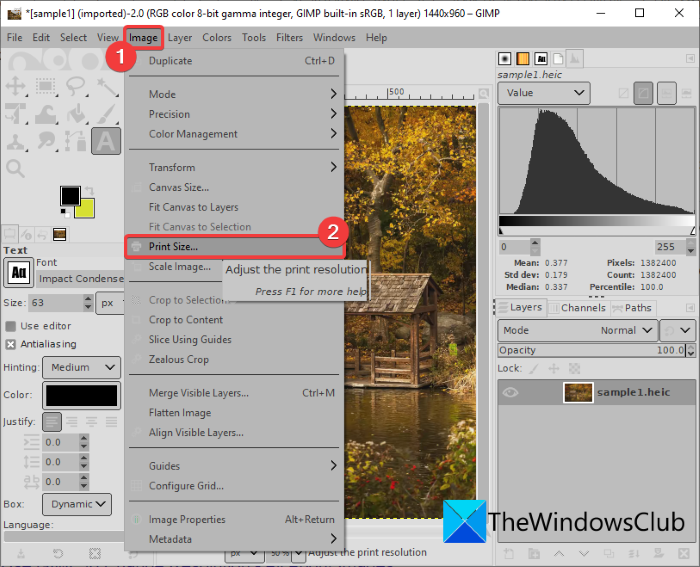
- Go to the Image and click on the Print Size option.
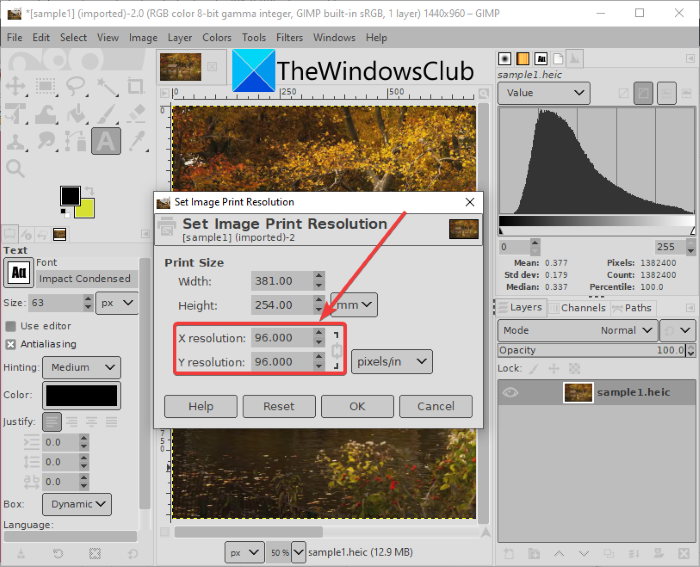
- Enter the new DPI of the image in the resolution fields.
- Press the OK button to apply the new DPI.
- Save the edited image with modified DPI.
Firstly, you need to download and install GIMP on your Windows 11/10 PC, if you don’t have it installed already. Then, launch the GIMP application and open the source image whose DPI you want to change. It supports a wide number of image formats, so you don’t have to worry about the input image format.
Now, go to the Image menu and click on the Print Size option.
It will open up the Set Image Print Resolution dialog window. Here, in the X resolution and Y resolution fields, you can view the current DPI value of the image. In these fields, enter the new DPI such as 96, 100, 300, etc. Enter a value in the X resolution field and the value will be automatically updated in the Y resolution field too. Also, make sure the unit is set to pixels/inch. And then, press the OK button to apply changes.
Finally, you can save the edited image in its original file using the File > Overwrite option. Or, you can create a new image with a changed DPI using the File > Export as option and select the output image format.
GIMP is a good option to change image DPI as per your requirement.
Read: How to edit Frames of an Animated GIF using GIMP.
3] Use IrfanView to change image DPI
You can also use IrfanView software to change image DPI on Windows 11/10 PC. It is a popular free image viewer and editor software that allows you to check as well as change the DPI of an image. Let us find out how!
How to change image DPI in IrfanView:
These are the basic steps to change image DPI in IrfanView:
- Download and install IrfanView.
- Open the main interface of IrfanView.
- Import the source image file.
- Go to the Image menu and click on the Information option.
- Enter new DPI in the Resolution field.
- Click on the Change and then the OK button.
- Save the modified image.
First of all, download and install IrfanView from its official website and then launch its main GUI.
Next, simply open an input image and then go to the Image > Information option. This will open up the Image Properties window where you can view information regarding the source image. Here, you can also view the resolution of the source image in DPI. Just enter the new DPI to which you want to change the image DPI.
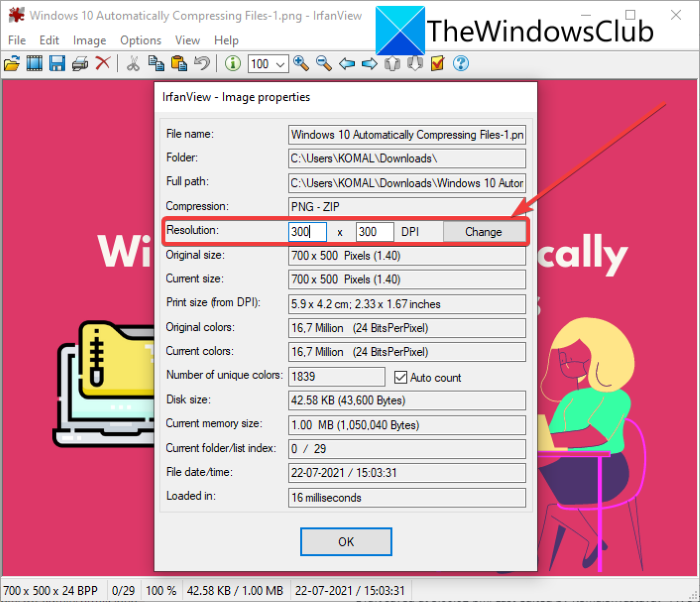
Now, click on the Change button present beside the Resolution field, and then press the OK button.
Lastly, save the edited image using one of its Save options.
Another method to change image DPI in IrfanView is to use its Resize option. Click on the Image > Resize/ Resample option to open the Resize/ Resample image dialog window. And then, in the DPI field, enter the new DPI of the image and then press the OK button. Finally, save the modified image.
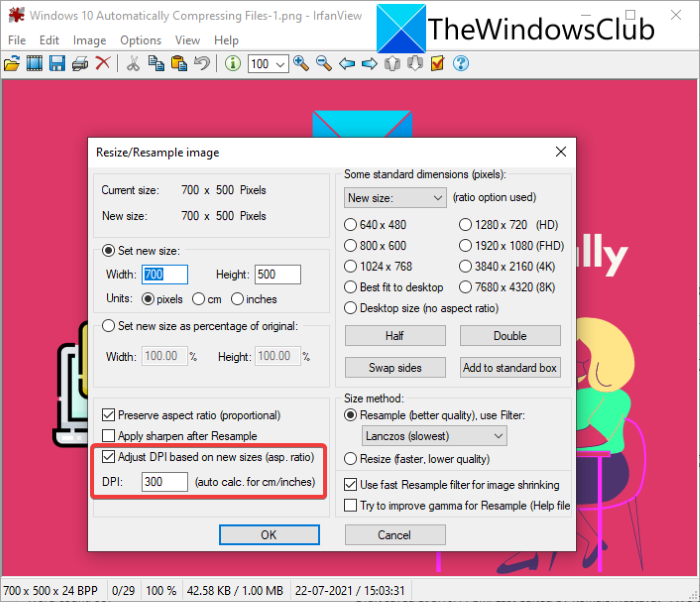
Irfanview lets you easily view and change image DPI on Windows 11/10 PC.
Read: How to open PSD files without using Adobe Photoshop.
4] Change DPI of multiple images at once using XnConvert
If you want to change the DPI of multiple images at once, you can use this software called XnConvert. It is basically a batch image resizer and converter using which you can change image DPI in a bulk. Let us see how you can do that.
How to batch change image DPI using XnConvert:
Follow the below steps to change the DPI in a batch of photos in XnConvert:
- Download XnConvert and install it on your PC.
- Launch XnConvert.
- Add multiple images to it.
- Go to the Actions tab.
- Add Image > Set DPI action.
- Enter the preferred DPI value.
- Set up output configurations.
- Press the Convert button.
Simply download and install XnConvert on Windows 11/10 from xnview.com. Then, open the GUI of XnConvert. Go to the Input tab and click on the Add Files button to import all your source images.
Now, navigate to the Actions tab and click on the Add action > Image > Set DPI option.
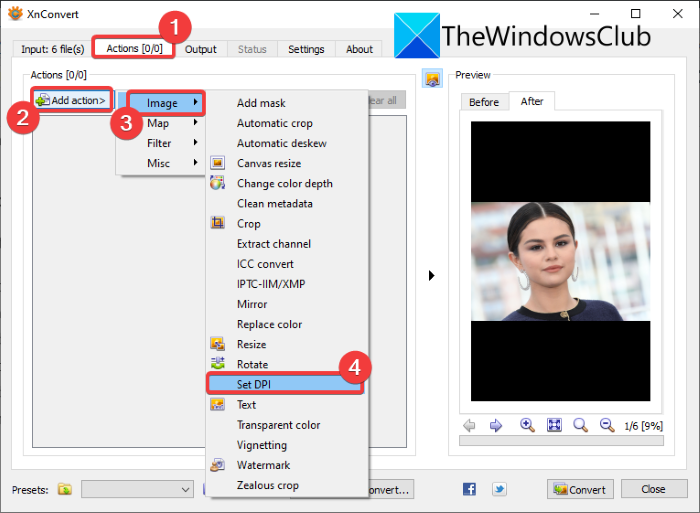
After that, enter a new DPI and enable the Keep Print Size option (as needed).

Next, go to the Output tab, select output image format, specify the output location, and press the Convert button to change the DPI of all images at once.

So, this is how you can change the DPI of multiple images at once using XnConvert software.
How do I make sure my pictures are 300 DPI?
You can use the methods discussed in this guide to change the DPI of an image to 300 DPI. Just enter 300 in the place of the DPI or resolution field to make sure your pictures are 300 DPI.
Now read: How to Change BPM or Tempo of a Song in Windows 11/10.
Leave a Reply