Do you want to know how to check the Intel processor generation on your Windows 11/1o PC? The CPU is one of the factors we take into account when purchasing a computer because it informs us about what the PC can and cannot do. Moreover, you might require such information if you need to fix an issue on your computer to check for its compatibility. The majority of computer CPUs come from Intel, but some PCs also use AMD and Qualcomm. You can look up the specifications of the Intel processor that your computer is using directly on your computer. This article will go through three ways to check the Intel processor generation in Windows.
How do you check the Intel processor generation your computer is using
Whatever the reason, if you want to check the Intel processor generation, you can find out the Intel processor generation on your Windows 11/10 computer using Command Prompt, Settings, Task Manager or freeware:
- Make use of Command Prompt to find Intel Processor Generation
- Check Intel Processor Generation via PC Properties
- Find Intel Processor Generation through Task Manager
- Using free software.
Now, how do you go through these methods? Here are the step-by-step details on how to do it.
1] Make use of Command Prompt to find Intel Processor Generation

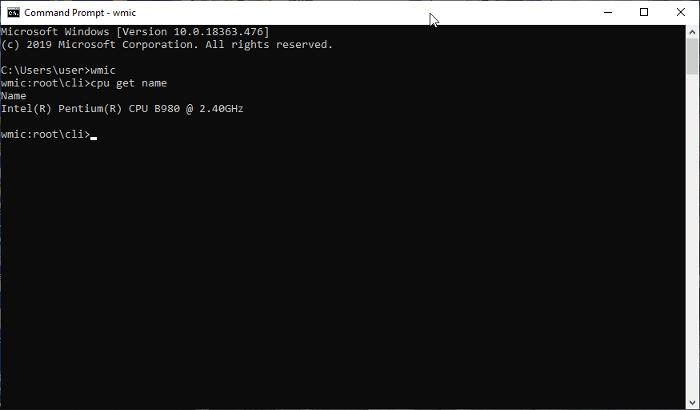
You can check Intel processor generation on Windows computers by running some commands in CMD. Here is how:
- Go to Command Prompt.
- Type wmic and press Enter on your keyboard.
- Then type cpu get name, and hit Enter again.
The commands will bring up your CPU details after a few moments.
Read: How to find out Processor Brand and Model on a Windows Laptop?
2] Check Intel Processor Generation via PC Properties
Windows 11

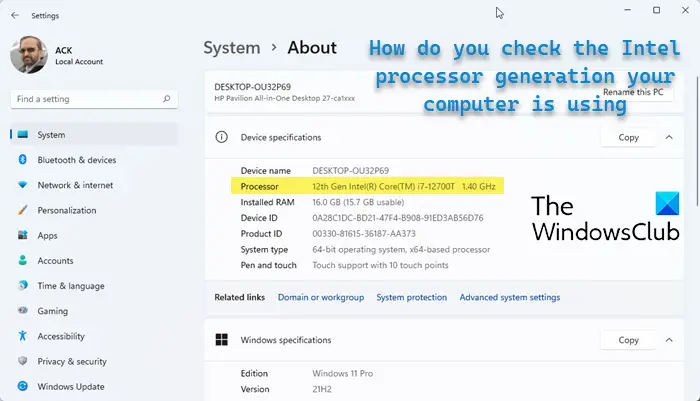
To Check Intel Processor Generation and other details in Windows 11:
- Open Settings > System
- Click on About
- You will see your Device specs there.
Windows 10

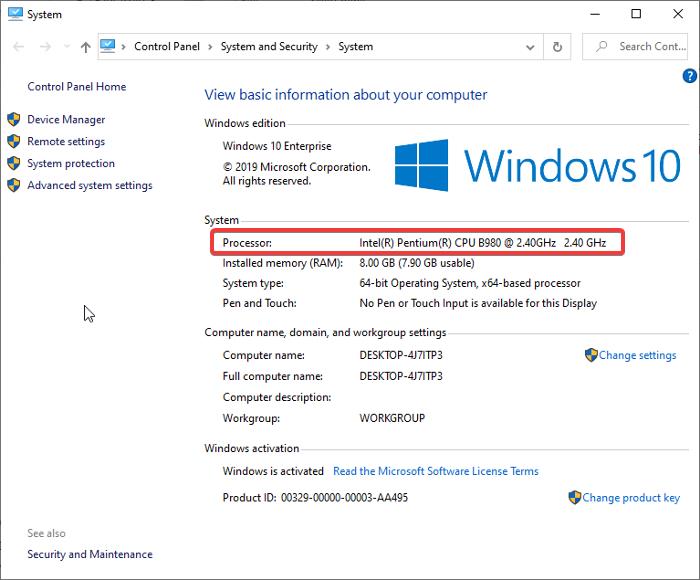
To check for Intel processor generation in Windows 10, go through the PC Properties:
- Simply go to File Explorer and right-click on This PC.
- On the resulting drop-down menu, hit Properties.
- Under System, the details in front of the Processor are your CPU details.
- From there, you can check your Intel processor generation.
Read: CPU is not running at full speed or capacity in Windows
3] Find Intel Processor Generation through Task Manager

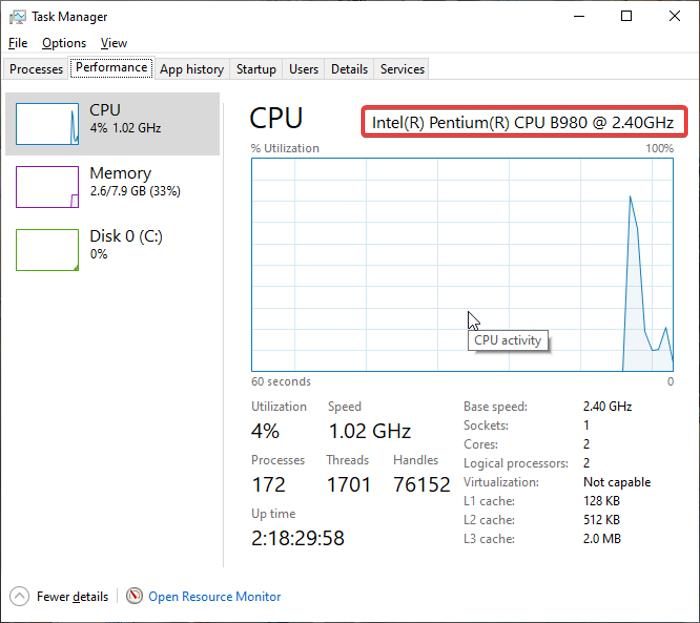
Another method you can use to see the Intel processor generation in Windows is through Task Manager:
- Right-click on the taskbar and select Task Manager.
- Switch to the Performance tab and hit the CPU option.
- The details in front of the CPU are your processor details.
Read: Find out Computer RAM, Graphics Card/Video memory
4] Using free software
You can also use any one of the following free software to find out all hardware details:
MiTeC System Information X | Sandra Lite | BGInfo | CPU-Z | HiBit System Information | Hardware Identify
Those are different methods you can use to check for Intel processor generation on Windows PC. You can also simply search processor on Windows Search Box and open the result to see your CPU generation. Make use of whichever one suits you.
Does Windows 11 support i5 7th gen?
No, Windows 11 doesn’t support the i5 7th generation processor as it’s not included in the list of compatible processors of Microsoft Windows 11. The minimum processor you can use with Windows 11 is the Intel 8th generation. So it’s best to consider other processors from the list of compatible ones and use it with your PC.
Why does Windows 11 require an 8th gen CPU?
As set by Microsoft, Windows 11 requires the bare minimum of 8th Gen CPU because it supports and makes it easy to enhance several security features of the Operating System. You can also use higher-generation processors, but Windows 11 works with lesser ones. Windows 11 supports the currently latest 12th Gen Intel i7 peocessor as can be seen in the image in this post.