If you want to find or check the RAM speed, type, etc., on Windows 11/10, here is how you can do that. There are several methods to check the RAM speed on your Windows 11 or 10 computer. It is possible to do it before and after installing RAM.

There are two most popular RAM speeds –
- 2400 MHz and
- 3200 MHz.
Let’s assume that you have 8GB 2400 MHz RAM installed in your computer, and you want to upgrade it to 16GB. If you purchase a 3200 MHz RAM and install it alongside the 2400 MHz RAM, you might get some errors while turning on and using the computer. That is why you should check the RAM speed before purchasing another RAM.
How to check RAM speed on Windows 11/10
You can find your RAM speed, type, or frequency using any one of the following methods:
- Check the sticker on your RAM
- Use Task Manager
- Use Command Prompt
To learn more about these steps, continue reading.
1] Check the sticker on your RAM

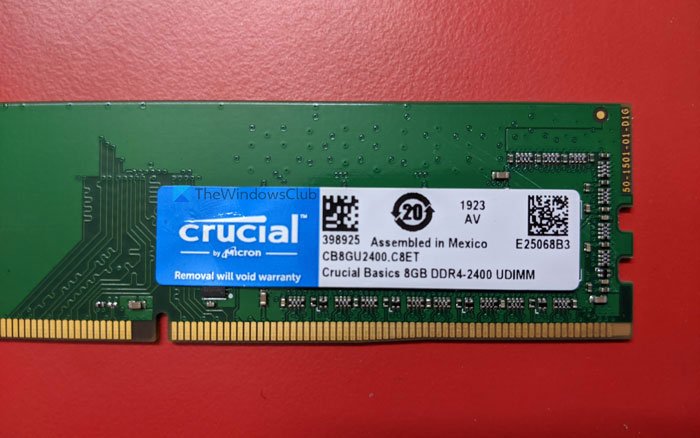
If you haven’t installed the RAM yet, and you want to check the speed, the applied sticker is the best place to find it out. Every manufacturer puts a sticker on the RAM so that buyers can purchase the correct RAM. Although it is not applicable for all the available RAMs in the market, the sticker says something like this:
8GB DDR4-2400
8GB denotes that it is an 8GB Memory. DDR4 means Double Data Rate, or it is a type or version of RAM. Finally, you can find 2400 or 3200. It is the speed of your RAM.
2] Use Task Manager

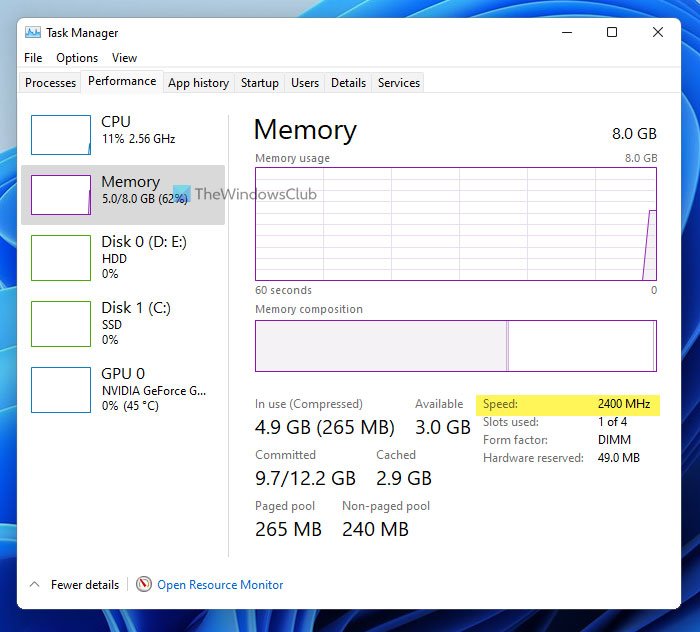
Task Manager is the best place to find out how much RAM you have, the RAM type (DDR2, DDR3, DDR4, etc.), and the frequency or speed of RAM. Whether you are using Windows 10 or Windows 11, you can use the Task Manager to get the information. To get started, do the following:
- Right-click on your Taskbar and select Task Manager – if you are using Windows 10.
- Press Win+X and select Task Manager – if you are using Windows 11.
- Switch to the Performance tab.
- Find out the Speed label.
Here you can find 2400 MHz, 3200 MHz, etc. It is the speed of your currently installed RAM.
3] Use Command Prompt

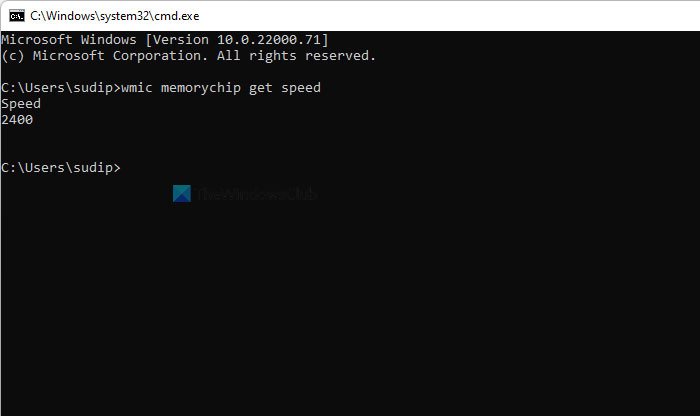
There is a simple command that you can use to extract the same information in Windows 11/10. However, it displays only RAM speed and nothing else. To find it out, do the following:
Press Win+R to open the Run prompt.
Type the following command:
wmic memorychip get speed
Press the Enter button.
Find out the information under Speed.
It is the speed of your RAM.
How do I check my RAM speed Windows?
You can use the Task Manager or Command Prompt to check your RAM speed on Windows. In Task Manager, switch to the Performance tab, or in Command Prompt, use the wmic memorychip command. Checking the RAM speed on Windows 11 and Windows 10 are not that different.
Fix: Wrong RAM Speed on Windows 11
How do I check my RAM MHz?
The frequency of your RAM and the RAM MHz is the same. In other words, manufacturers denote the speed in MHz units. Therefore, you can either check the sticker on your RAM or use Task Manager to find the RAM MHz.
How can I check my RAM speed in CMD?
To check your RAM speed in CMD, you have to use the wmic memorychip get speed command. Following that, it displays the speed under the Speed heading in Command Prompt window.
How do I find out my RAM size?
You can find your RAM size using the sticker put on your RAM, Task Manager, and a third-party tool called CPU-Z. In Task Manager, go to the Performance tab to find out the total size of your RAM. In CPU-Z, switch to the Memory tab.
That’s all! Hope this guide helps.
Related read: Find out Computer RAM, Graphics Card/Video memory of your PC.
Leave a Reply